
Talea user guide
1.How does Talea work
Talea is comprised of two components:
- Talea web: The web-based Project where the survey is created and surveyors are managed
- Talea app: The mobile phone app where data is collected and submitted to the Project
The project manager is responsible for setting up and managing the Project. The web-based Talea Project must be set-up before observers are invited by the project manager to download the Talea app and collect data. The observers use the app to collect data using the Packages sent by the project manager to the app on their Device. Observers then submit completed surveys to the Project where the project manager can view, analyse and download the data.
Click the quick start guide below to download the pdf version:
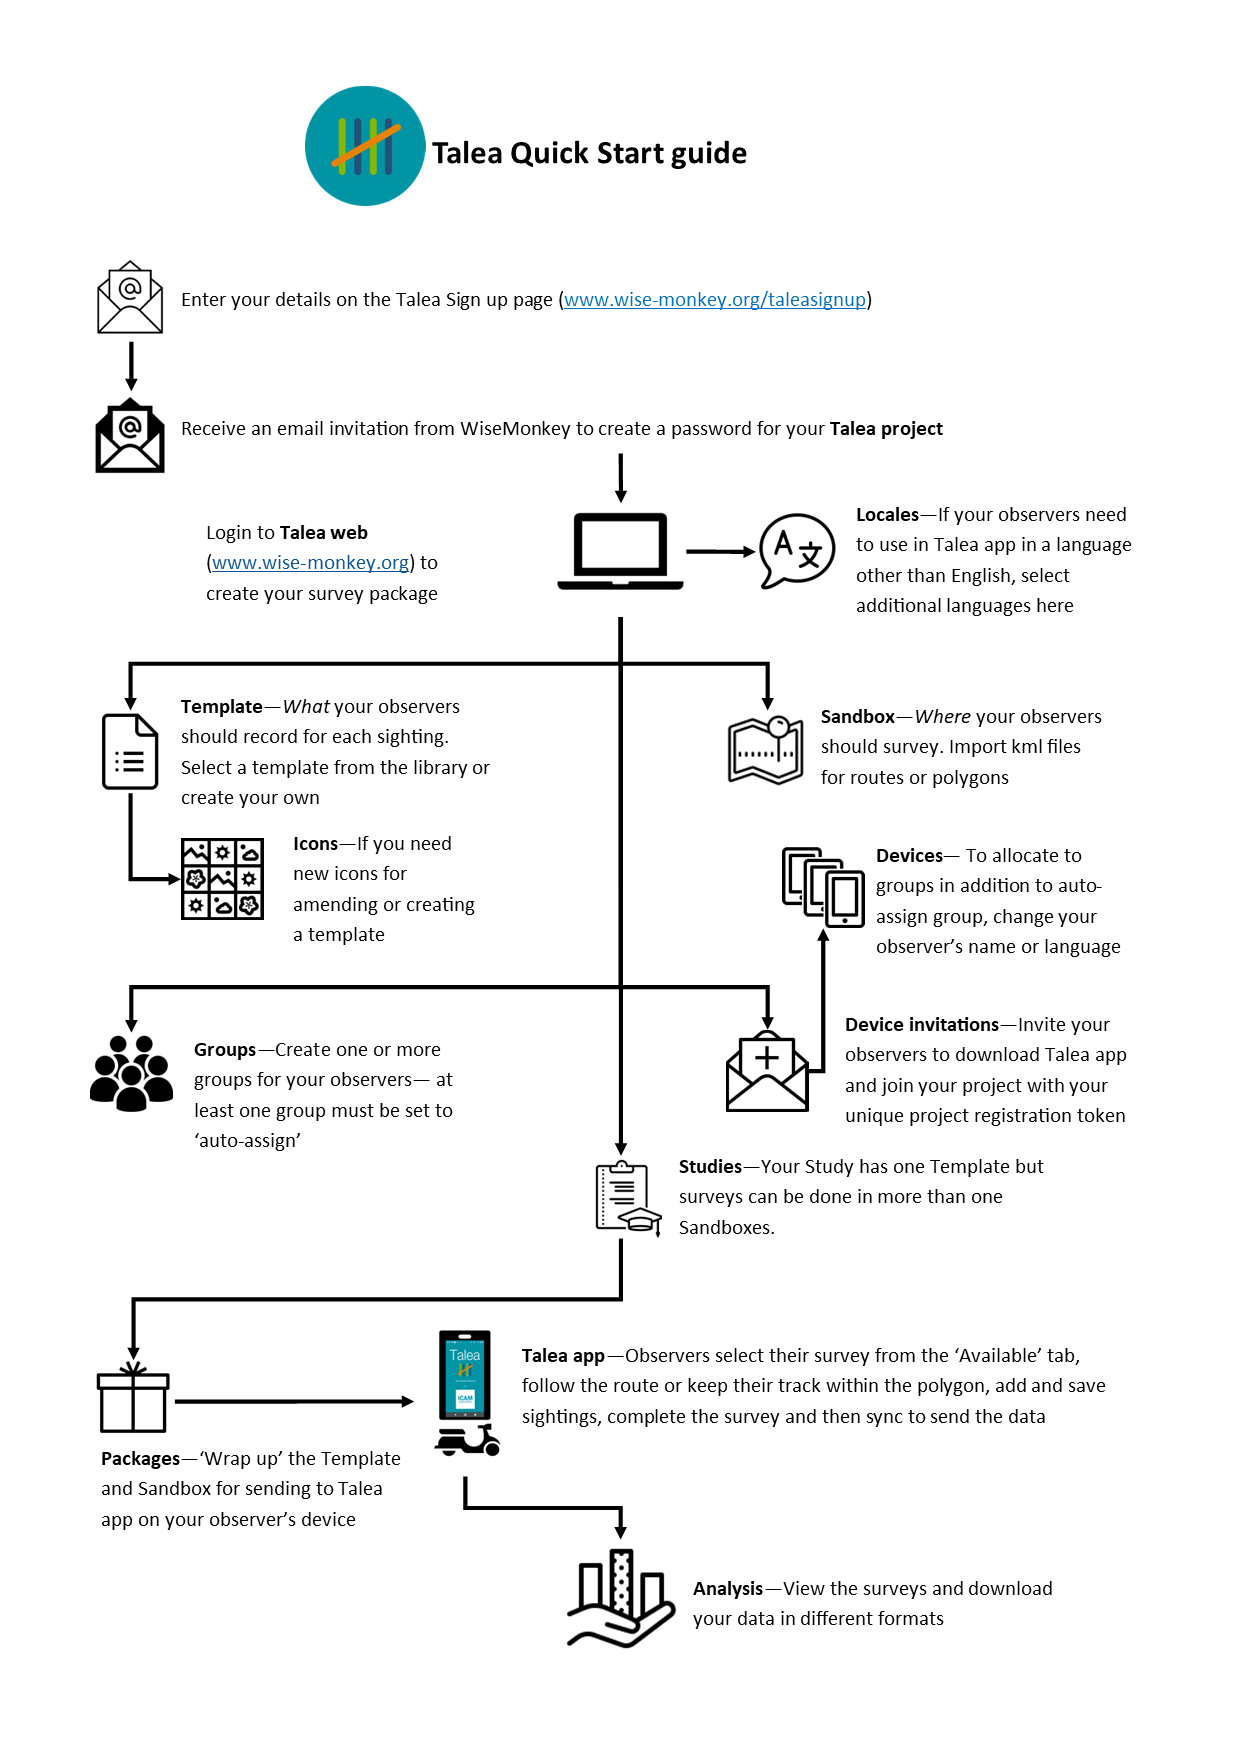
2.How to set up your Talea project
2.1.How to create a Talea project
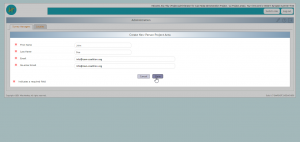
- Enter your details in this sign up form.
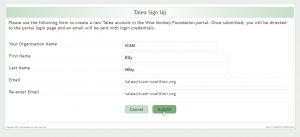
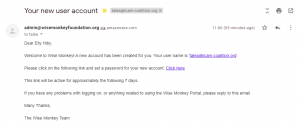
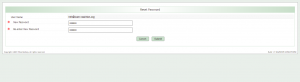
- Once you click submit, your Talea Project will be automatically created and you will be sent the following email from admin@wisemonkeyfoundation.org, showing your username and also a link to another webpage where you will create your own password.
- Enter your password twice and click submit.
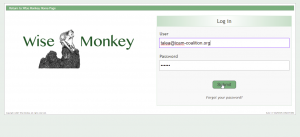
- Now the Wise Monkey login page opens, here you enter your username and password to enter the site.
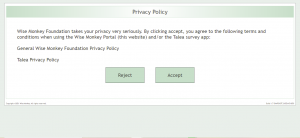
- The first time you login, you will be asked to view the Wise Monkey privacy policy and the Talea privacy policy, and confirm your acceptance of these terms by clicking ‘Accept’.
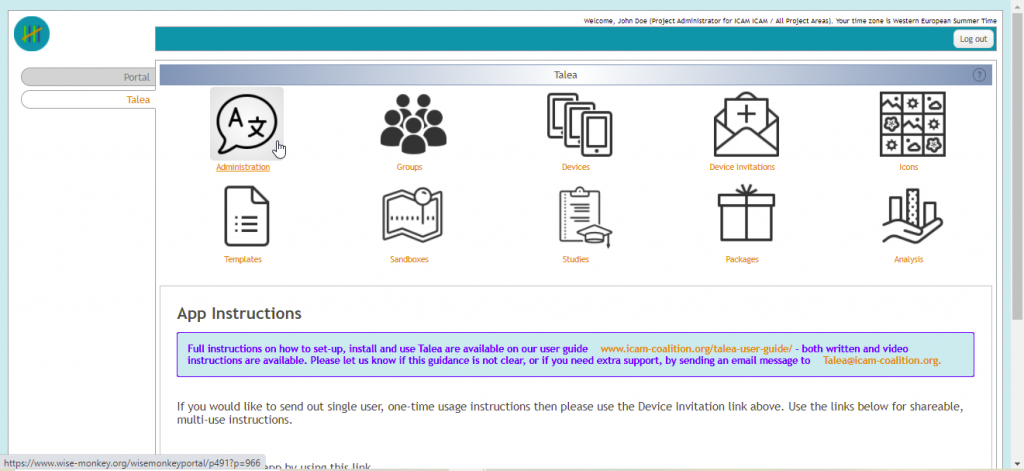
- Now you will enter the Talea web. It will open on the portal tab.
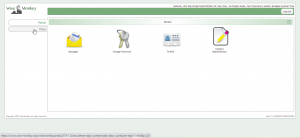
- Click the Talea tab and this will open the Talea web dashboard where you will find all the functions for setting up your survey.
2.2.How to add survey managers. Administration.
Once your Talea project has been created, you can add new survey managers. Survey managers have access to Talea web and can set-up and send out surveys to observers. The observer role is someone that only uses Talea app when conducting a survey and does not have access to Talea web – adding observers is done using Device Invitations from the dashboard (see section 2.5).
- Open Administration from the dashboard.

- You will see yourself listed as one of the survey managers. To add a new survey manager click ‘Create new survey manager’.

- Fill in the details of your new survey manager, then click ‘Save’.
 An email will be sent to your new survey manager showing them their username and also asking them to click a link to a new webpage where they will create their own password for accessing the same Talea project on Talea web.
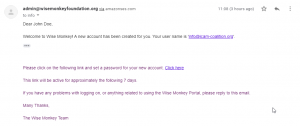
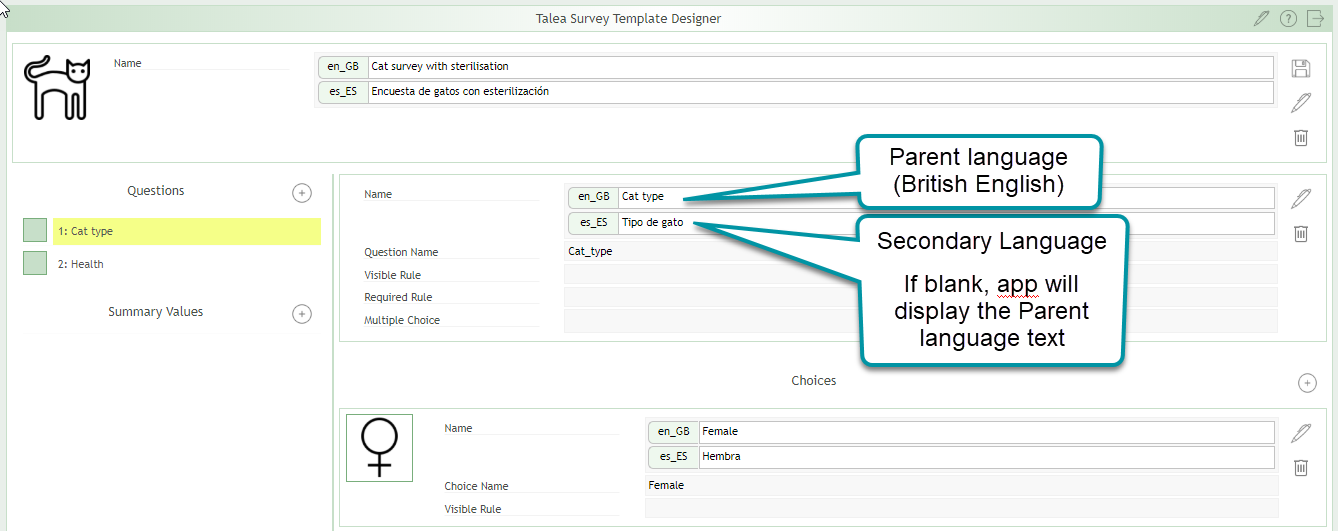
2.3.How to select what language your Talea app will use. Locales
Your project will be set-up with a parent language, this will be British English by default. Whenever you enter text, for example when naming a Sandbox or when adding questions and options in Templates, you will need to enter the text for the parent language. You have the option to add as many secondary languages as you like. For each language added, an extra space will be provided under the English text box so you may enter the translation in your chosen secondary language. If you do not enter a translation for your secondary language, the app will instead use whatever is entered for as the English text.
- Select the Administration from the Dashboard.
2. Then open the Locales tab at the top. You’ll see the parent language (British English) at the top. Tick whichever secondary language you also want to include.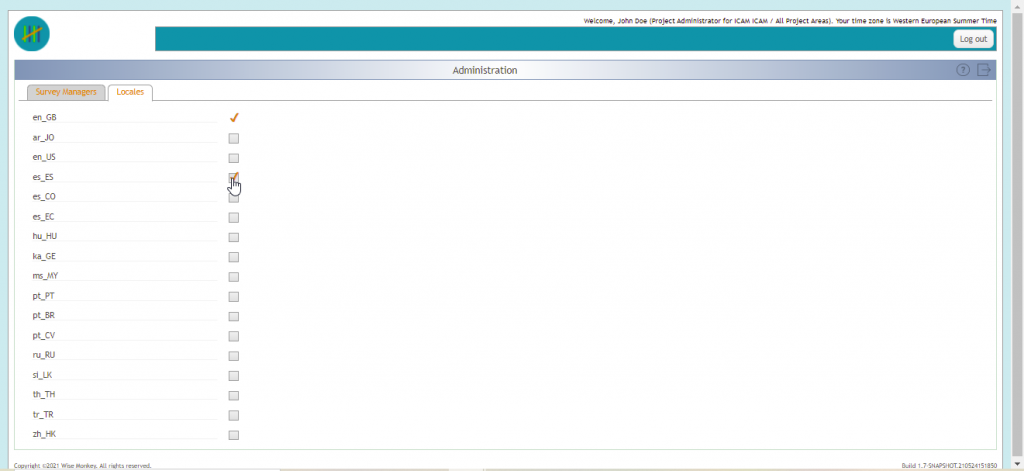
3. How Parent and Secondary language options will appear in the Template Designer
4. If you want to use a language that is not listed here, let us know by emailing talea@icam-coalition.org and we can arrange to add this language to the list.
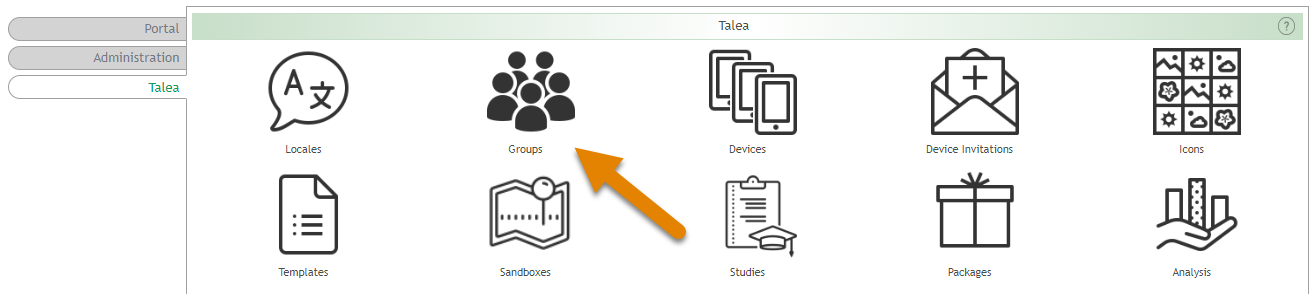
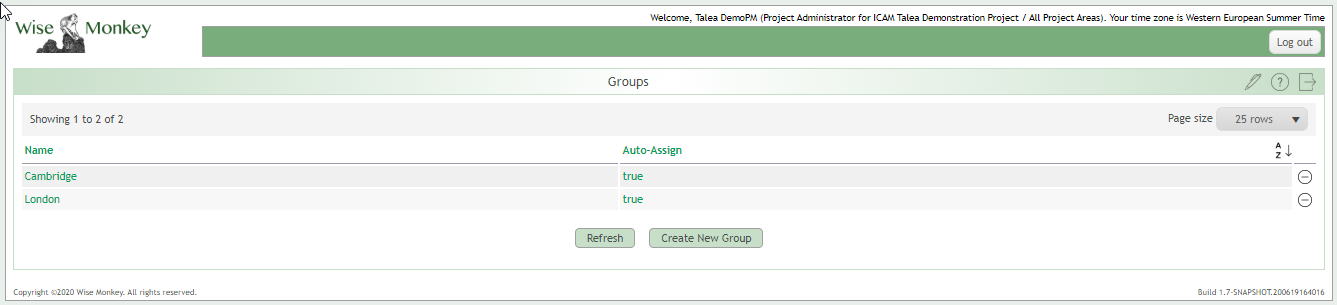
2.4.How to group your observers. Group
You must enter at least one Group for your observers. However, if you have several observers, you may want to split them into several Groups – this is not essential but may keep things simpler for your observers. For example, some observers may be assigned to surveying in London and other observers are only surveying in Cambridge. You don’t want to confuse observers by presenting them with Packages that are outside their assigned area, so you assign your observers to Groups. When you create Packages, these are assigned to Groups of observers. If you want all your observers to see the same list of available Packages in the app, assign them all to one group. One observer can be a member of more than one Group.
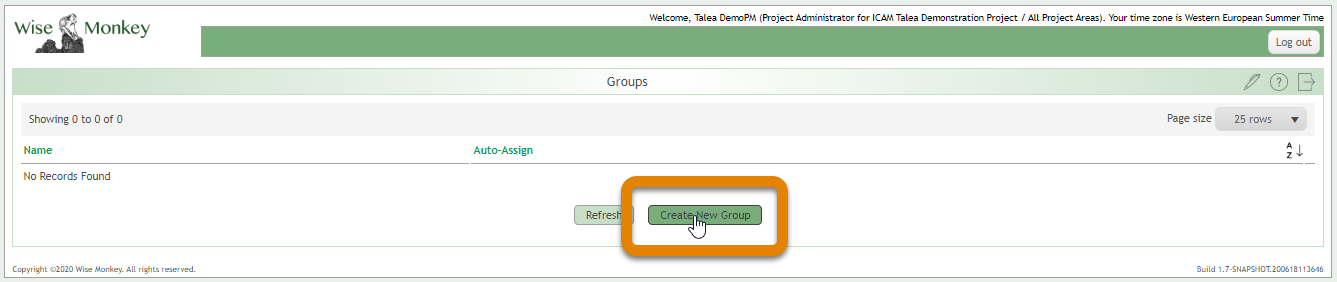
- Select Groups from the Dashboard
2. Select ‘Create new group’
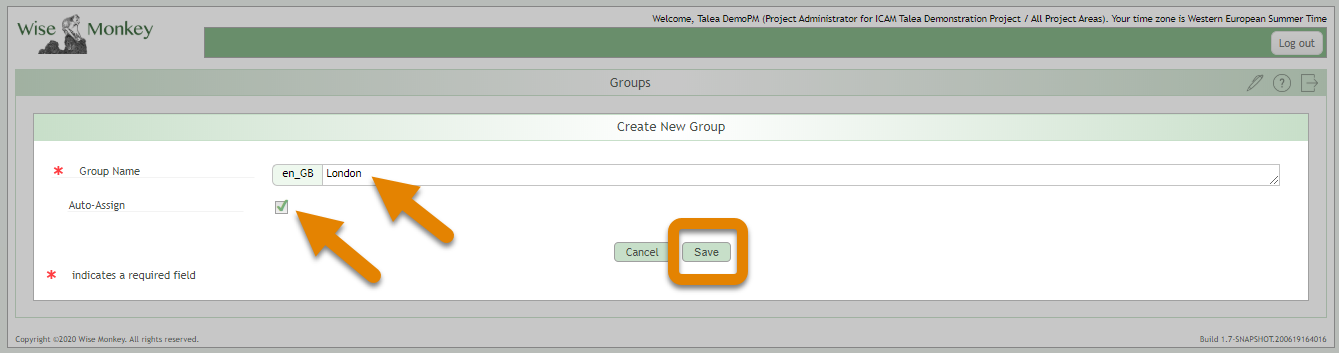
3. Enter Group Name
4. Tick ‘Auto-Assign’ if you want your observers to be automatically assigned to this Group when they install the app. Observers can be members of more than one Group. You can also assign/reassign Observers to Groups later using Devices on the Dashboard.
5. Click Save
6. List of created Groups
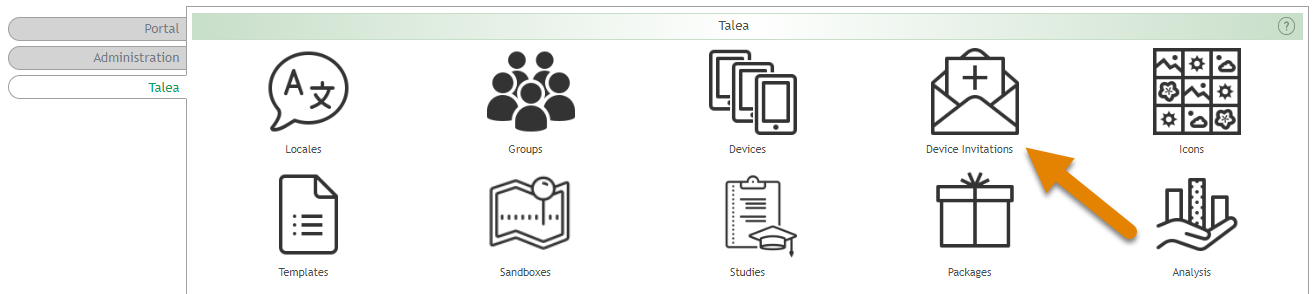
2.5.How to invite new observers to your project. Device Invitations
For your observers to collect data and submit it to your project, you must invite them via the device that they will use for surveying – this must be an Android phone or tablet, running Android version 6 (Marshmallow) or higher. If your observer wants to change the device they use for surveying, you will need to invite them again via this new device. Ensure you have completed step 2.4 and that at least 1 of your groups is set to ‘auto-assign’ before sending your observers your Registration token – when a new observer uses your token they will automatically be added to any, or all, ‘auto-assign’ groups in your project – you can then change which group they are in using by opening ‘Devices’ from the dashboard (step 2.6).
- Select ‘Device Invitations’ from the Dashboard
- Under these App Instructions you will find a link to Talea on PlayStore and also a Talea App Registration token that is unique to your project. Next to each of these you will see a copy icon which you can use to copy to your clipboard. Copy and paste the link and the token into your messaging service of choice (e.g. email, WhatsApp, Line, Facebook messenger, etc) and send these to your observer.
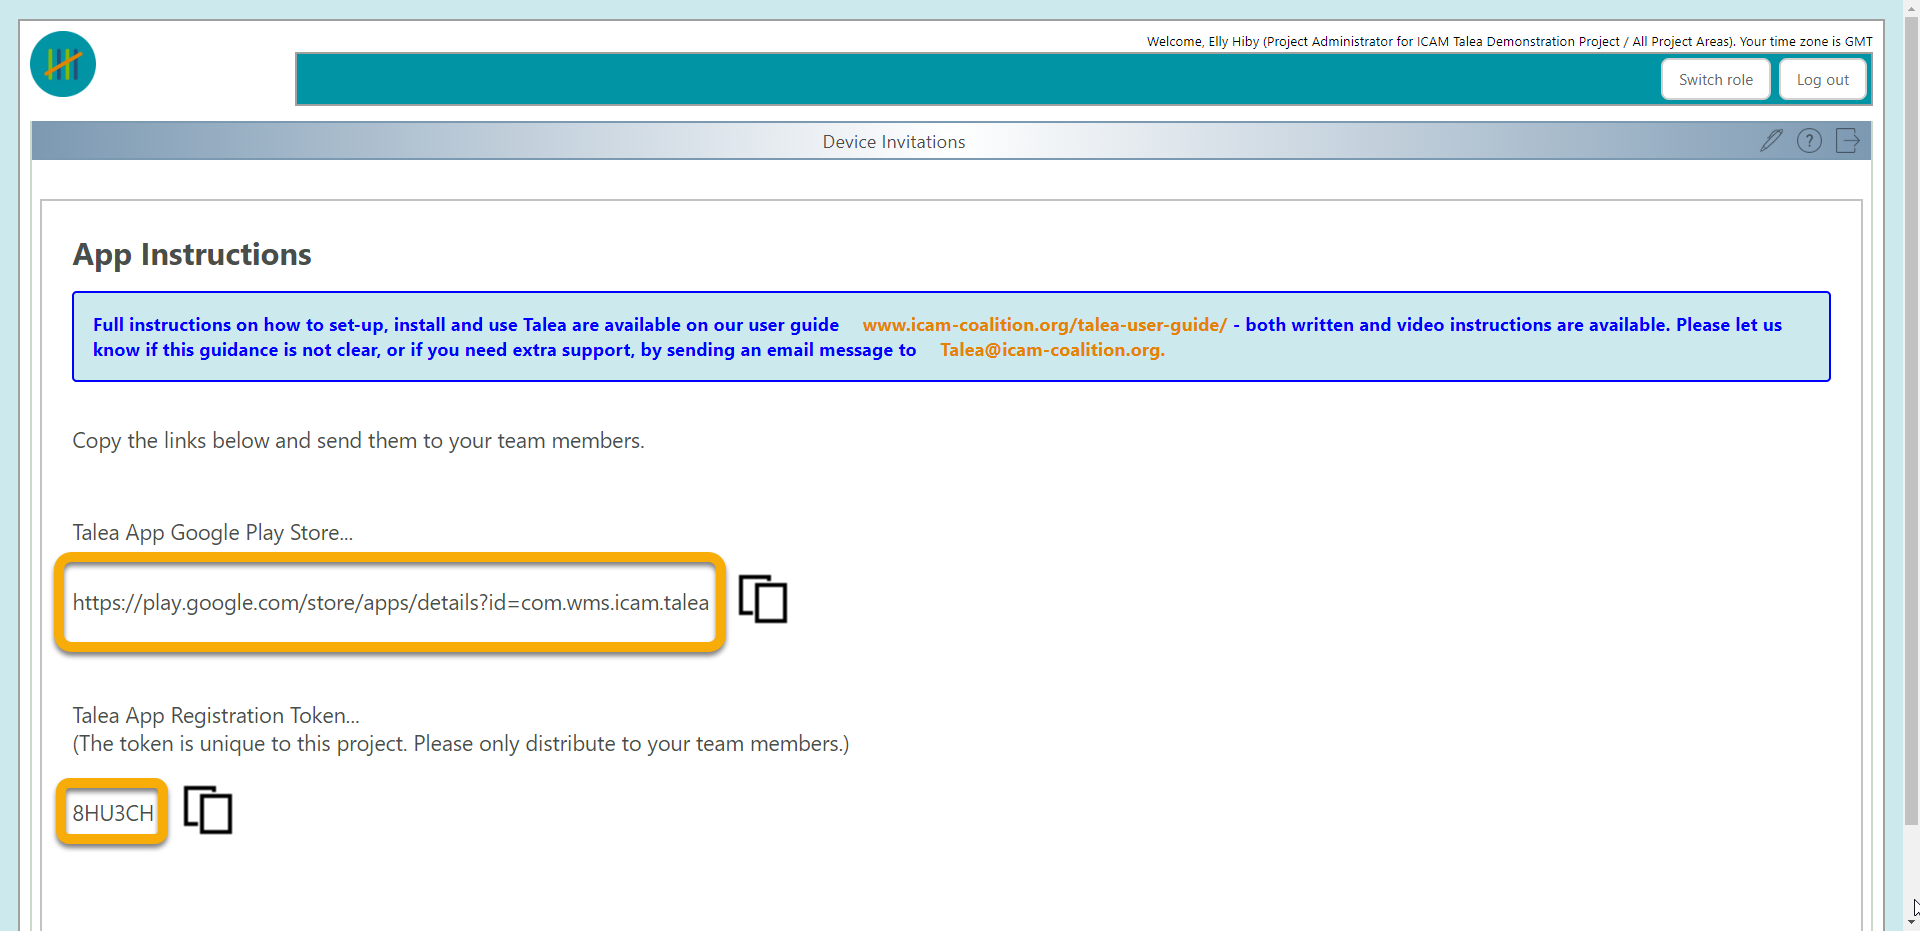
2. Ask your observer to follow the instructions in step 3.1 to install Talea on their phone using the link and token you have just sent to them.
3. Once your observer has joined your project using the token, they will appear in the list under ‘Devices’, at this stage they will only be in groups that had been set to ‘auto-assign’. If you need them to be in a different group, follow the steps in 2.6 to change their group assignment.
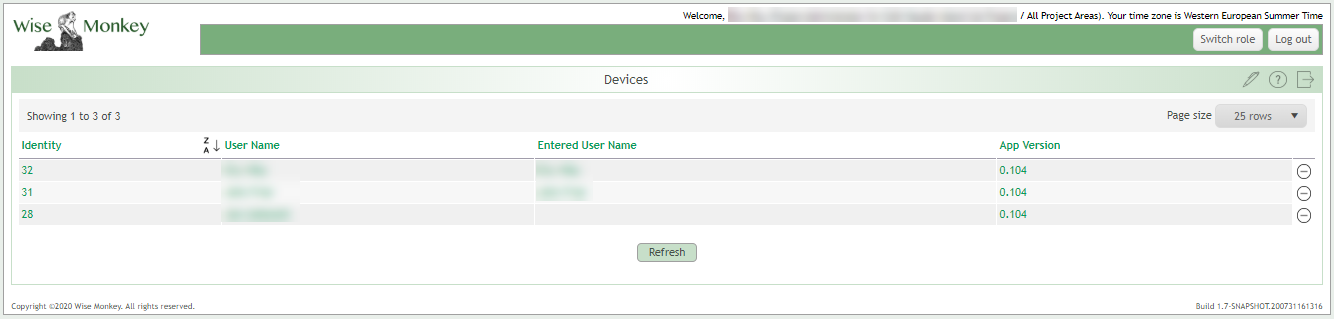
2.6.How to change observer name, Group assignment or delete an observer. Devices
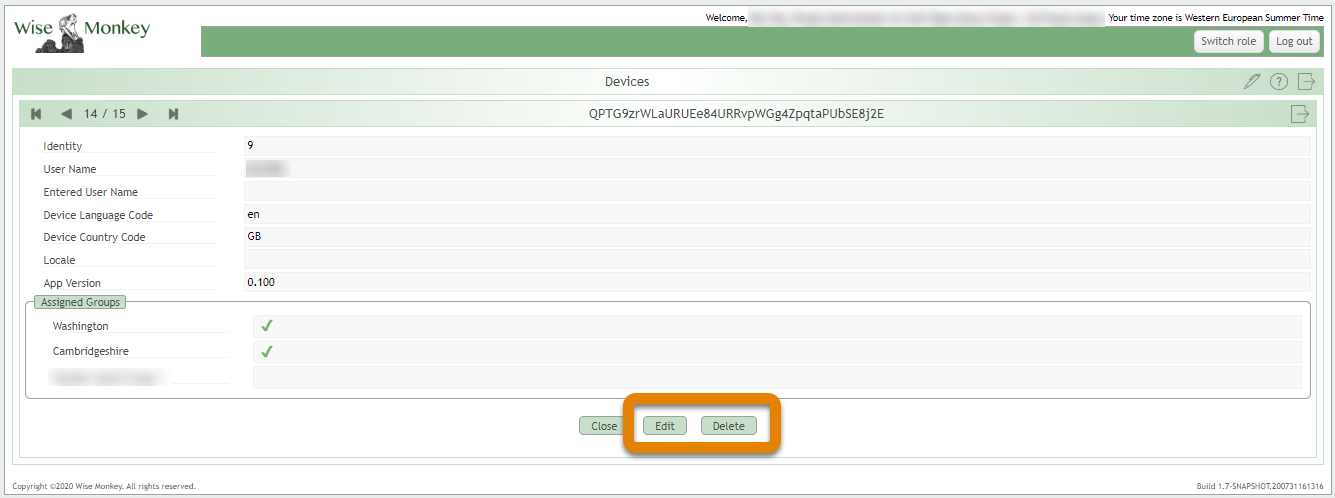
Once your observers have been invited and installed the Talea app on their device, they will appear in the Devices list. You can view, edit or delete observer details by opening Devices from your Dashboard.
- Select Devices from the Dashboard
![]()
2. This opens the list of all the Devices in your Talea project. Each Device represents an observer, observers can have more than one Device. For each device two names are listed: 1) the ‘User name’, this is the name entered by the survey manager when the Device invitation was created, and 2) the ‘Entered User Name’ which is what the observer entered when they set-up Talea on their phone after receiving the SMS invitation. The ‘User name’ is displayed in the data download so the observer can be identified for the data collected. The purpose of displaying both names here is so that the survey manager can check the invitation went to the correct person.
3. Select the Device you wish to view, edit or delete.
4. The details for each Device include the following:
-
- Device identity: an automatically generated number when the Device joined the Talea project
- The user (observer) name entered when a Device Invitation was created
- The Country code for the mobile number associated with the Device
- The Language Code is generated by the Device and is indicated by the language selected by the Device user in the Device settings.
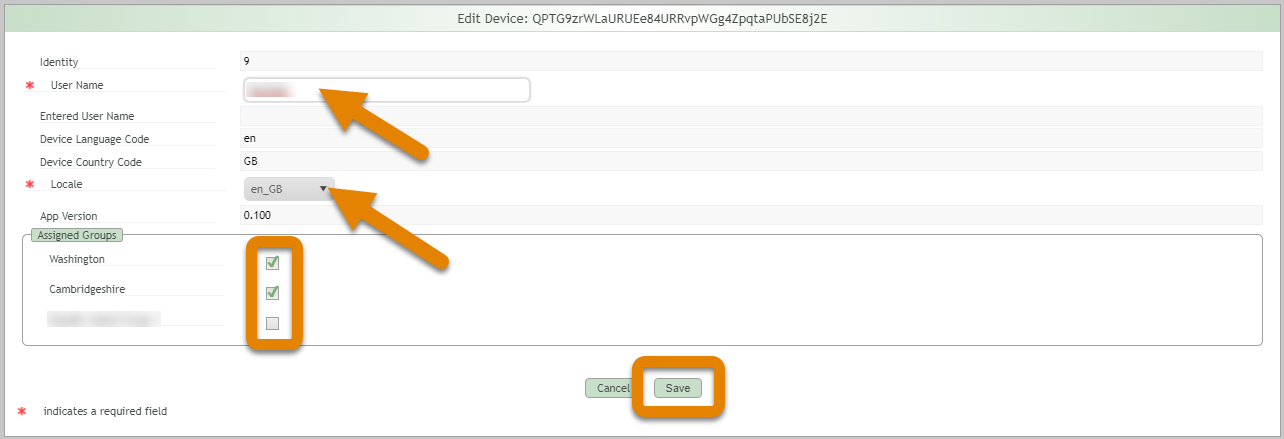
- If the language selected using the Device settings is not what the observer wants to use for the Talea app, this can be changed by using the Locale menu; click the dropdown arrow and select the preferred Locale.
- What version of Talea app is being used
- All the available Groups for the project; the Groups this device is assigned to will be ticked, this will control which survey Packages the observer receives to their Device.
5. Click to ‘Edit’ or ‘Delete’
6. The ‘Edit’ page allows you to change the user (observer) name, which language they will use for Talea app (indicated by the ‘Locale’) and which Group they are assigned to.
7. Click ‘Save’ when you have completed your changes
8. The ‘Delete’ button will bring up a confirmation page to ensure you want to carry through with deleting this Device from your project
2.7.How to add icons to use in my Template. Icons
When you add a Template from the library to your project (see ‘How to add a Template from the Library’) all the icons associated with that Template are added to Icons. However you can also add your own icons to use when editing or creating your own Template. Images to be used as icons should be png files, approximately square (they will be automatically resized to 128 X 128 pixels when uploaded), simple and coherent, monochrome or using few colours and using a transparent or white background. Take note that if these icons are to be used as choices for the first question, they will appear in the app on the map to indicate the location of previous sightings – hence a transparent background may be best for these icons in particular.
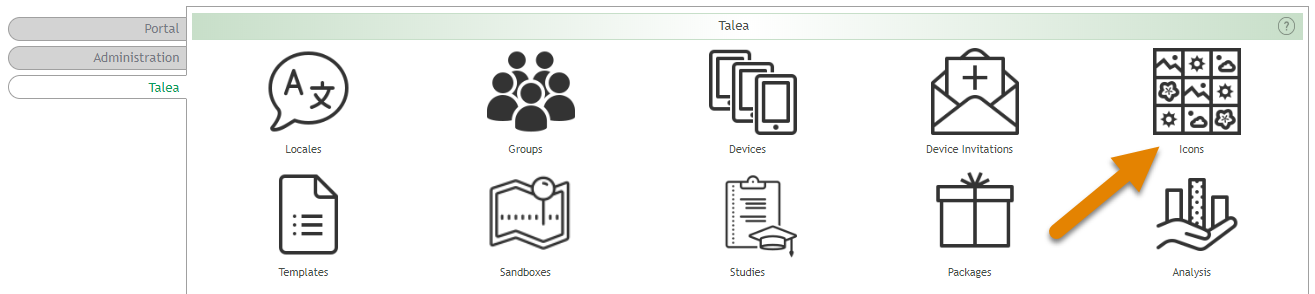
- Select Icons from the Dashboard
2. This opens the list of icons currently available, note there may be more than one page of icons, use the arrows at the top to flip through the pages. Click ‘Create New Icon’ to add a new image as an icon.
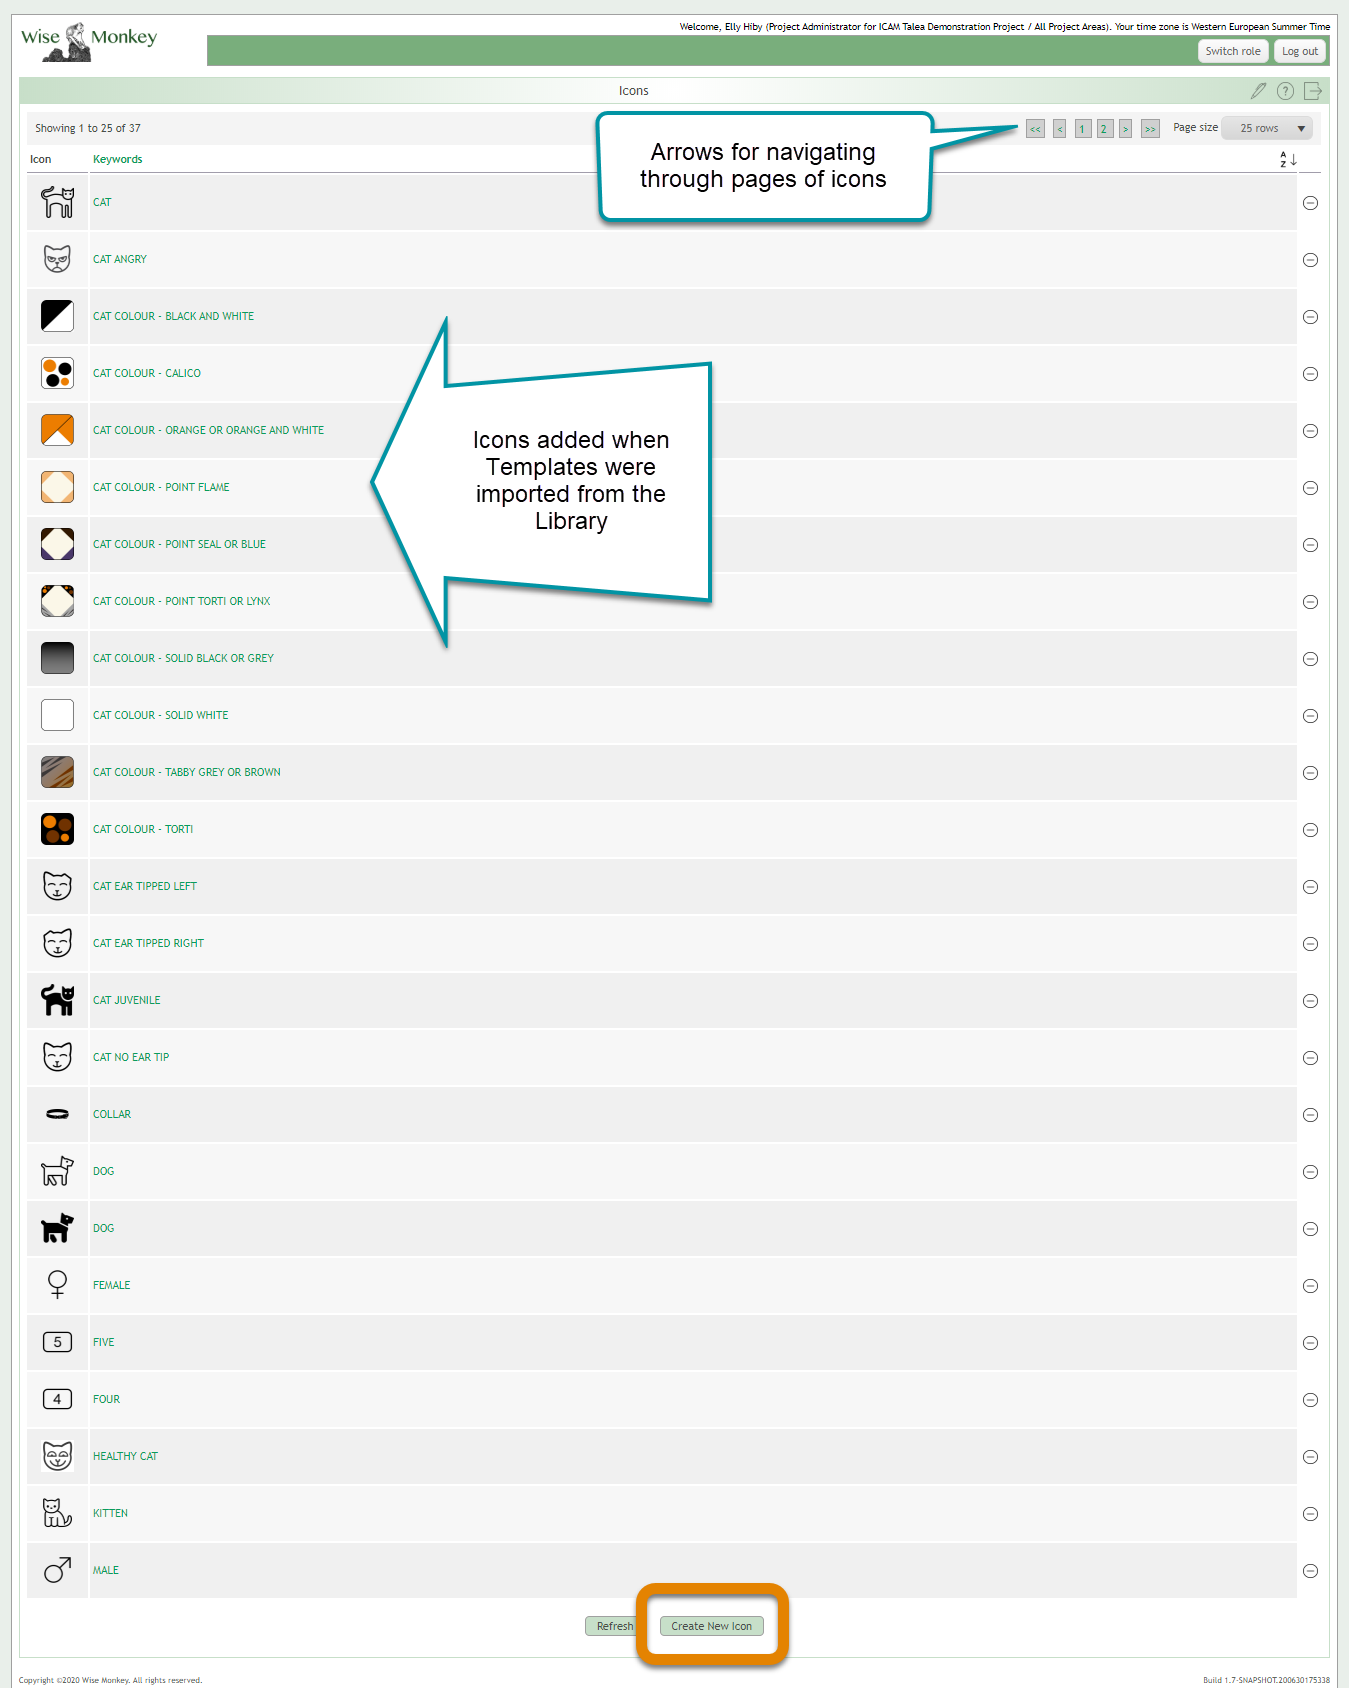
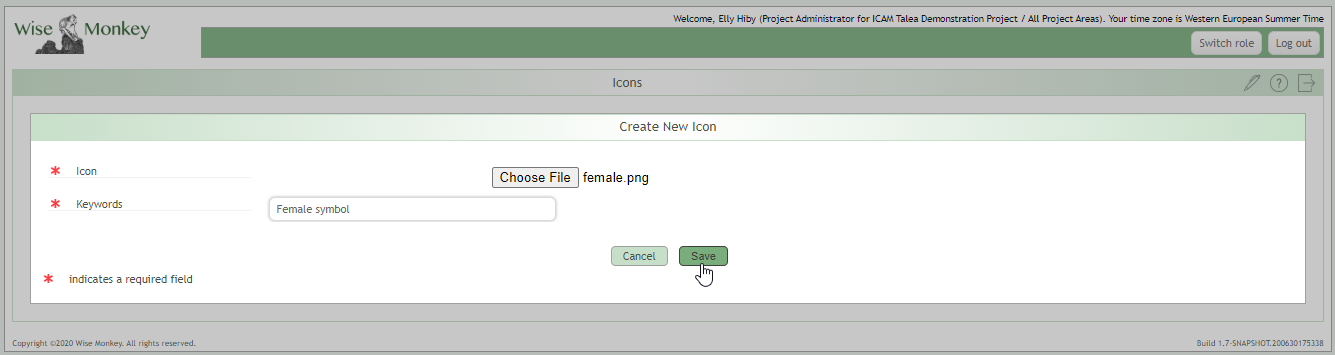
3. Click ‘Choose file’ to open browser window and select your png image file. Enter a simple name including key words that describe the image. Then click ‘Save’.
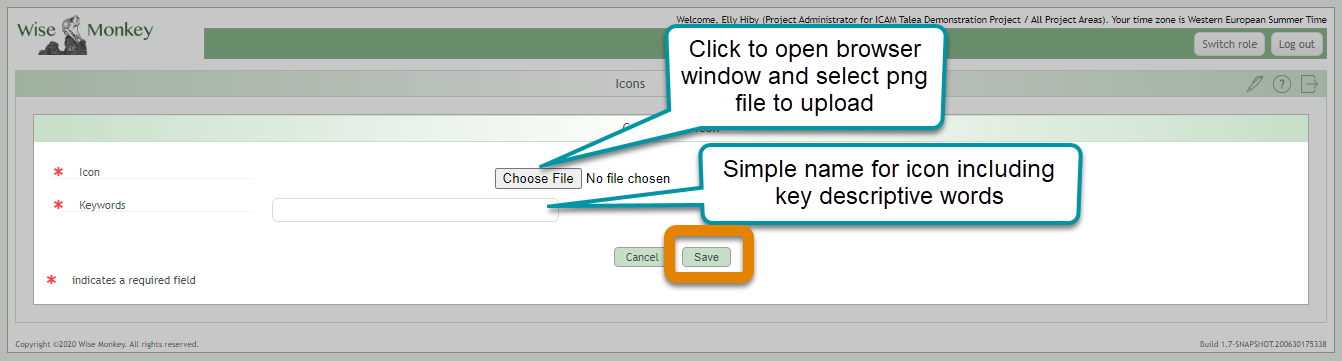
4. The image will be added to the icon list and will then be available to select as an icon for a Choices when using the Template Designer.

2.8.How to add, edit or create a Template for your survey. Template
Templates define what questions your surveyors will be asked when they record a sighting, and also what options they can choose from to answer those questions. You have 3 choices of template:
- You can add a Template from the Library Templates to your project and use it without changes. These templates have been created for previous surveys and some will include basic analysis built in, which you will see when you download your survey data. Follow the instructions in ‘1. How to add a Template from the Library’.
- You can add a Template from the Library Templates to your project and add or amend the questions, choices and icons. Follow the instructions in ‘2. How to edit a Template from the Library’. Note that if you change question or choice names used to create summary values, this may affect this built-in analysis; but you can update or create your own summary value analysis.
- You can build a template yourself from scratch and add your own analysis in Analysis. Follow the instructions in ‘3. How to create a Template from scratch’.
If you amend the questions or choices in a Template, you must send this out to your observers again using a new Package. Amendments to a Template will not be applied to Packages that have already been sent out. However, you can change the Summary Values in a Template as these are not used by the app, only in the Analysis.
Tips for designing Templates:
- Use different icons for each of the choices within one template to avoid confusion. It makes it easier for your observers to review and edit previous choices they are all represented by different icons.
- Always include an ‘unknown’ option, for those animals that are seen but disappear from view before any further characteristics can be judged. These unknown choices should ideally also have their own unique icon.
- Only use multiple choice questions if you are sure the animal can be more than one choice at once, otherwise go with the default format of a single choice answer to the question.
- Minimise the number of questions you present to your observers by combining any choices that are mutually exclusive in one question.
- For example, if kittens are too young for sterilisation, and pregnant or lactating females are clearly still intact, consider combining these into one question of “What type of cat is this? (Cat type)”. Followed by the mutually exclusive answer choices ‘sterilised’, ‘unsterilised’, ‘pregnant’, ‘lactating’, ‘kitten’ and ‘unknown sterilisation status’.
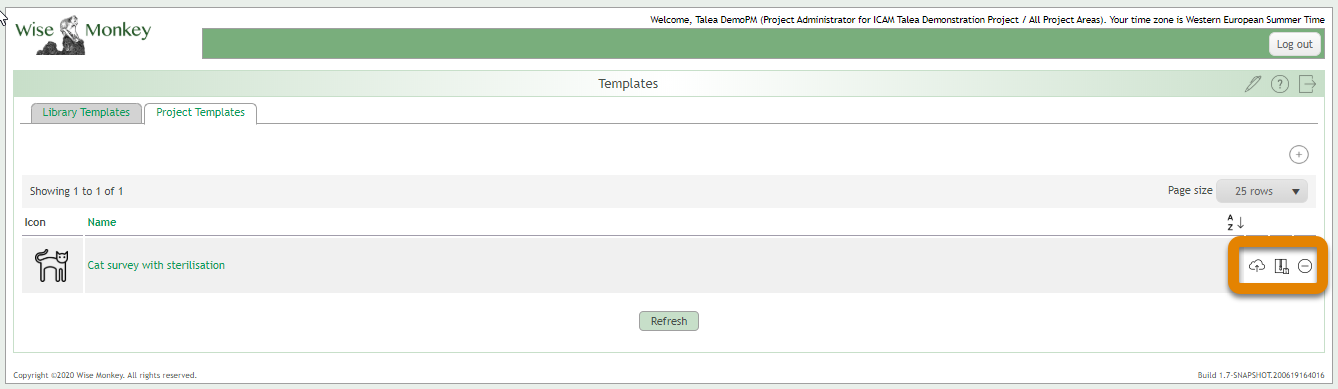
2.8.1.1. How to add a Template from the Library
- Select Templates from the Dashboard
![]()
- In the ‘Library Templates’ tab, click on a Template name to view the questions and options
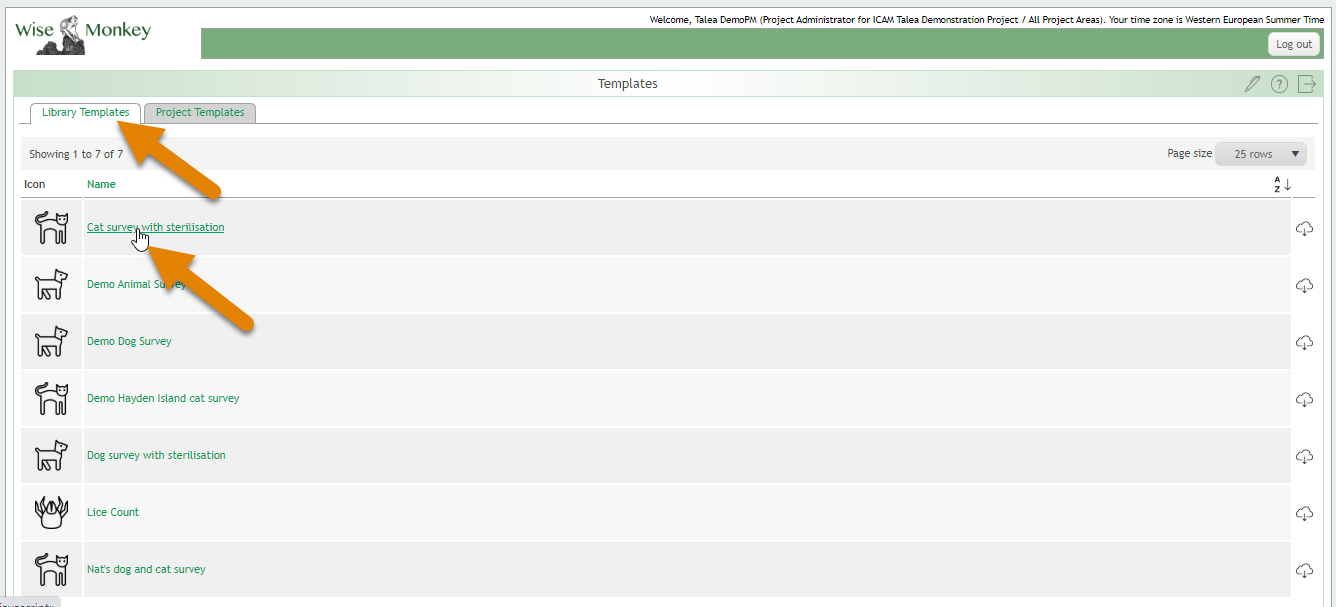
- Once you have chosen a Template, click the cloud plus down arrow icon to copy it to your Project. When you copy a Template to your Project, all the Icons associated with that Template are loaded into your Icon library also.
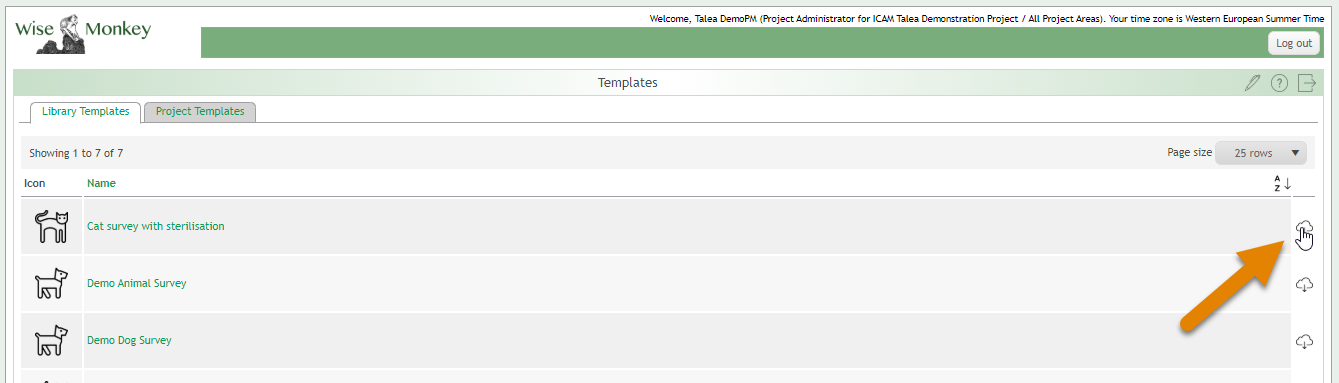
- You will be asked to confirm if you want to add this Template to your project
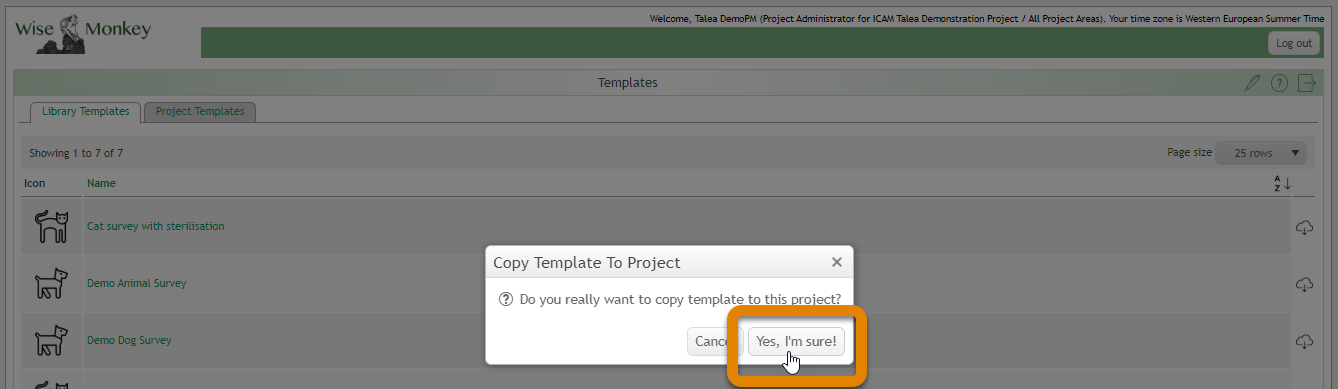
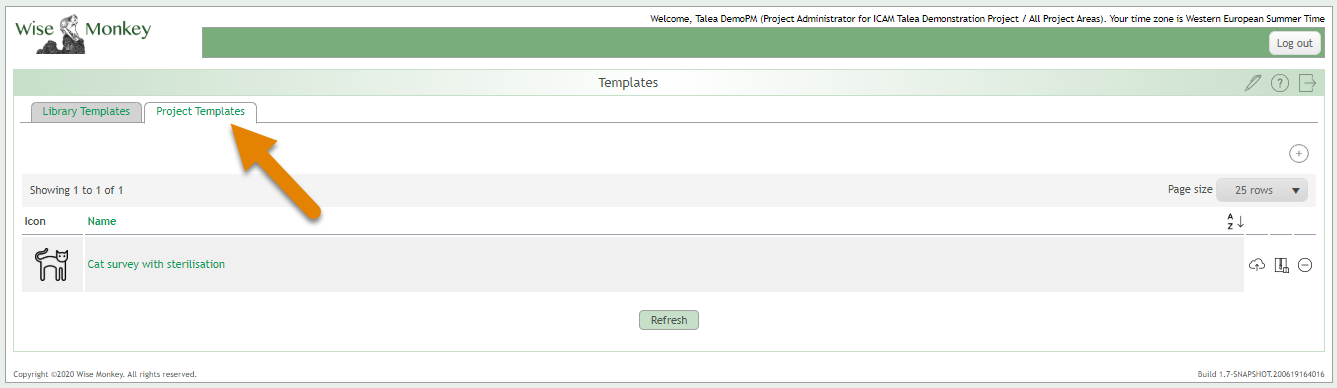
- This Template will now appear in the ‘Project Templates’ tab and you can begin to create Packages with this Template to send to your Groups of observers
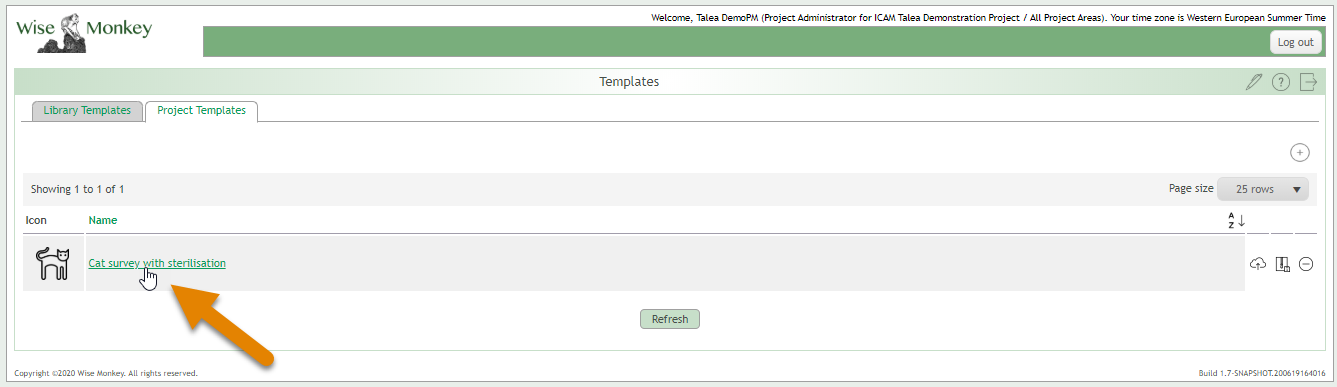
2.8.2.2. How to edit a Template from the Library
- Follow steps 1-5 in ‘How to add a Template from the Library’
- Select the Template you want to edit by clicking the name, this will open the Template for editing in the Talea Template Designer
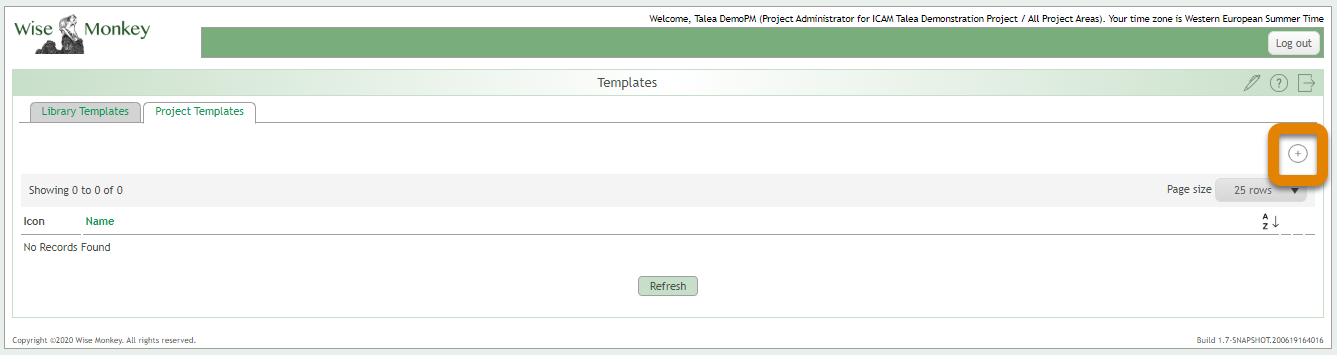
2.8.3.3. How to create a Template from scratch
- Open the ‘Project Templates’ tab and select the “+” icon
- Use the Talea Template Designer to create your Template
Once you have added Templates to your Project Templates tab, you will see 3 additional options:
- Cloud with up arrow icon: If you have created your own template, or amended a Library template, you can ‘Submit Template to Library’ where it will be reviewed by the Talea team for inclusion in the Library for other users
- File icon: Archive Template
- “-“ icon: Deletes the entire template, you will be ask to confirm whether you want to go ahead and delete
2.9.Using the Template Designer
The Template Designer allows you to edit a Template from the Library or create your own Template.
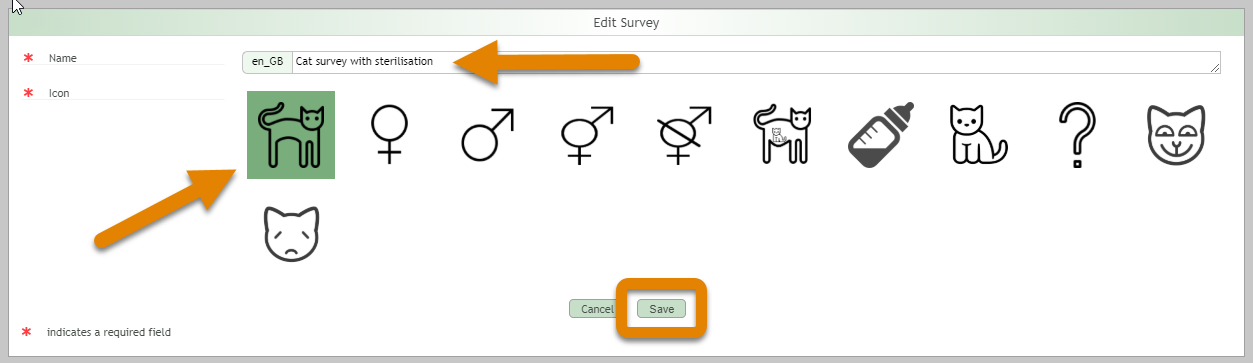
- The pen opens the Template name and icon for editing/creating
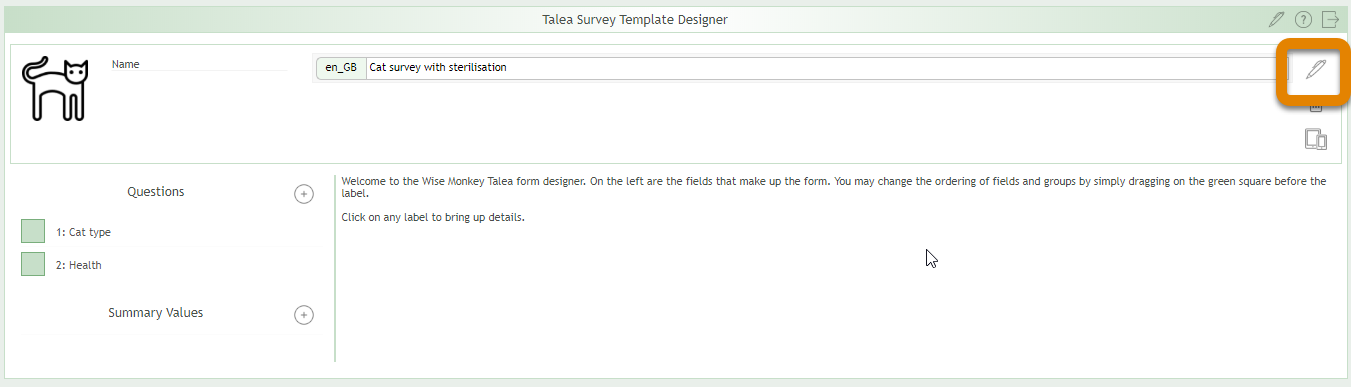
2. From the ‘Edit Survey’ window you can enter or edit the name and select or change the Template icon. Click ‘Save’ when you have completed editing/entering. The Template icon is used to identify the Template in the Library or Project Template list, along with the Template name, it does not appear in the app.
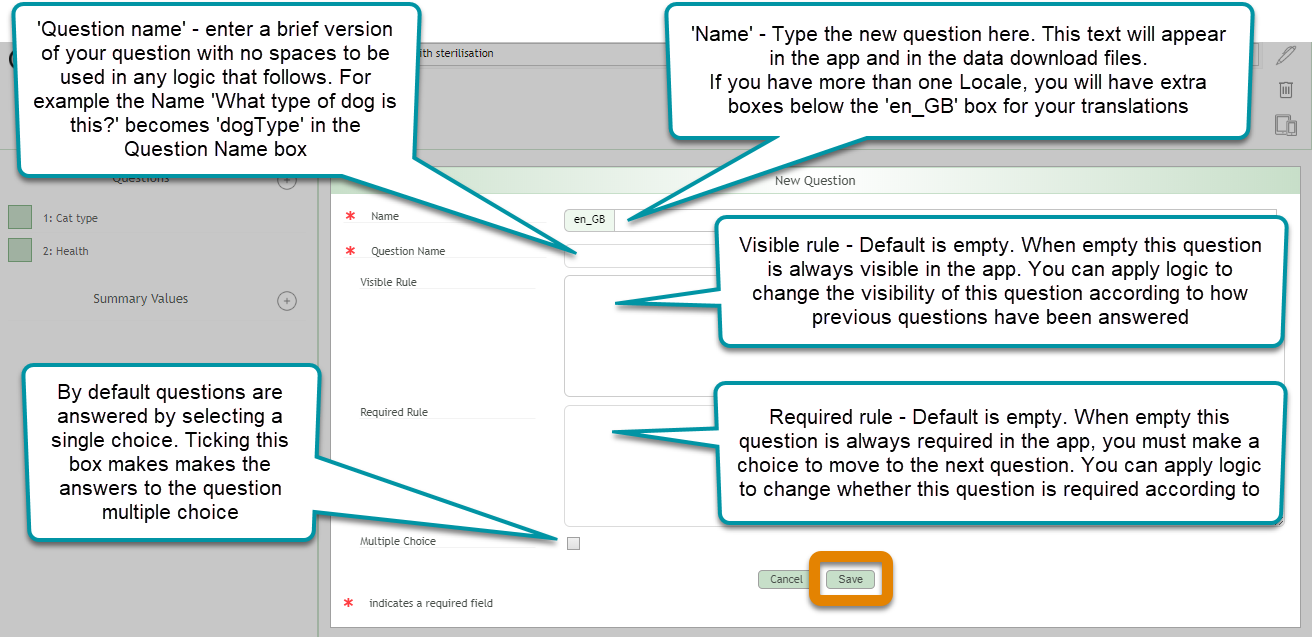
3. The “+” icon allows you to add a new question

4. This opens the ‘New question’ window with the following boxes and options for you to complete before selecting ‘Save’
5. Once you have added your question, you need to add Choices for answering your question by clicking the ‘+’ icon
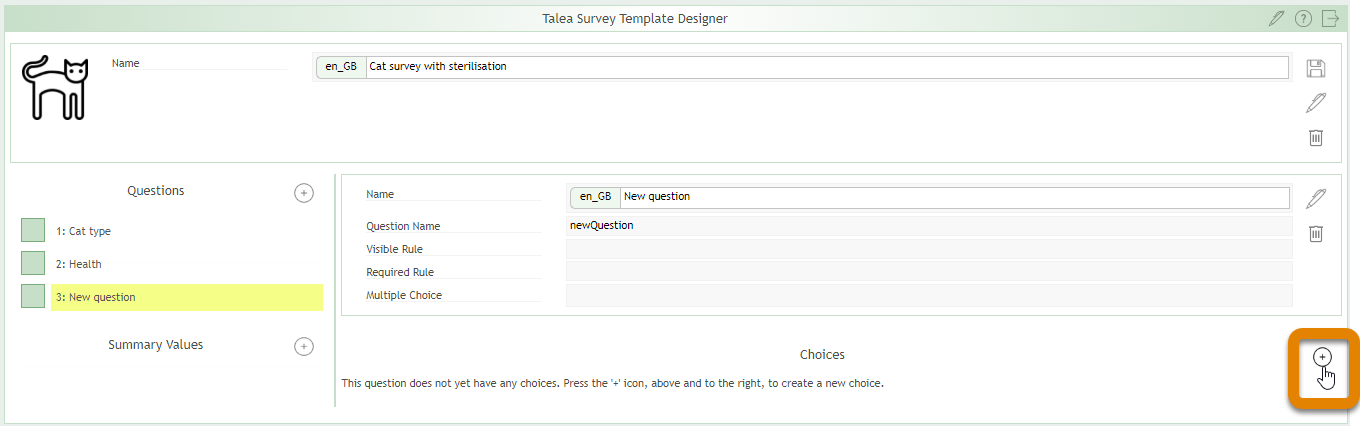
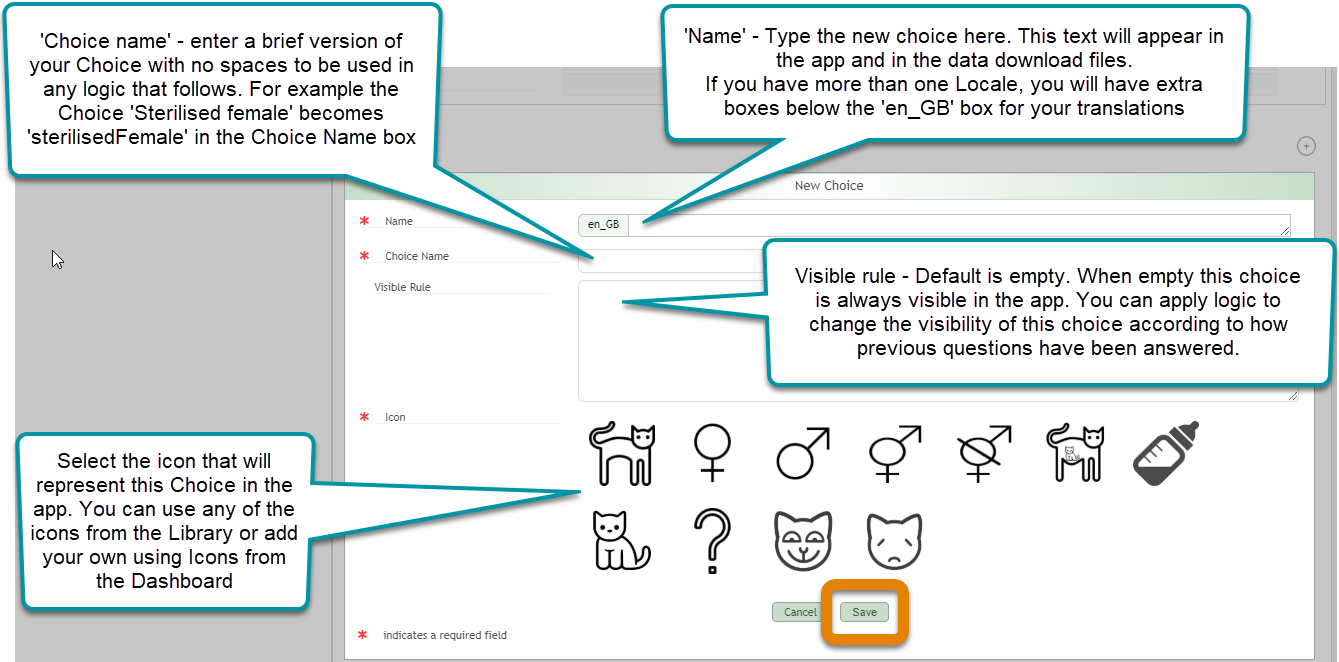
6. This opens the ‘New Choice’ window with the following boxes and options for you to complete before selecting ‘Save’. To add your own icons follow the instructions in How to add icons.
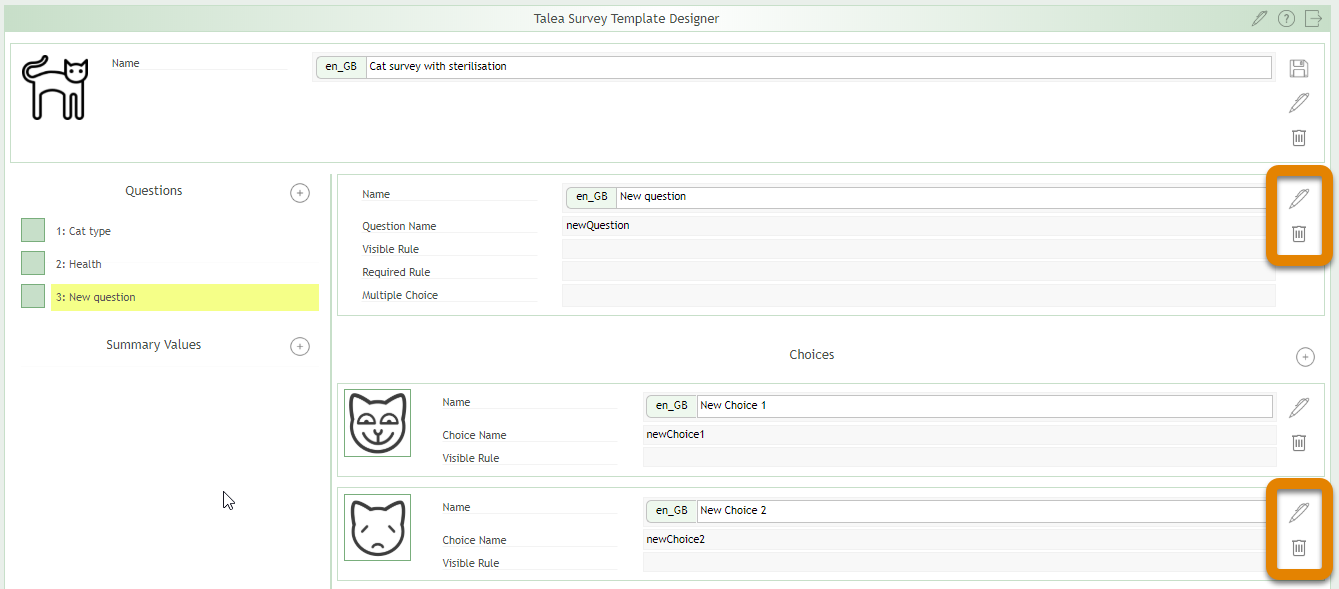
7. You can edit or delete a Question or Choice by using the pen or bin icon at any time – you can do this with questions and choices you have added or those that are already part of the template. The pen icon will open the ‘Edit Question’ or ‘Edit Choice’ window with the same boxes and choices as the ‘New Question’ or ‘New Choice’ windows.
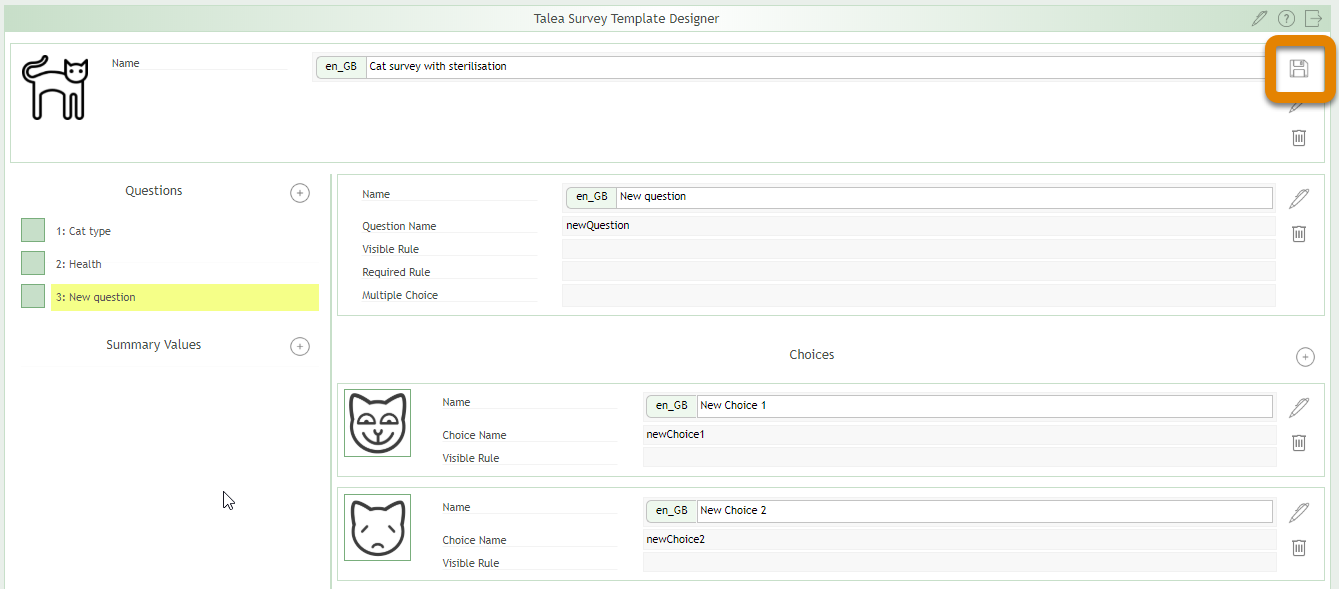
8. Once you are happy with your template click the save icon. This will return you to the Project Template window where you will see your new/amended Template listed.
2.9.1.How to change the visibility of questions or choices. Skip logic
You may want to change how questions or choices are displayed dependent on the answers to previous questions. For example, you may only want to ask about pregnancy and lactation if the sighting was of a female animal.
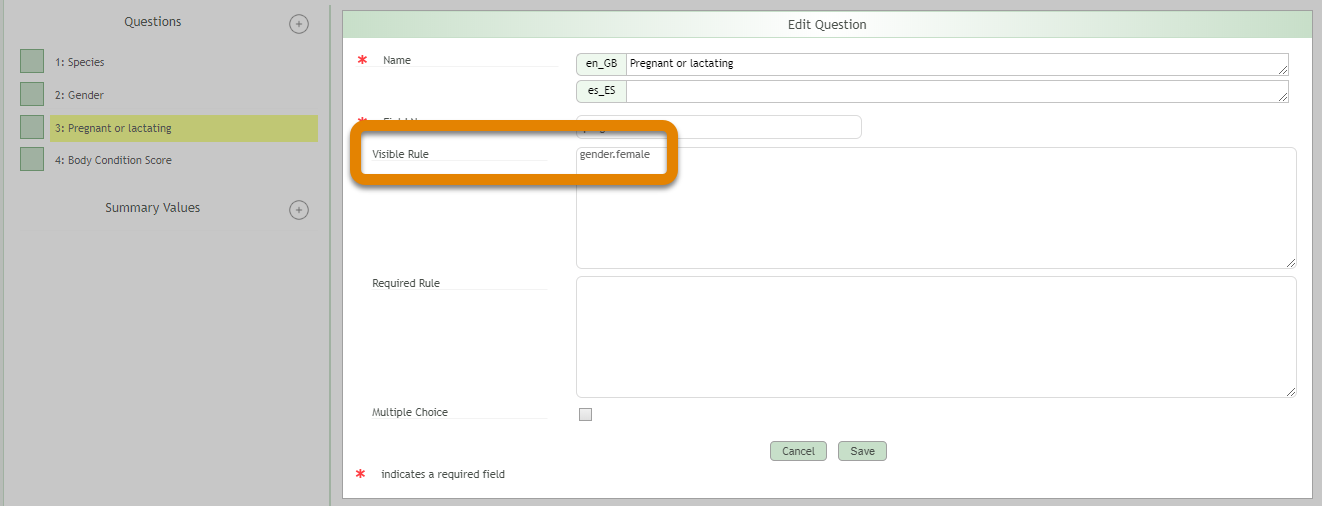
- Open the question or choice that you want to apply the skip logic to, using the pen icon if this is a question you have saved previously. If the ‘Visible Rule’ box is blank the question or choice is always visible. To make it only visible when something is TRUE enter “Question Name.Choice Name” – note it is the Question Name and Choice Name that you must use here, i.e. the brief interpretation of your Question or Choice written with no spaces. In the example below this is “gender.female” meaning this question will only be visible when the previous question about gender was answered with female. Alternatively you can make this question visible when something is FALSE but using “NOT(Question Name.Choice name)”, for example the same skip logic could have been achieved with “NOT(gender.male)”.
2. Skip logic can also be applied to Choices as well as Questions. In the following example the Choice of ‘Kitten’ was made to NOT be visible if the previous question about ear tipping had been answered with left ear tipped or right ear tipped, as only Juveniles and Adults could be ear tipped.
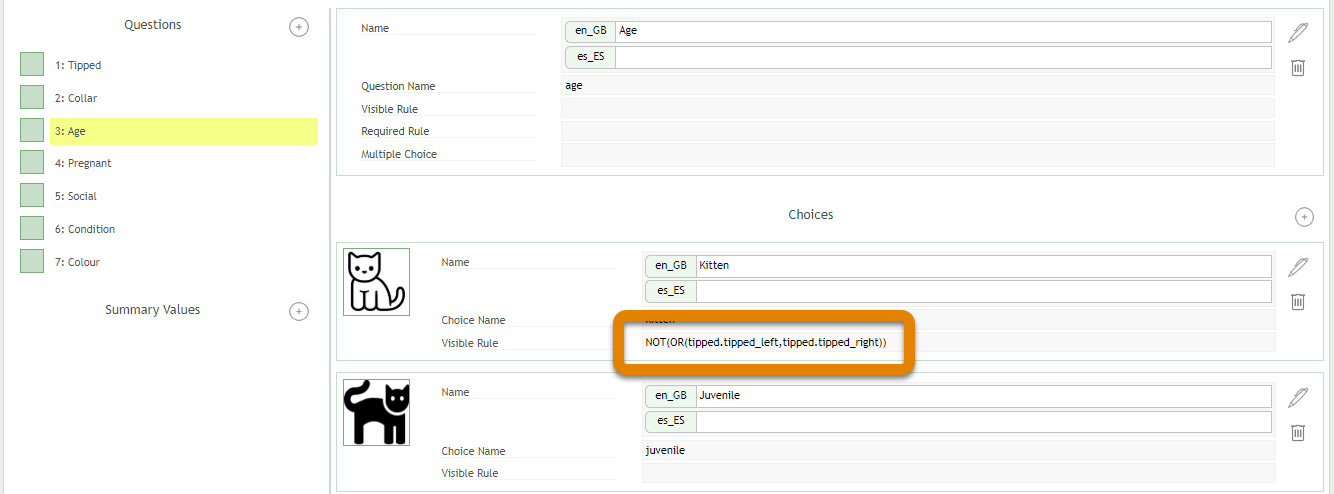
3. The functions OR and AND can be used to string functions together in the skip logic by adding these terms to the beginning and nesting the choices.
- For example, NOT(OR(tipped.tipped_left,tipped.tipped_right)) means that if either the option left ear tipped or right ear tipped had been selected for the question “Tipped”, this should not be visible.
- For example, AND(tipped.intact,gender.female) means that if the cat is not tipped and is female, this question or choice will be visible; you might want to use skip logic like this for a question about pregnancy, as a male or sterilised cat could not be pregnant.
4. A full list of the available functions is available here.
2.9.2.How to add summary statistics to the analysis
Within the Template Designer you can add calculations performing summary statistics that will be applied to all data collected using Packages including that Template. You can add and amend these Summary Values at any time and the updated calculations will then be used when exporting data using Analysis.
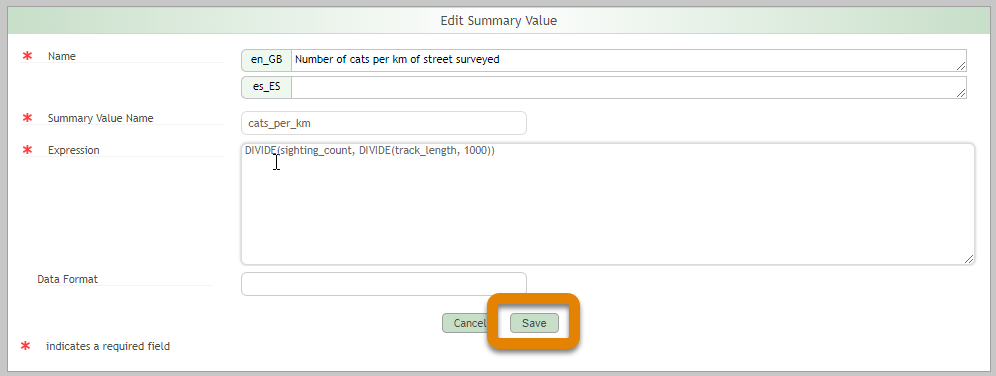
- Open the Template you wish to add summary statistics to and click “+” to the right of Summary Values

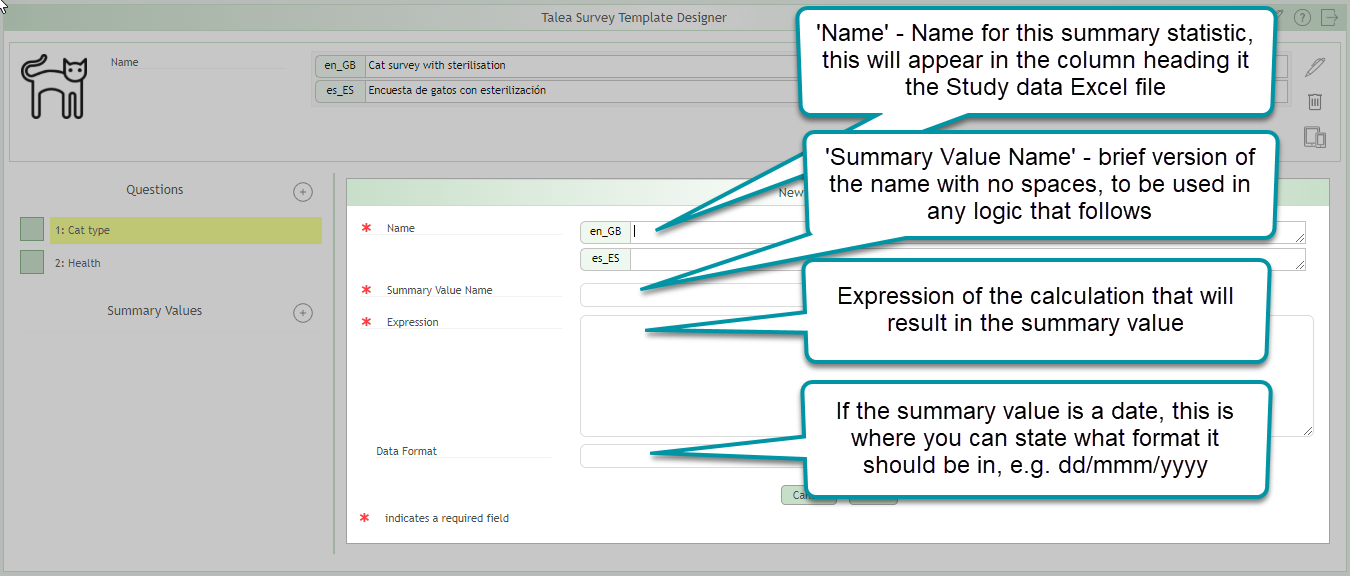
2. This opens the ‘New Summary Value’ window where you give this Summary Value a ‘Name’ that will appear in the summary worksheet of the Excel file. A ‘Summary Value Name’ which can be used in expressions of any subsequent Summary Values. The ‘Expression’ which describes the calculations that will be applied to the data to create the Summary Value. A list of available commands for this Expression is found here. And if the Summary Value will be a date, then the format of that date.
3. You can edit a Summary Value later by clicking the pen icon.
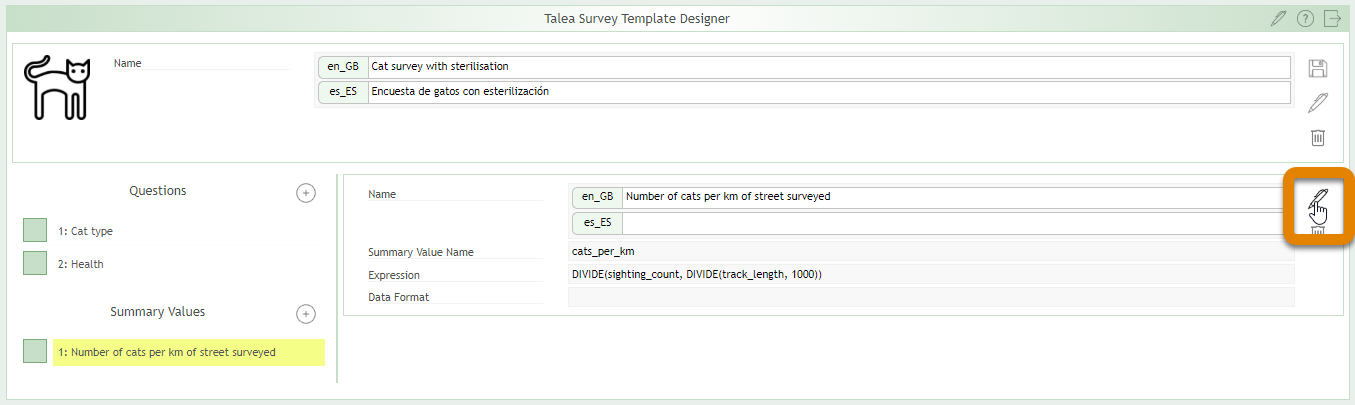
4. This opens the Edit Summary Value window. Where you can change any of these details and then click ‘Save’.
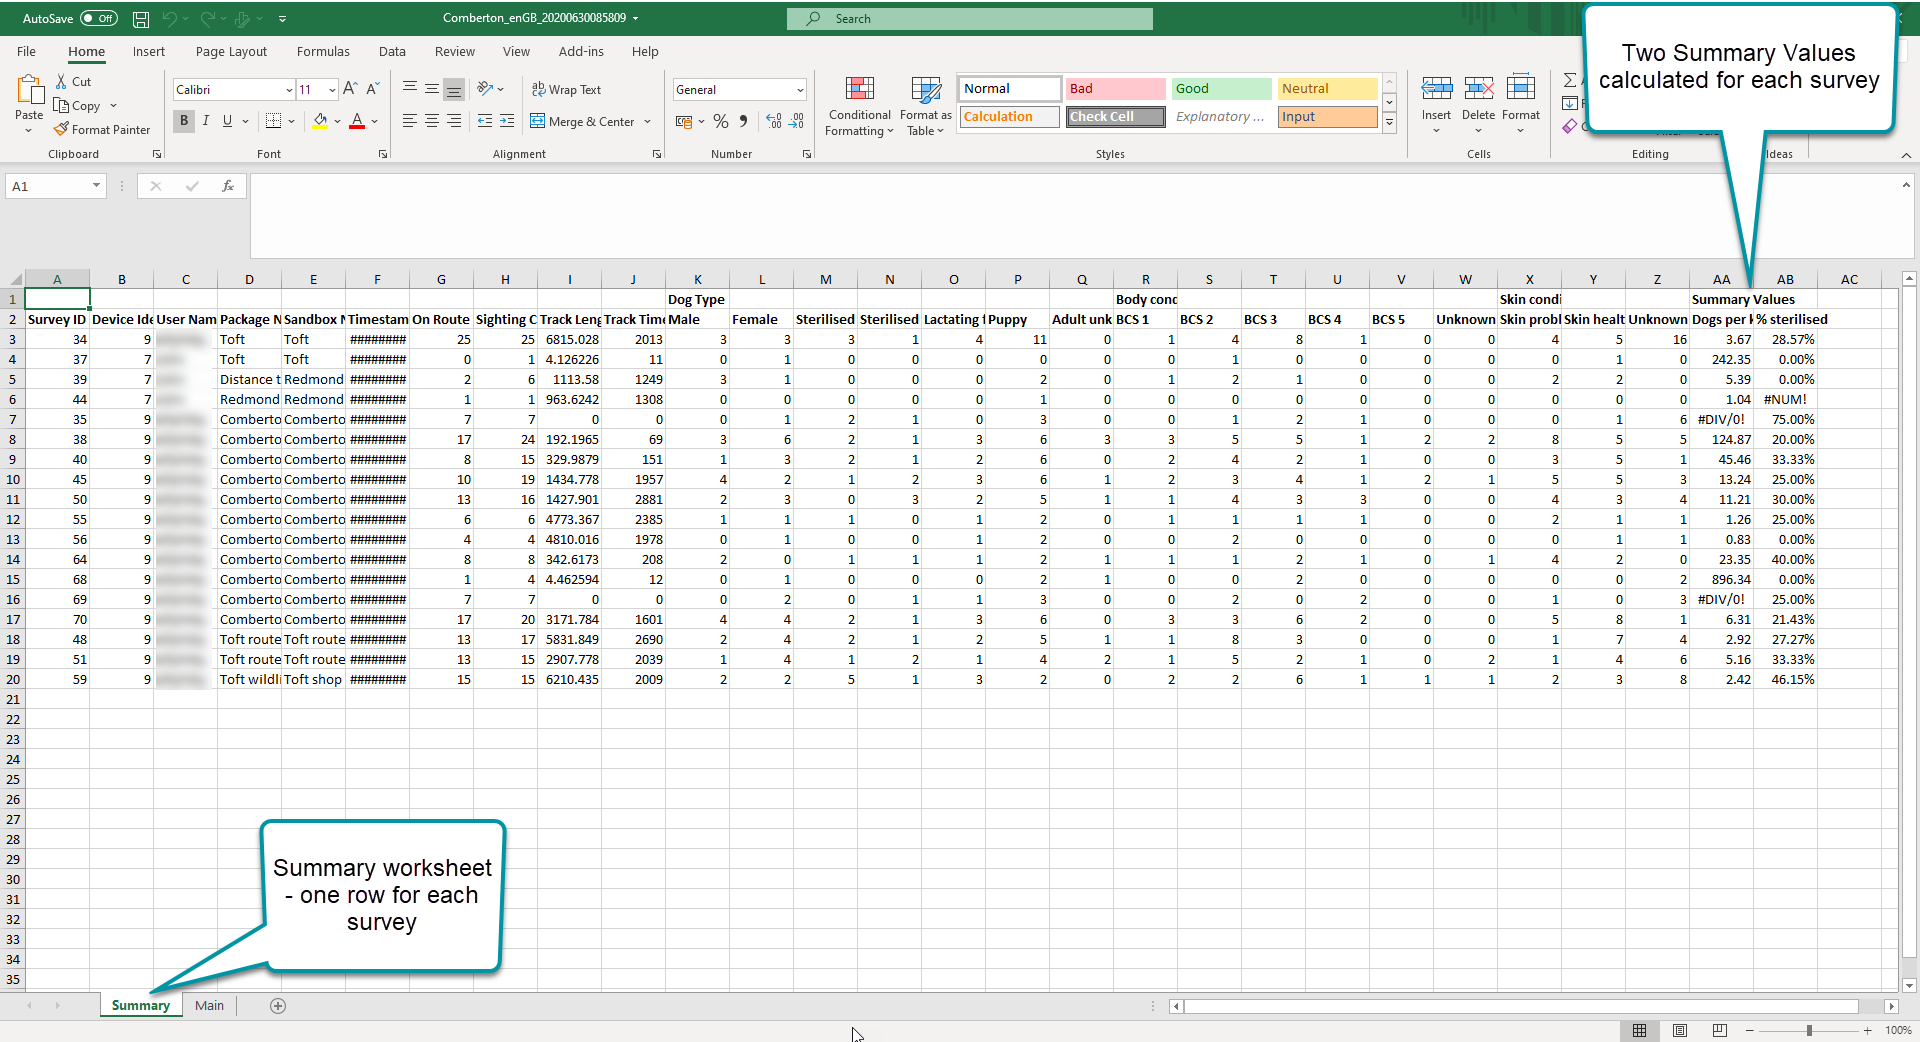
5. The Summary Value will appear in the last columns of the ‘Summary’ worksheets in the Excel file download (see How do I view and access data that been collected for how to access and download an Excel file).
2.10.How to show observers where to survey. Sandboxes
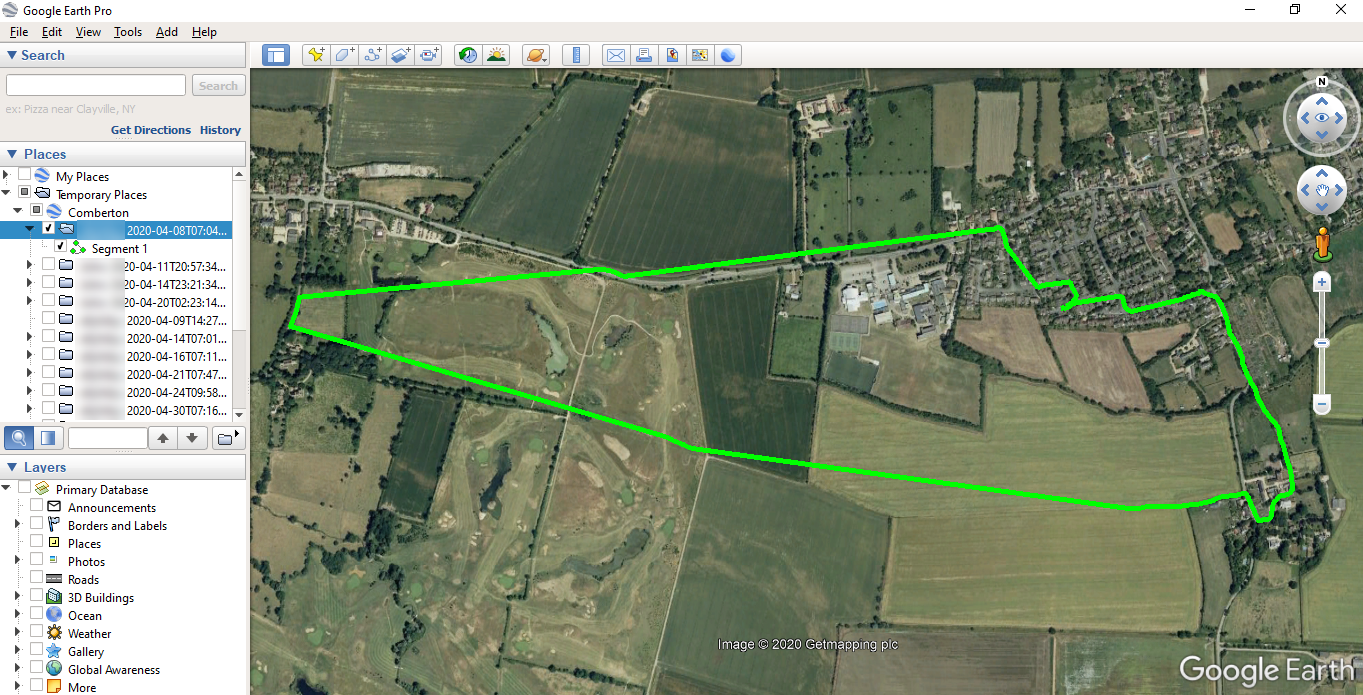
You tell observers where to survey by sending them either a route or polygon in a Package with the Template. We call these routes or polygons Sandboxes as this is the area in which observers ‘play’. You will need your routes or polygons saved as kml files to import them into your Talea Project. There are many programs available for creating kml files, Google My Maps is one example of a free online program that allows you to create routes and polygons and save these as kml files.
When you use your Talea app it records your track, which can then be downloaded from your Talea Project. If you want your observers to define the route themselves, you can create a draft route which you Package up with your Template and send to your observers to follow. Your observers can survey using this Package as many times as they like, once they are happy they have completed the survey along the ideal route, you can download the kml of this track and import this into your Talea Project as a new Sandbox – Follow the instructions in Step 5 of ‘How do I view and access data that has been collected?’ to download the kml file for the track associated with a specific Survey.
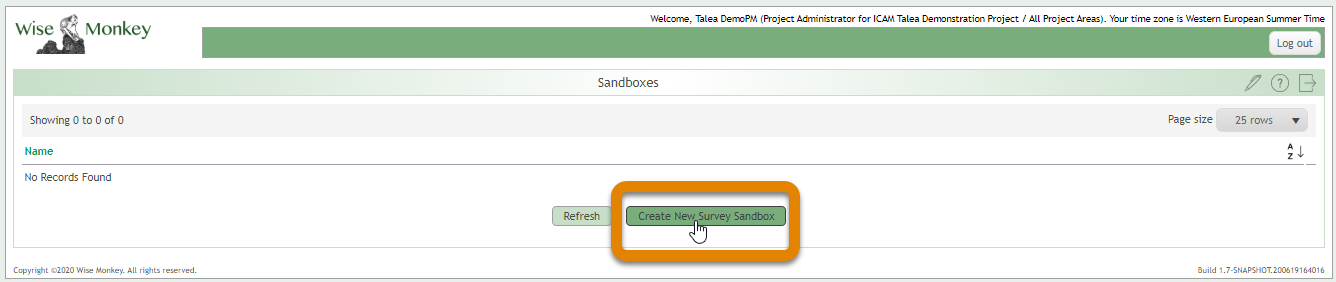
- Select Sandbox from the Dashboard
2. Select ‘Create New Survey Sandbox’
3. This opens the ‘Create New Survey Sandbox’ window with the following boxes and options:
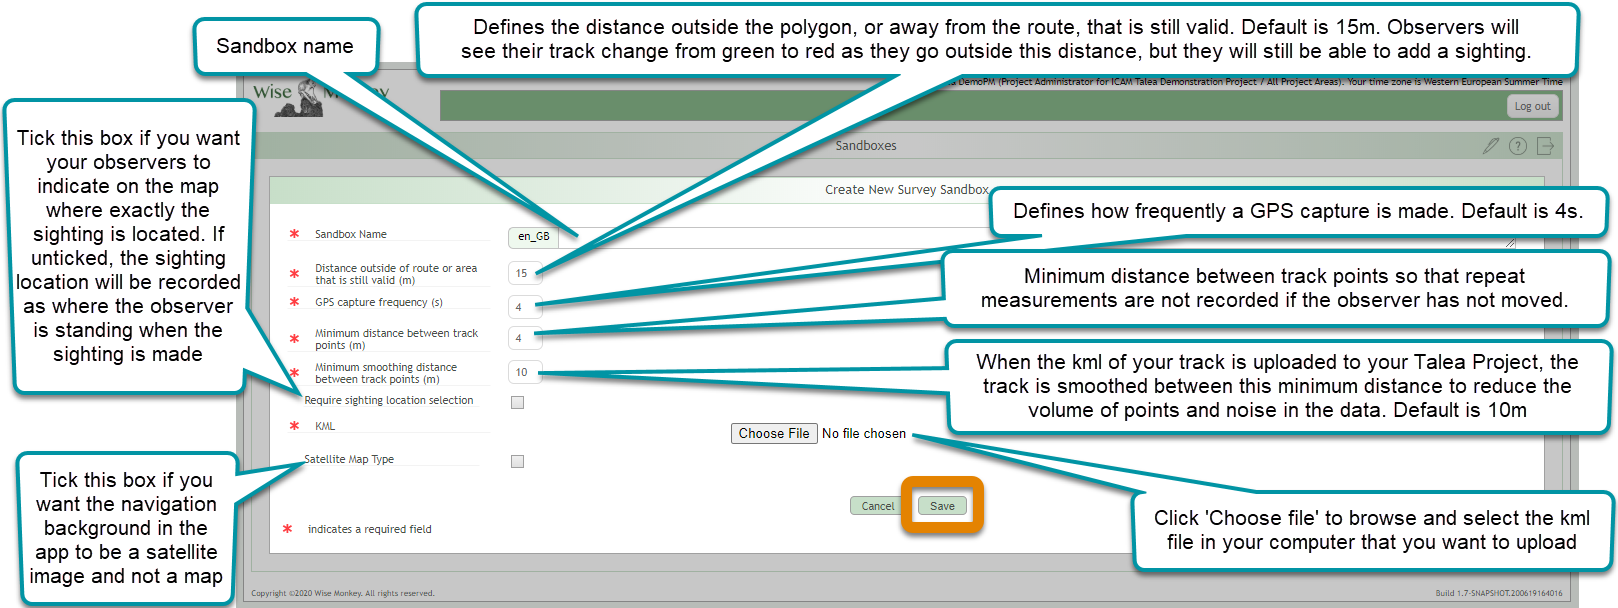
4. If you tick ‘Require sighting location selection’ you will also be asked to define the ‘Maximum sighting distance (m)’. This is a distance from either side of your route or polygon. This will show as a highlighted zone around your Sandbox in the app, you won’t be prevented from adding a sighting outside this zone, it’s just there for guidance.
5. Once you have added your kml files and defined their parameters, they will appear in your Sandboxes list
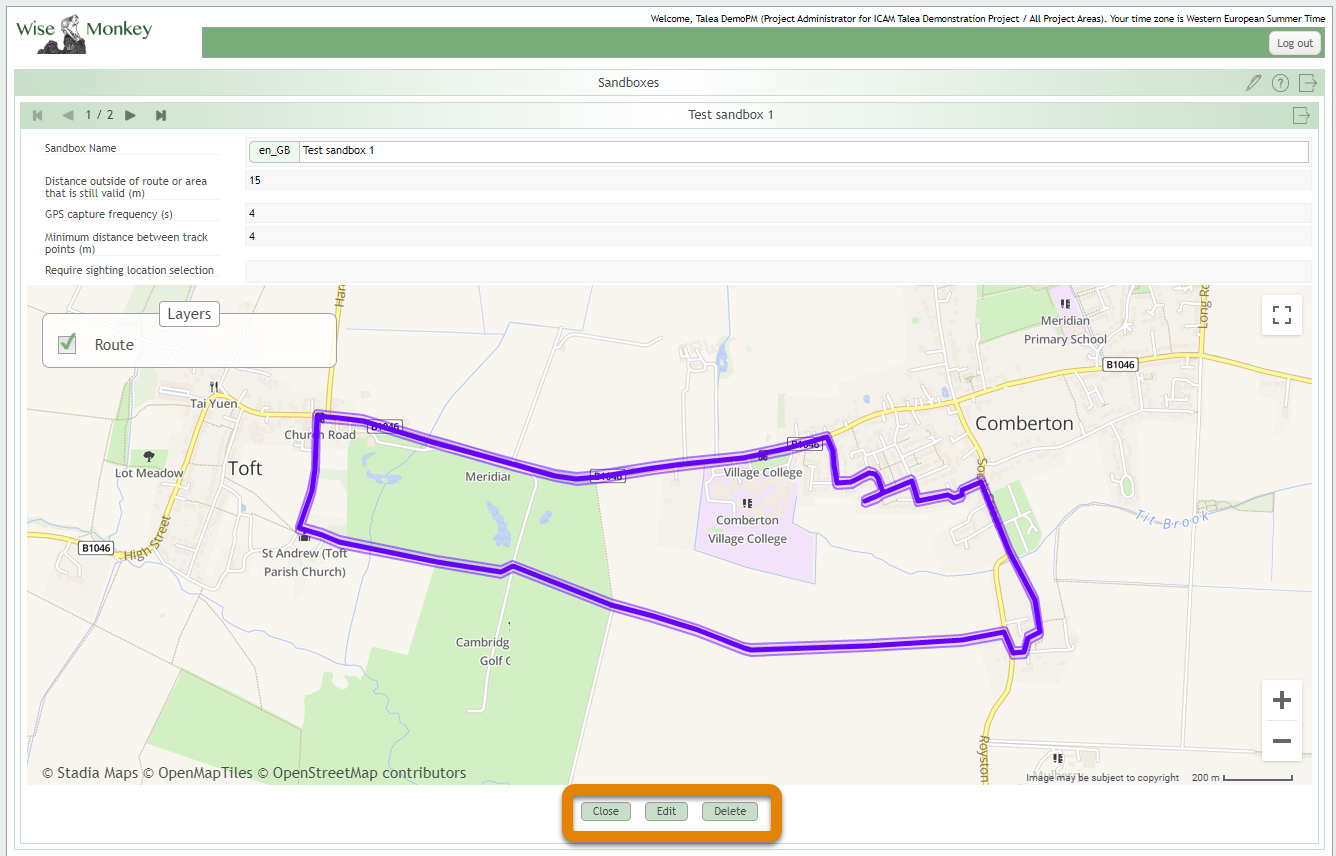
6. Click on the Sandbox Name to open it and view the route or polygon on an Open Street Map background. You have the option to ‘Close’, ‘Edit’ or ‘Delete’ at the bottom of the window
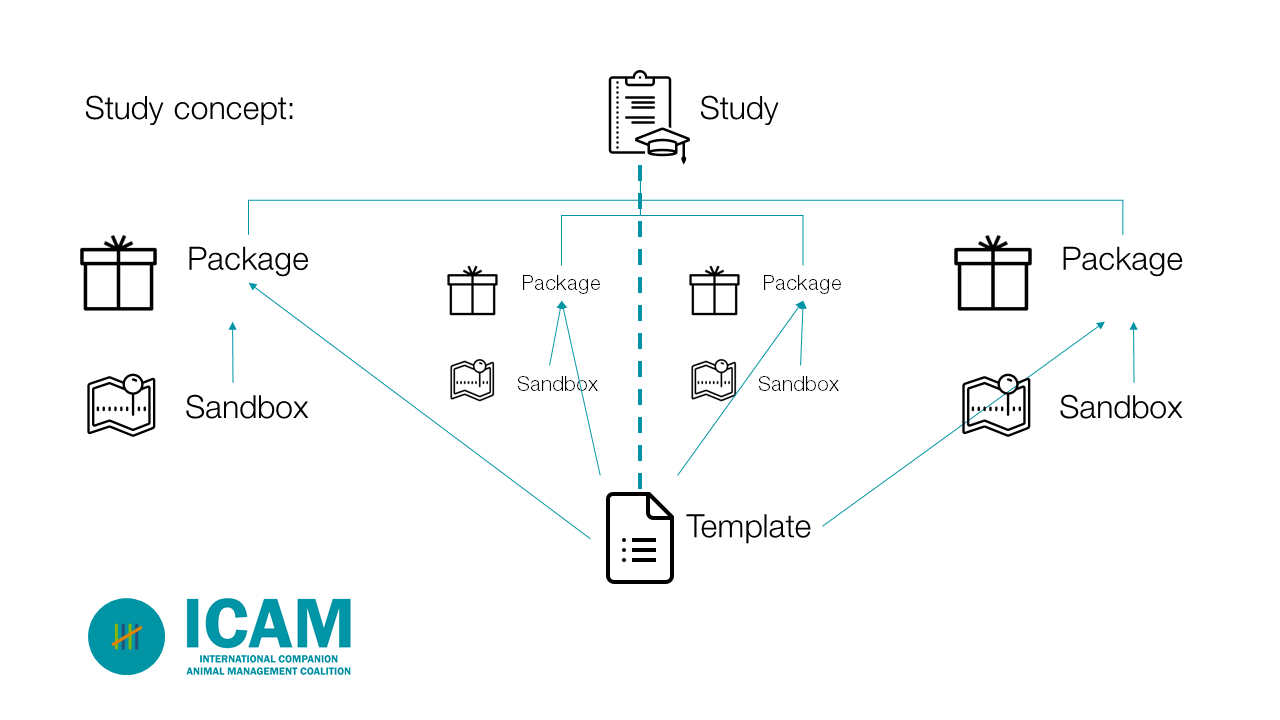
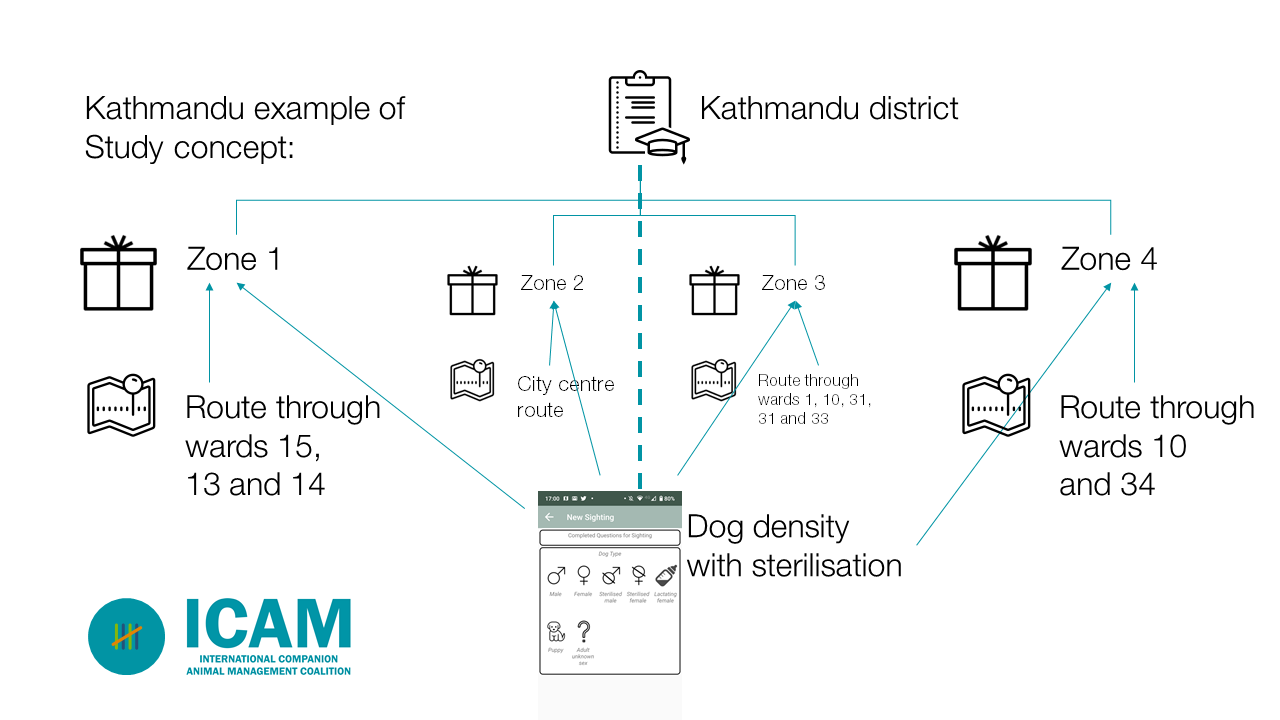
2.11.How to send observers where and what they should survey. Study and Packages
Once you have a Template and a Sandbox imported into your Talea Project, you can Package these up and send them out to your observers. But first you must create a Study in which all related Packages will live.
Each Study is associated with just one Template, but this Template can be used in many Sandboxes. Each combination of Template and Sandbox is called a Package, so a Study can include many Packages.
2.11.1.How to create a Study
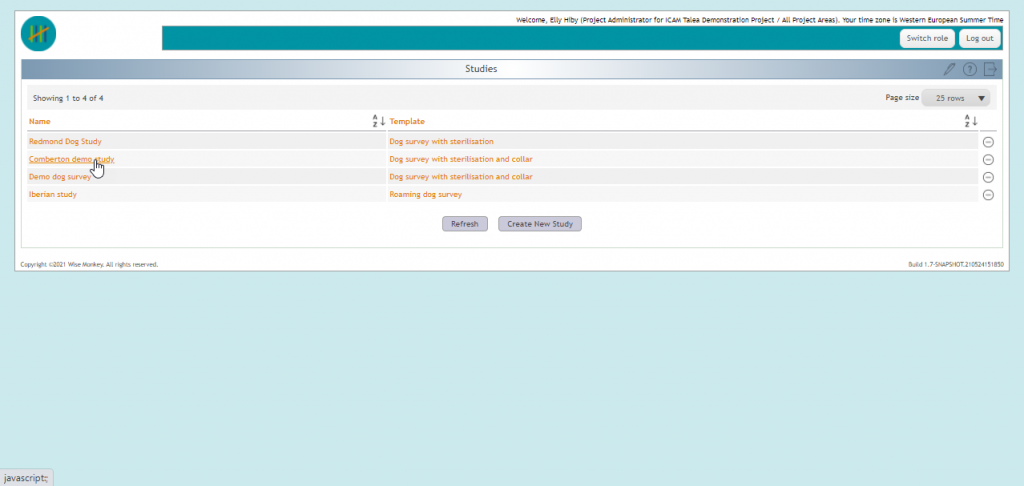
- Select Studies from the Dashboard
![]()
2. Select to Create New Study
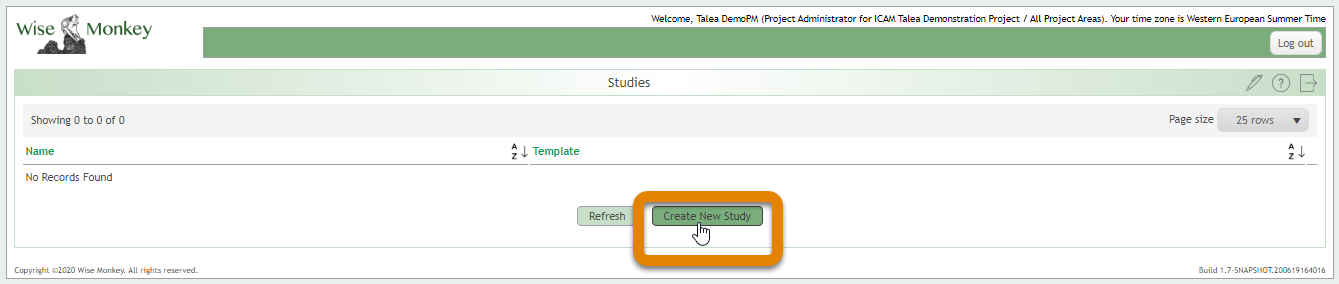
3. This opens the ‘Create New Study’ window with the following box and option to complete before clicking ‘Save’:

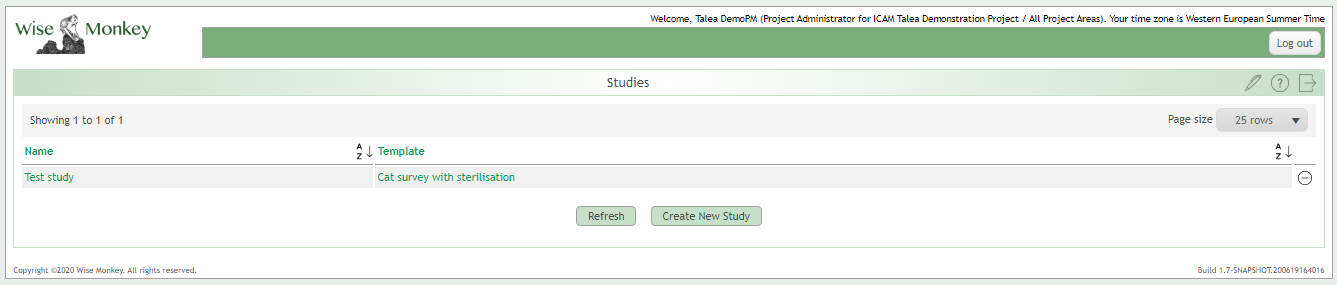
4. This adds the Study to the Studies list
2.11.2.How to create and send a Package to observers
- Select Packages from the Dashboard
![]()
- Select ‘Create New Survey Package’
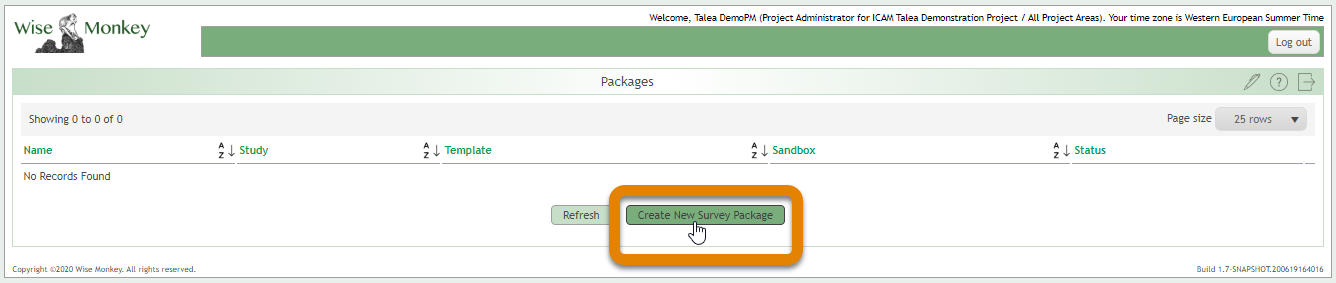
2. This opens ‘ window with the following boxes and options to complete before clicking ‘Save’:
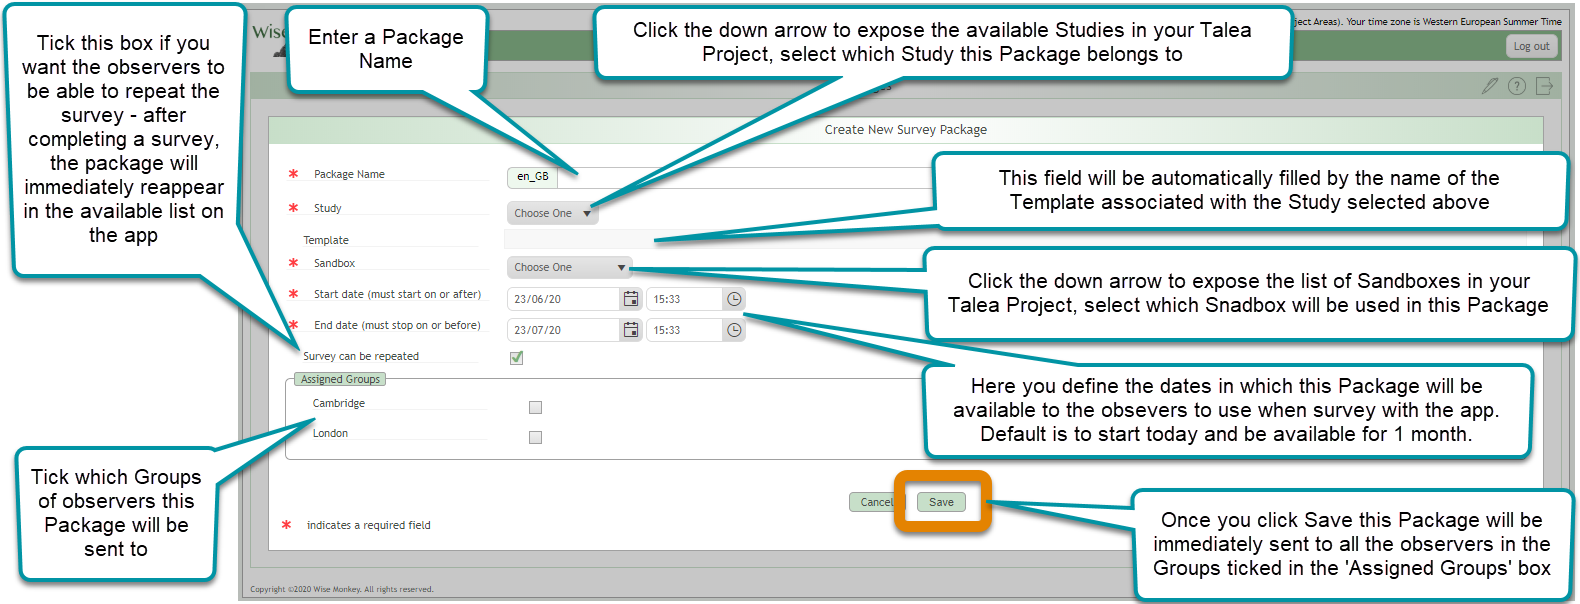
3. As soon as the Package is saved it will be sent to the observers belonging to the Group or Groups that were ticked in ‘Assigned Groups’ box, appearing in the ‘Available’ list in the app. It will also appear in the Packages list of your Talea Project.
2.12.How to recall a Package from the Talea app
You may want to remove a Package from your observers’ devices – perhaps because you have made changes to the Template since the Package was sent out and want to send out a new Package including this updated Template – note that any changes you make to a Template or Sandbox after a Package has been sent out will not update on the app, you need to send out a new Package for your observers to see these updates. You may also want to remove a Package because you no longer need that Sandbox to be surveyed. In Talea, the process of removing a Package from your observers’ devices is called a ‘recall’ and must be done from within the Talea website.
- Select Packages from the Dashboard
![]()
2. To recall a Package, select the curved ‘recall’ arrow. This Package will remain in your list but its Status will be ‘Recalled’ and it will be removed from your observers’ devices.

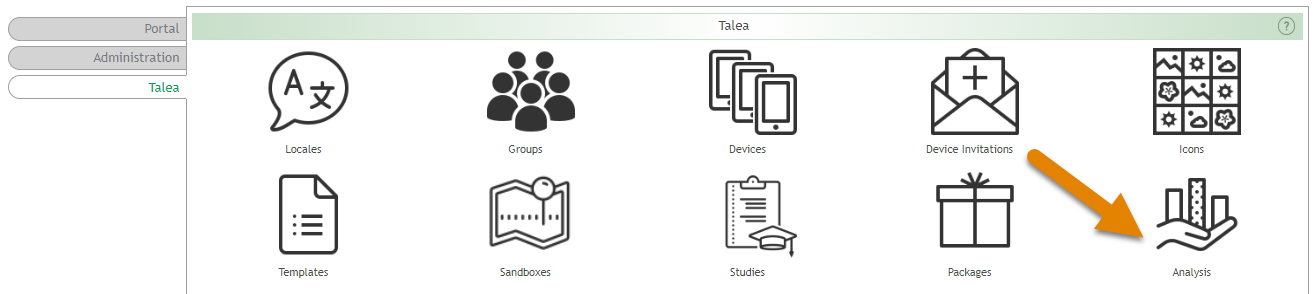
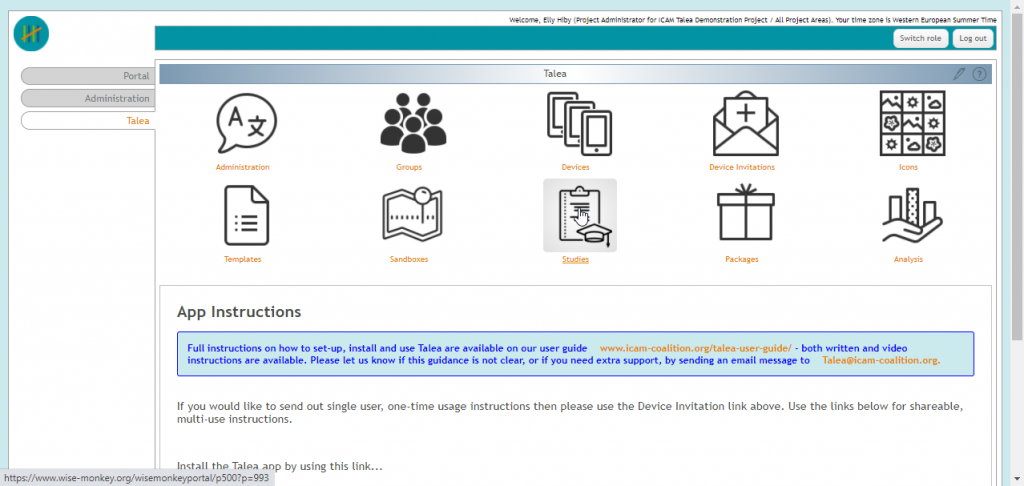
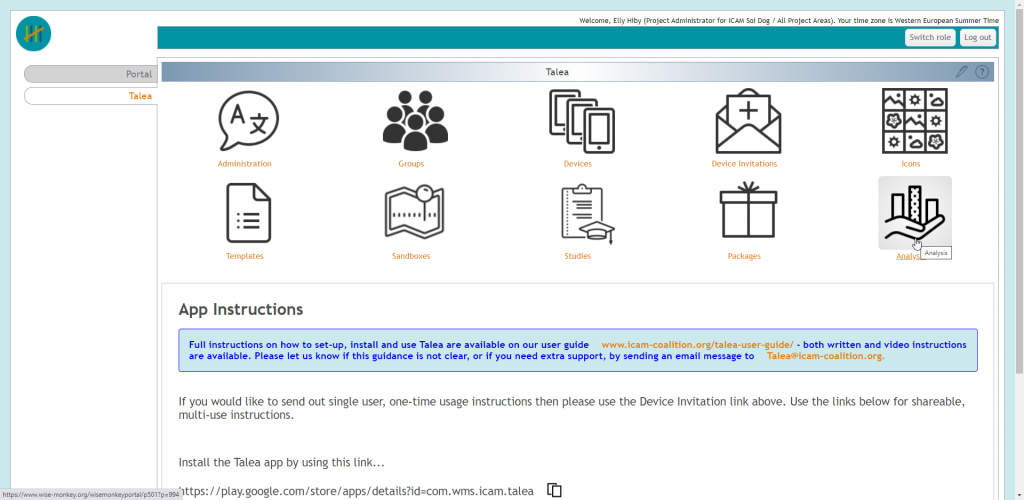
2.13.How to view and access data that has been collected. Analysis
As soon as your observers sync the Talea app on their Device, any completed surveys are uploaded to your Talea Project. To view these, use the Analysis function on the Dashboard.
- Select Analysis from the Dashboard
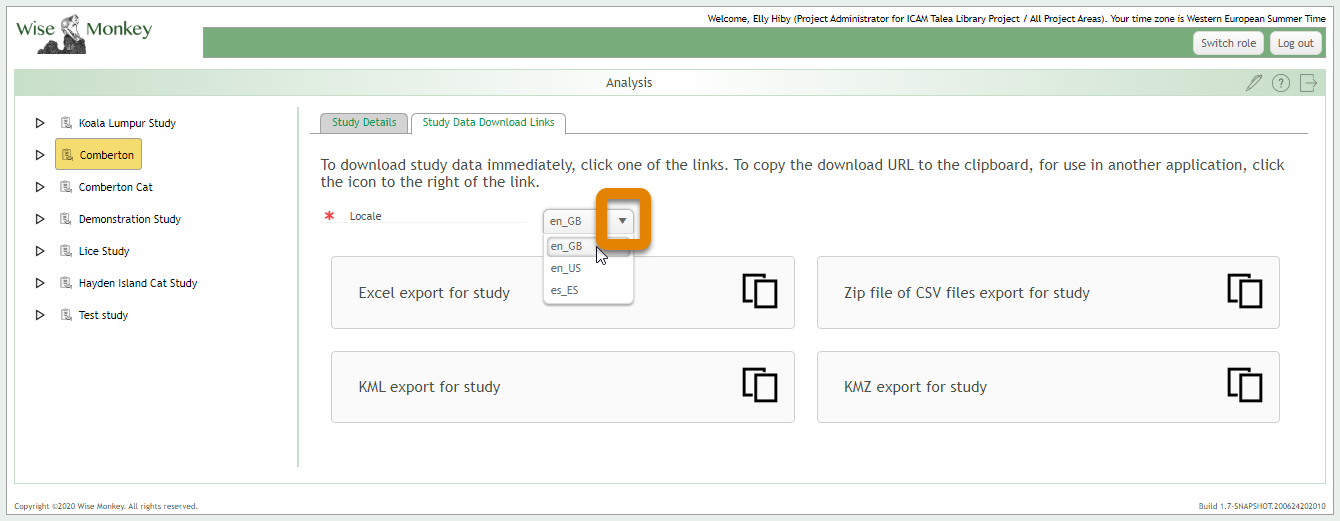
2. This opens the Analysis window where you will see all your Studies on the left. Click any Study name to open the ‘Study Details’ tab.

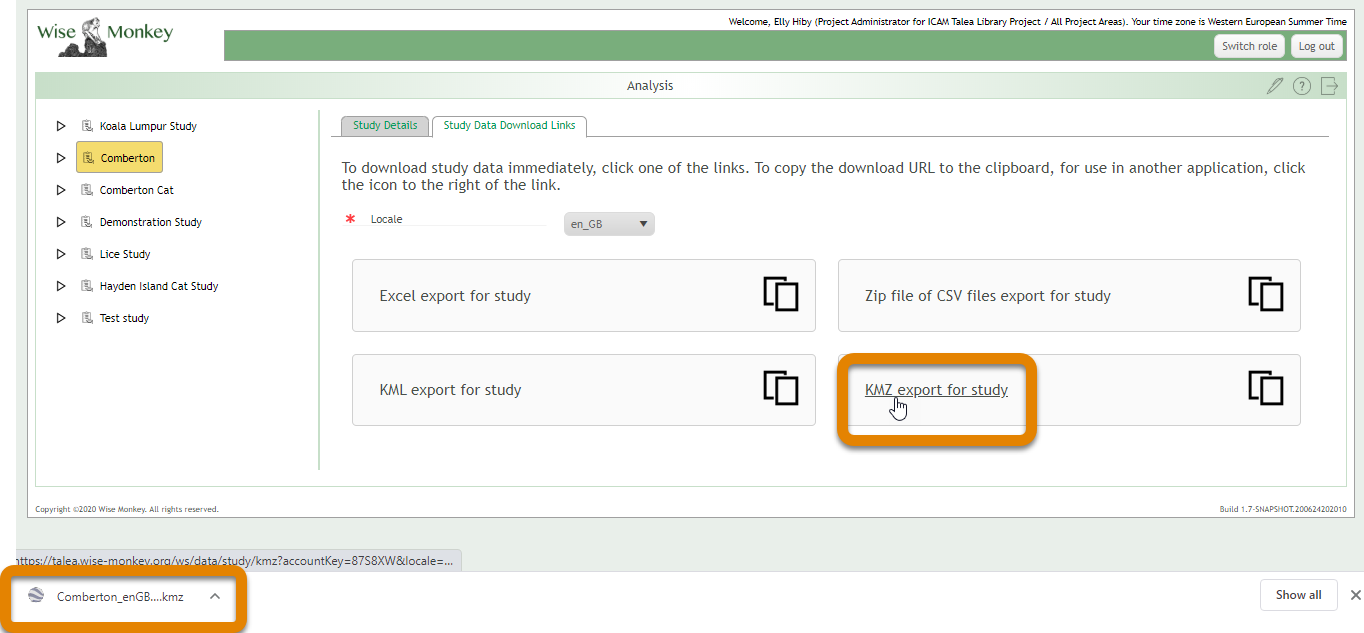
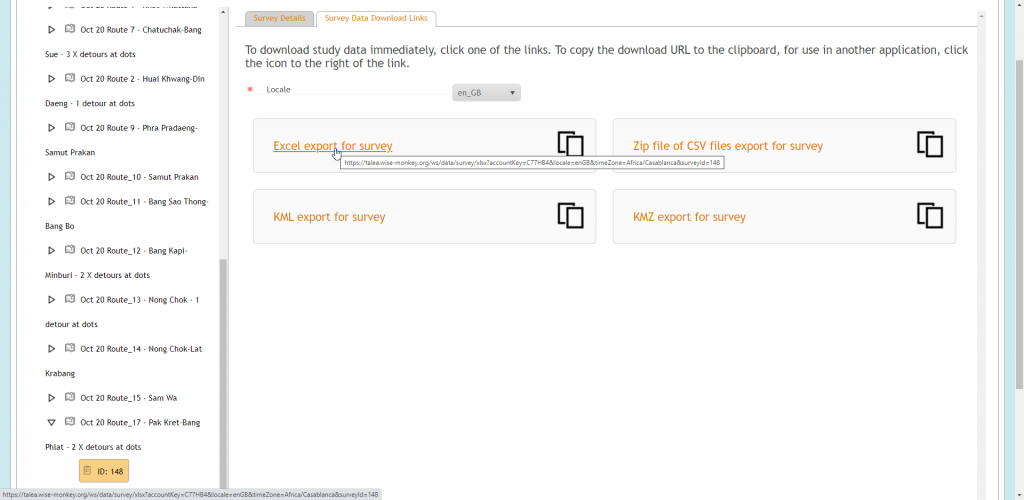
3. The ‘Study Data Download Links’ tab allows you to download the data for the whole study in different formats. Click the down arrow to change the language for the downloads, this will be British English as default.
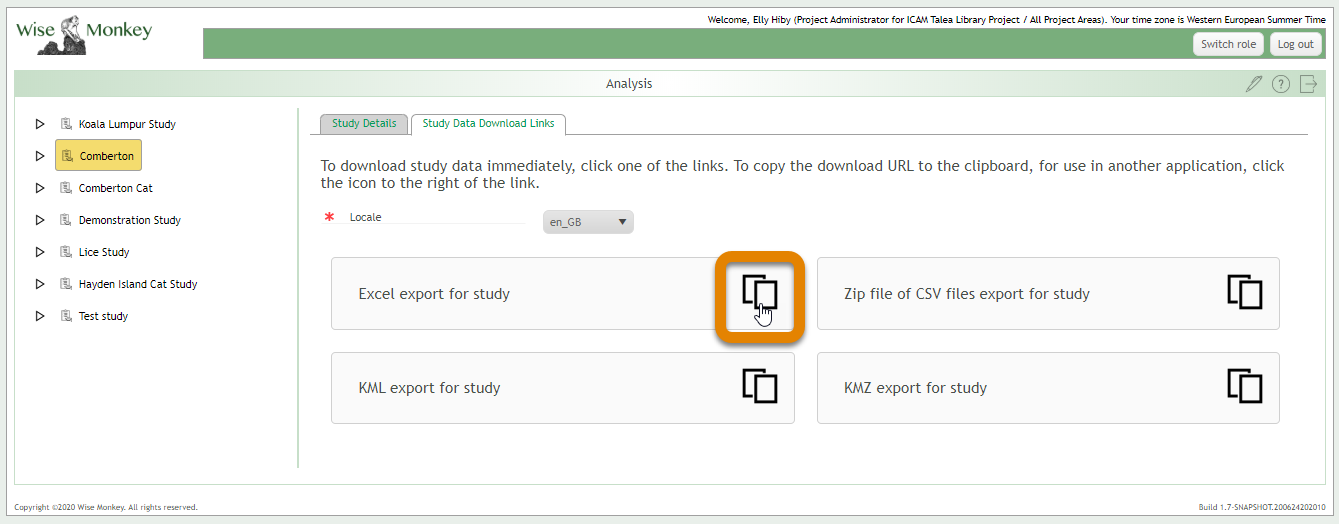
4. Clicking the copy icon copies the weblink to the data to your clipboard, this might be useful if you are using a program like R to analyse your data, as this program can access data from a weblink. This link is unique to your study and access the most recent dataset.
5. Alternatively, clicking the ‘Excel export for study’ title opens the data in Excel.
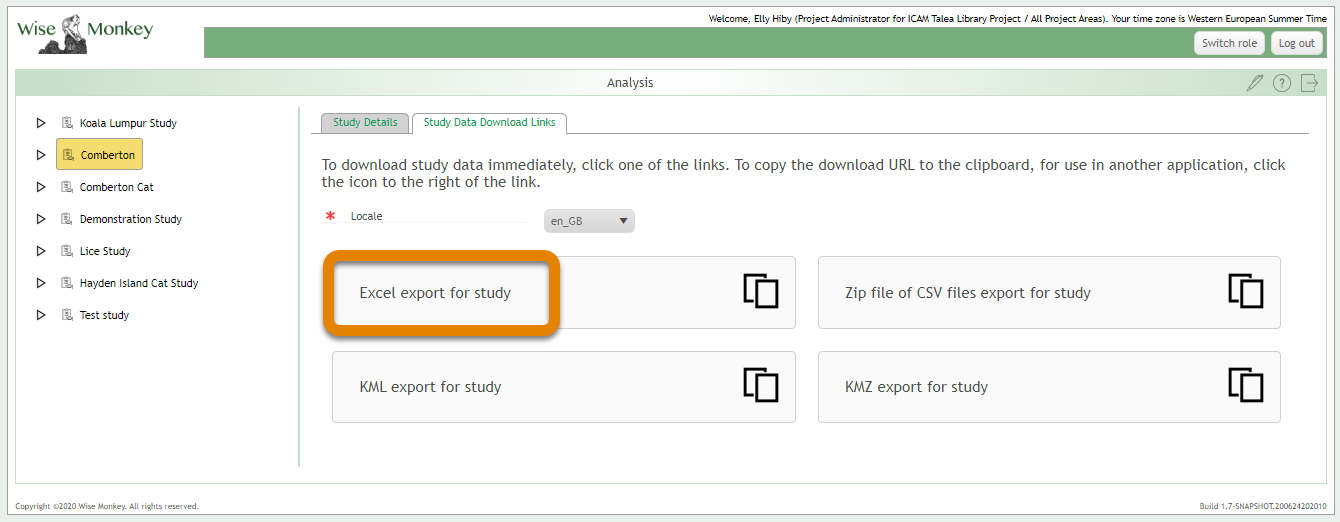
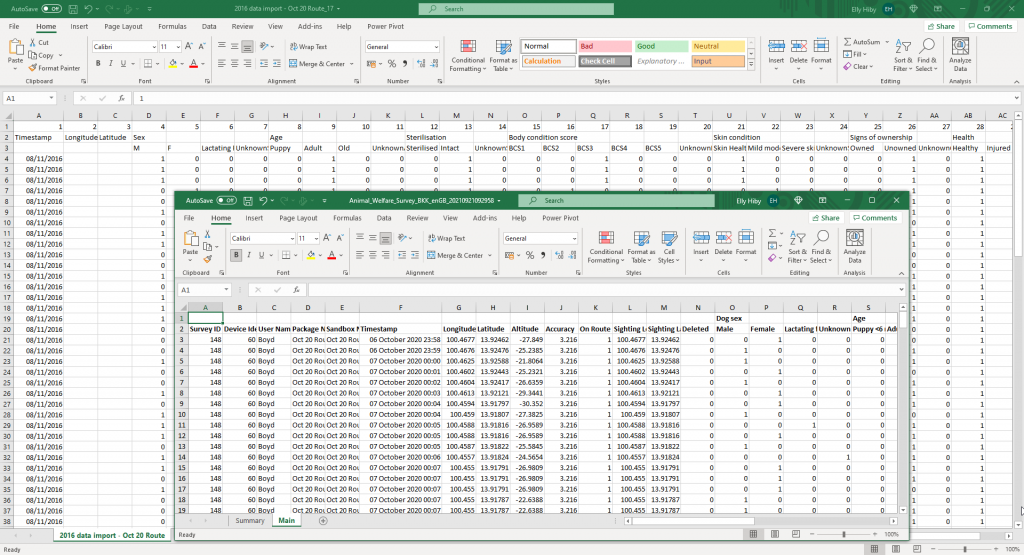
- The Study data is presented in 2 worksheets in the Excel file. The ‘Summary tab’ shows the data in one row per survey with any Summary Values in the final columns; see ‘How do I add summary statistics to my analysis’ for instructions on how to write the calculations that produce these Summary Values.
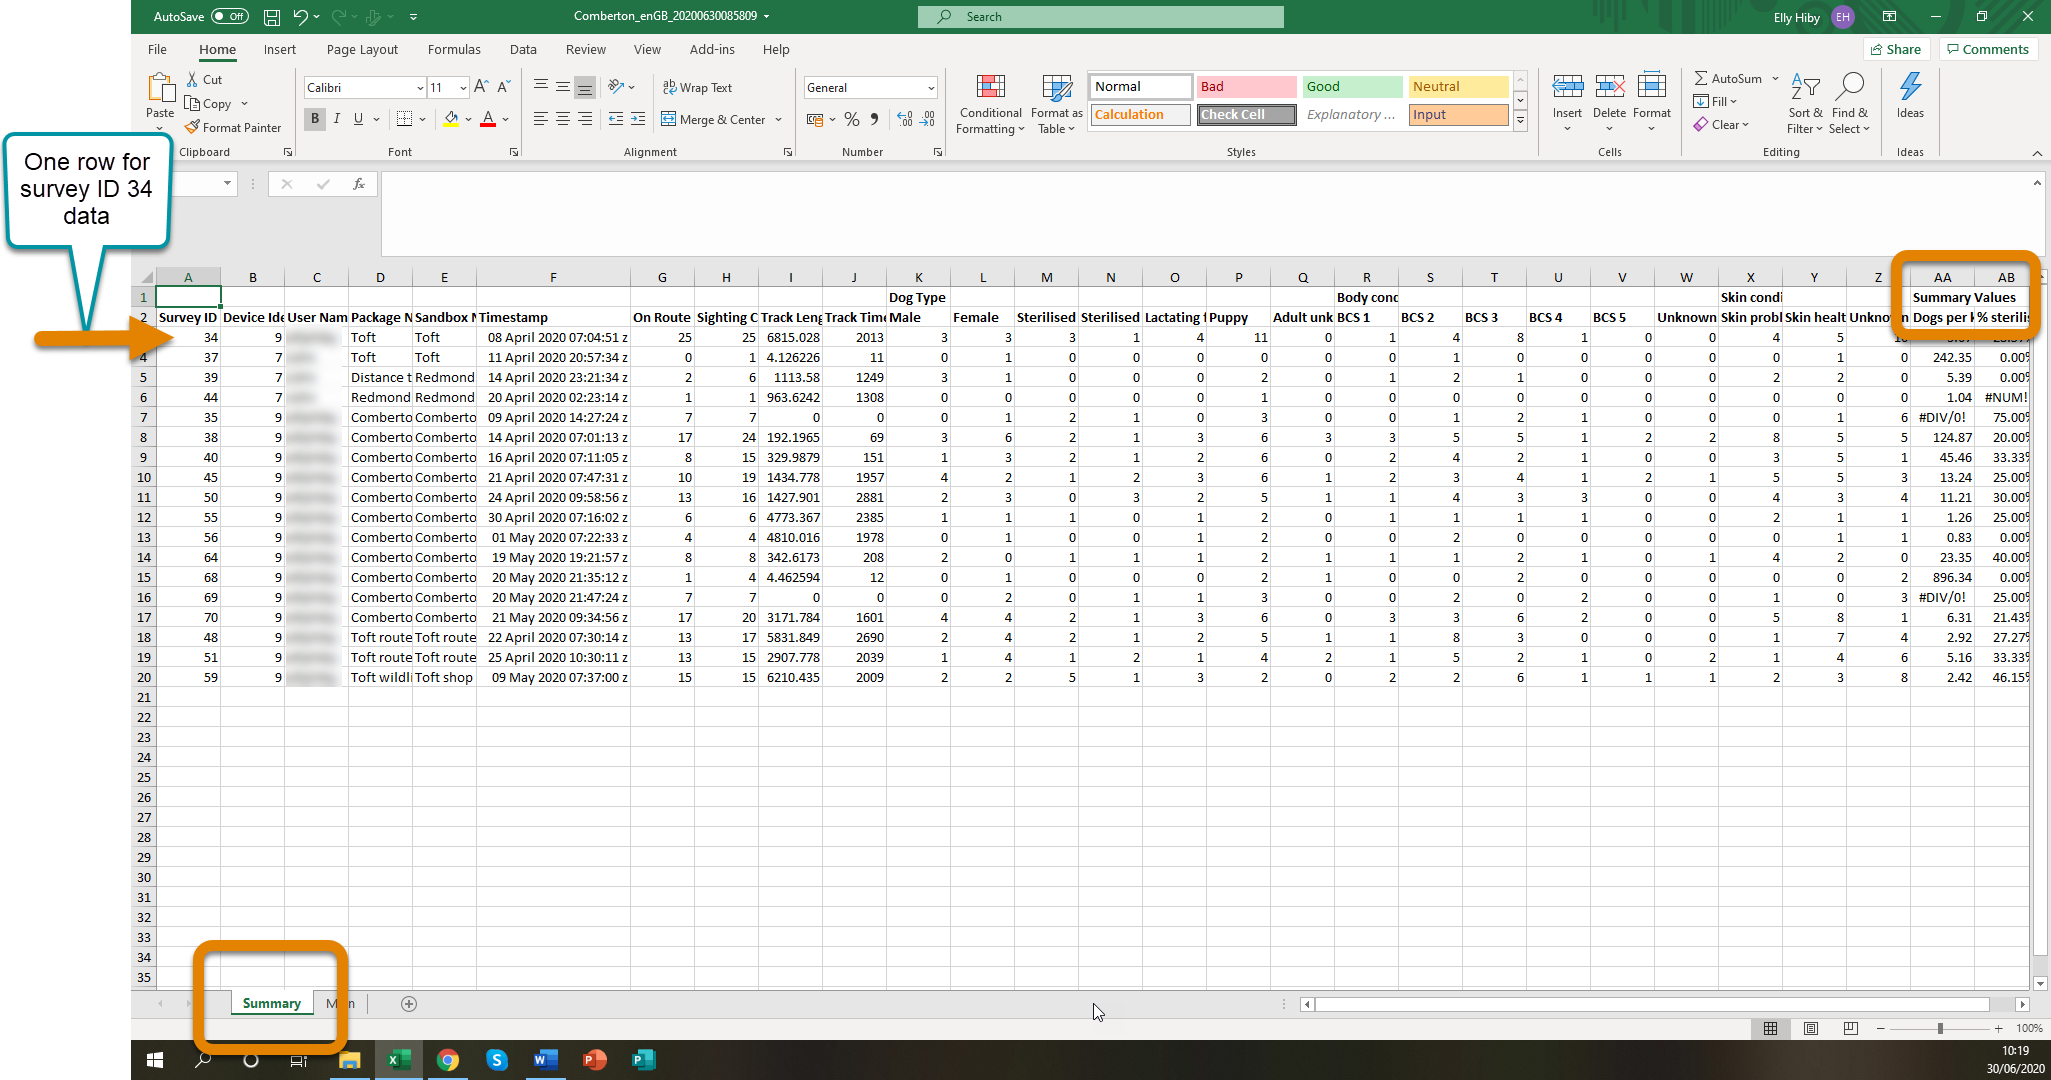
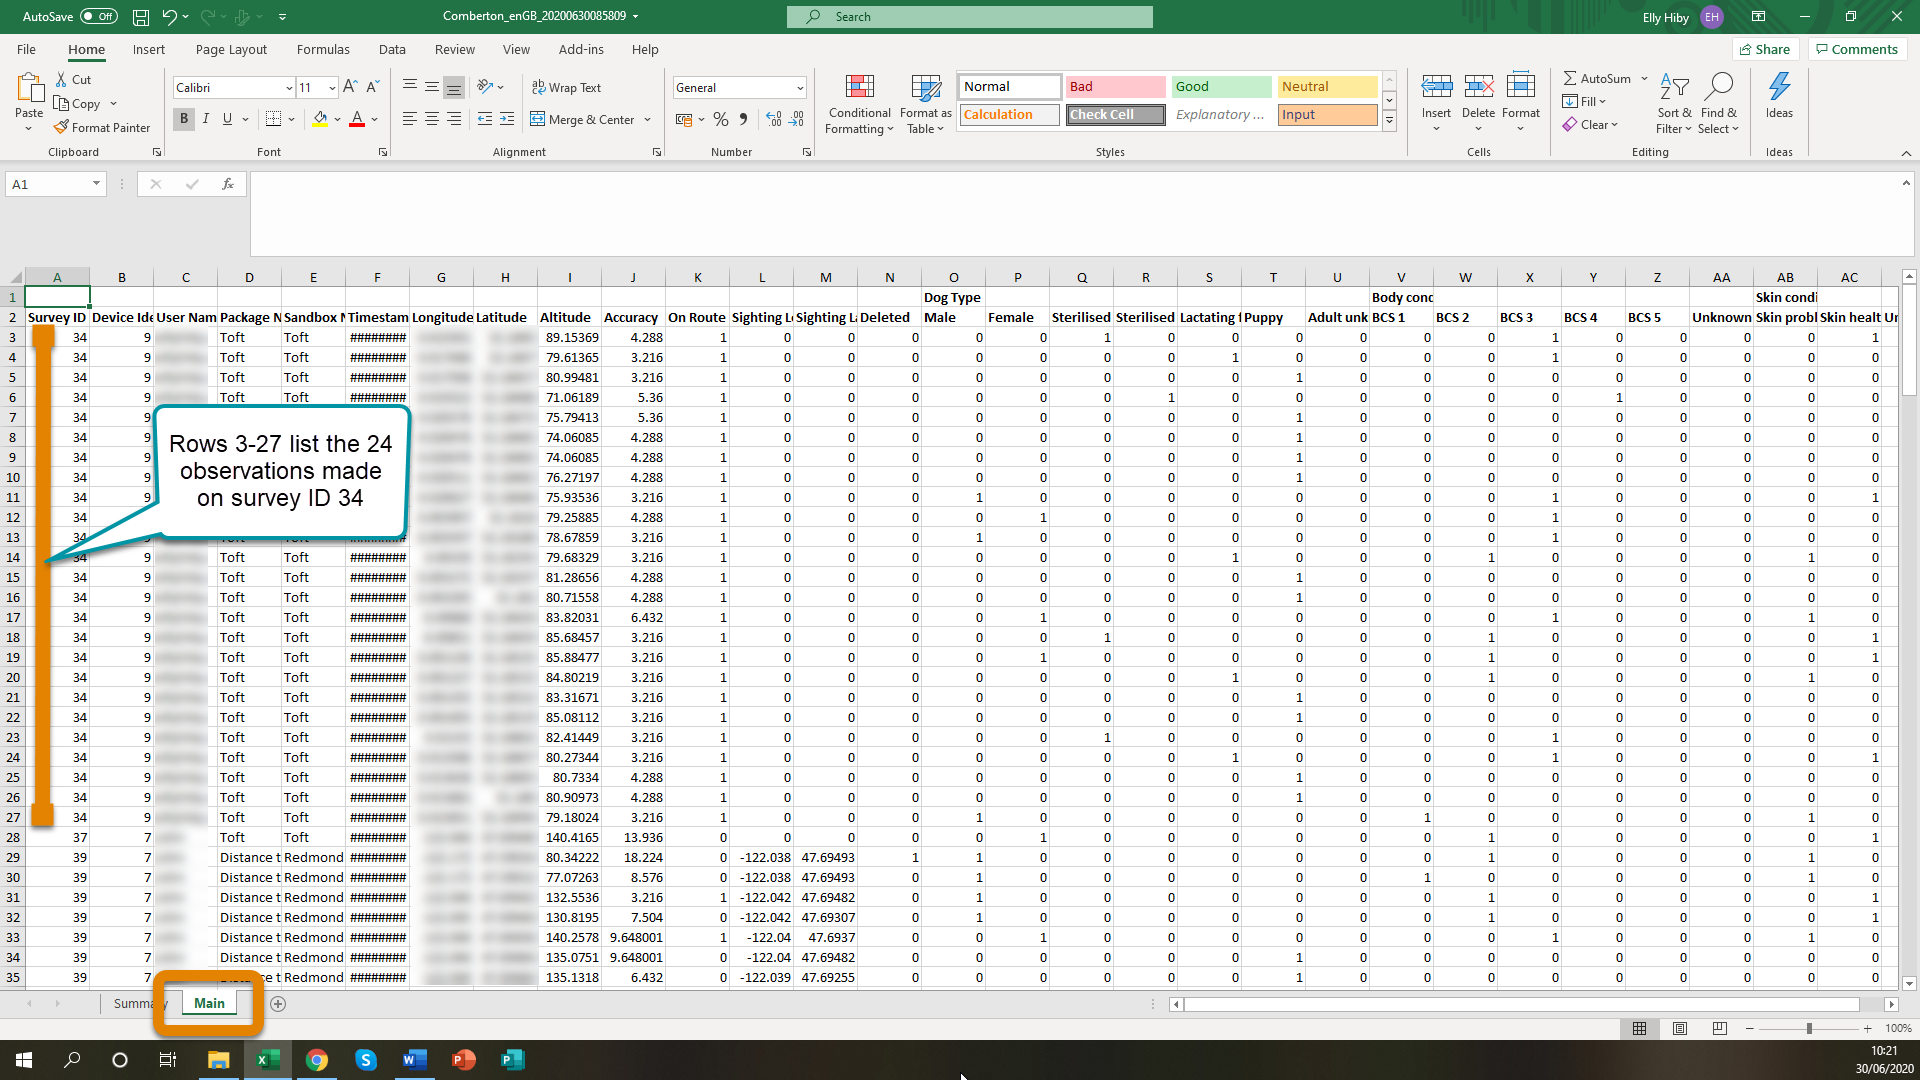
- The ‘Main’ tab shows the data in one row per observation.
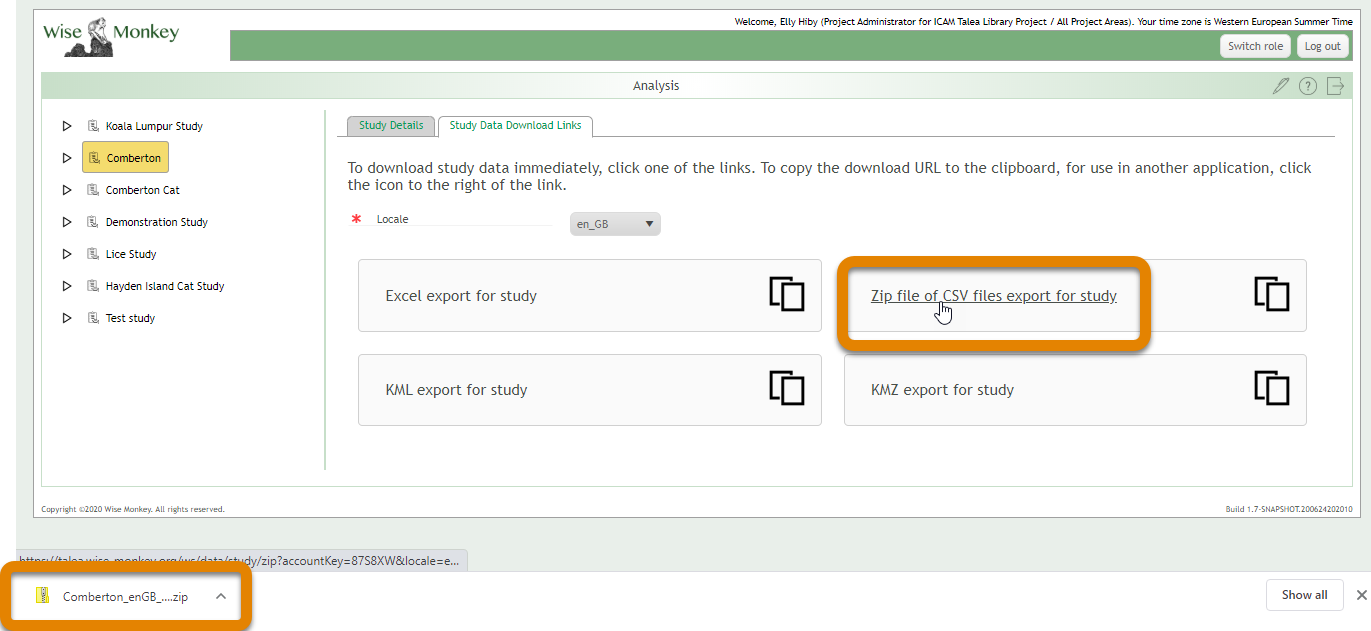
6. Clicking the ‘Zip file of CSV files export for study’ exports the data as a comma separated vales file in a Zip folder, which will appear in your Downloads folder. This csv file shows the data in one row per observation; the same format at the ‘Main’ worksheet of the Excel file.
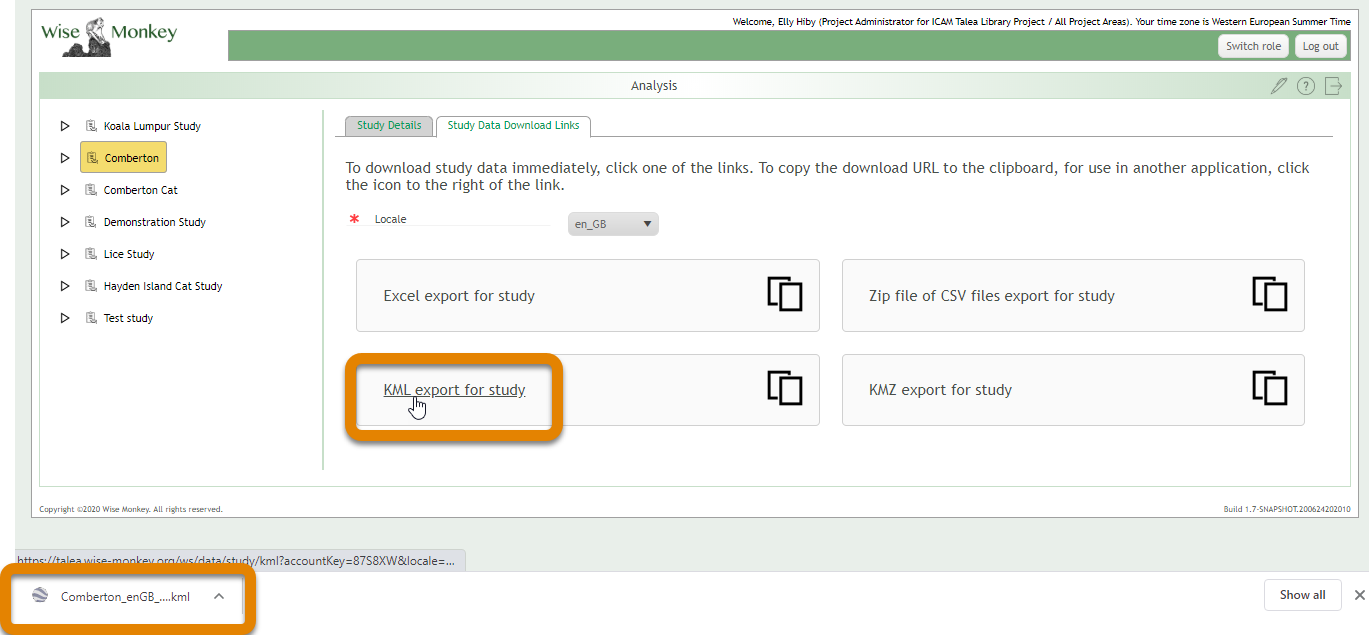
7. Clicking ‘KML export for study’ exports a single kml file comprised of just the tracks travelled on all surveys in the study, each survey is represented as a segment of the kml file. This kml file will appear in your downloads folder. It can be opened in Google Earth or in other mapping programs. Step 5 describes how you can also open each survey separately and export the track travelled as an individual kml just for that single survey.
8. Clicking ‘KMZ export for study’ exports a single kmz file, this includes the tracks, routes and sightings, separated into segments for each survey. This kmz file will appear in your downloads folder. It can be opened in Google Earth or in other mapping programs. Step 5 describes how you can also open each survey separately and export this data as an individual kmz just for that single survey.
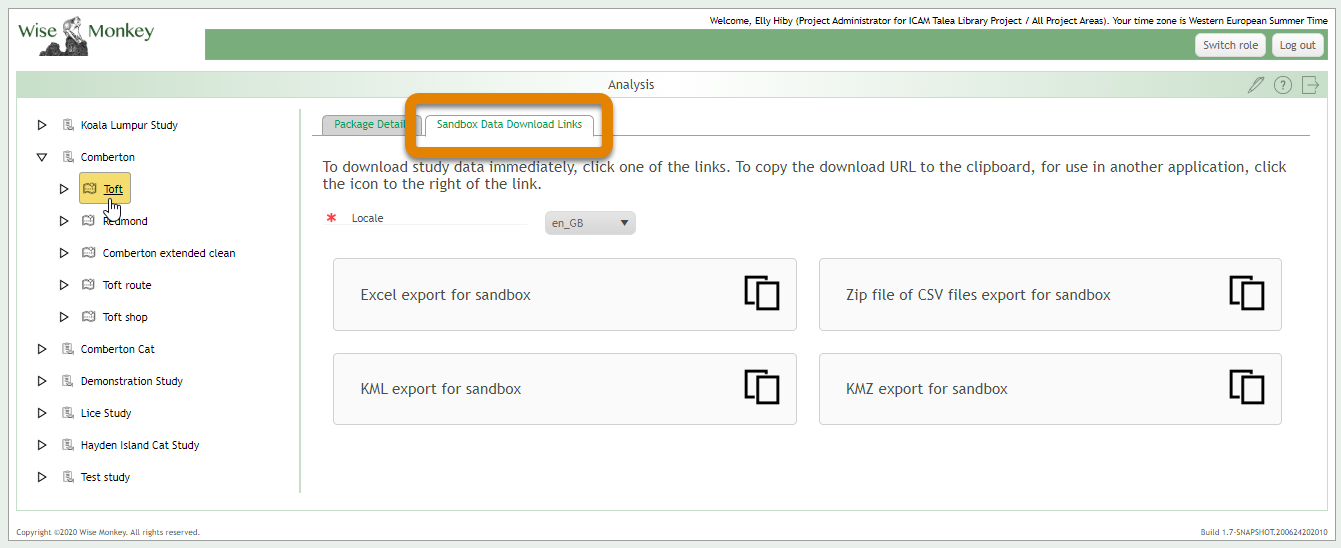
9. Clicking the arrow to the left of the Study name opens up the list of Sandboxes within that Study.
10. Click a Sandbox name to open up the ‘Sandbox Details’ tab where the Sandbox can be viewed in a map.

The ‘Sandbox Data Download Links’ provides the same 4 formats of data download, but restricted to only surveys completed within that Sandbox.
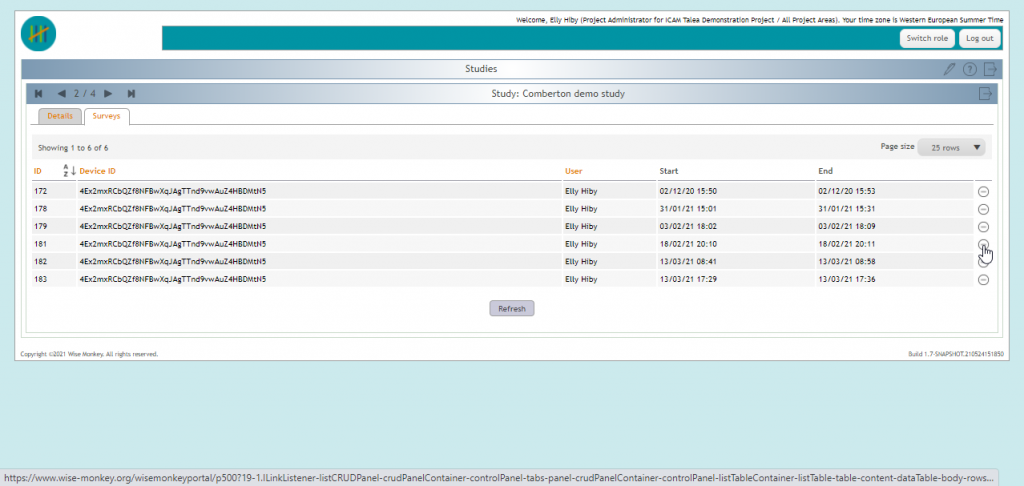
11. Clicking the arrow to the left of the Sandbox name opens up the surveys completed within that Sandbox.
12. Click a Survey name (surveys are named automatically with an ID number) to open up the ‘Survey Details’ tab where the survey details are listed and visible on a map. Adjust what is shown on the map by using the tick boxes in the ‘Layers’ menu to switch the route, track and sightings layers on and off.
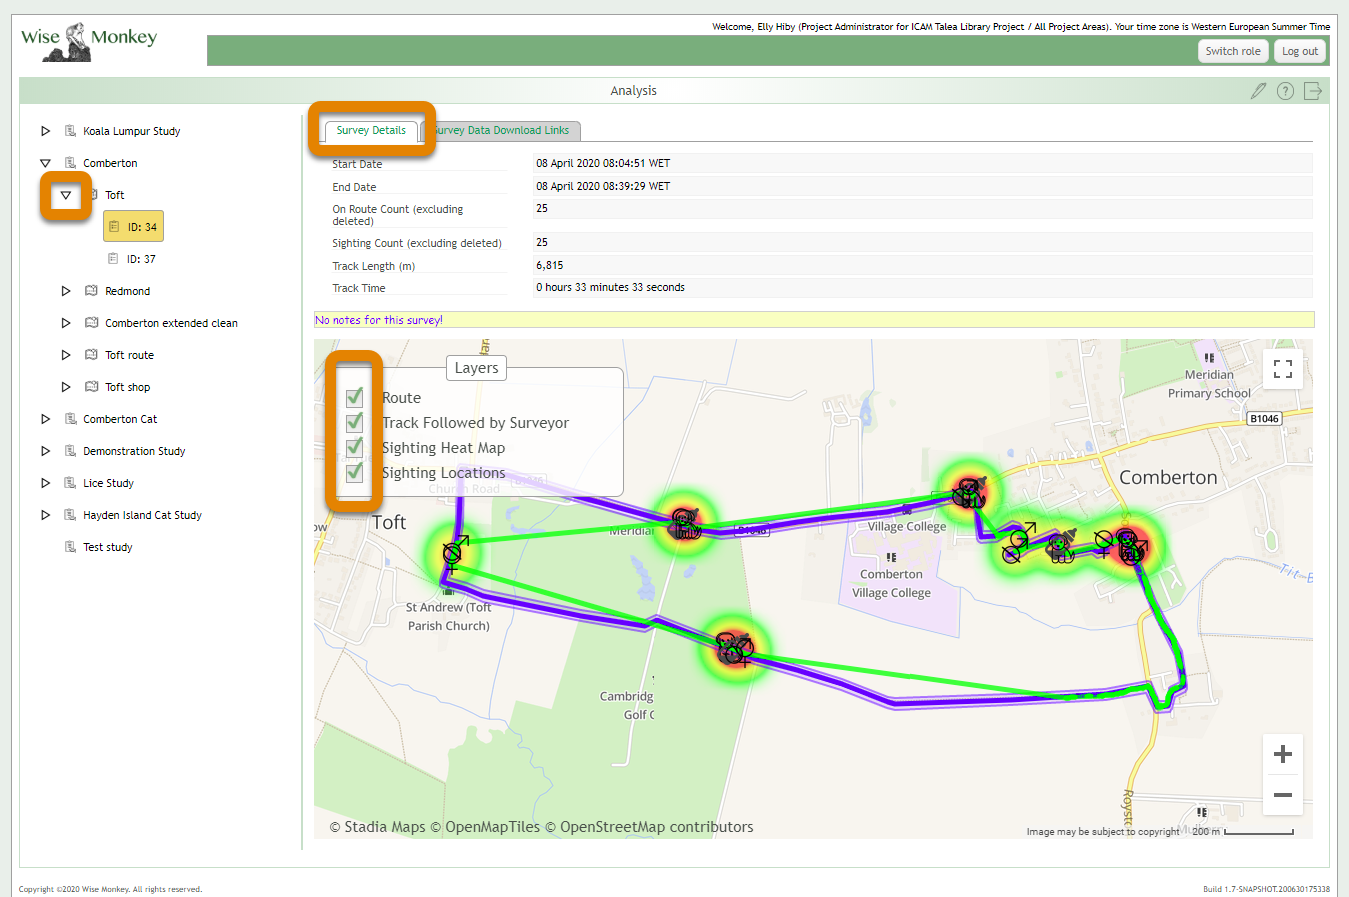
The ‘Survey Data Download Links’ tab provides the same 4 formats of data download, but restricted only to that survey.
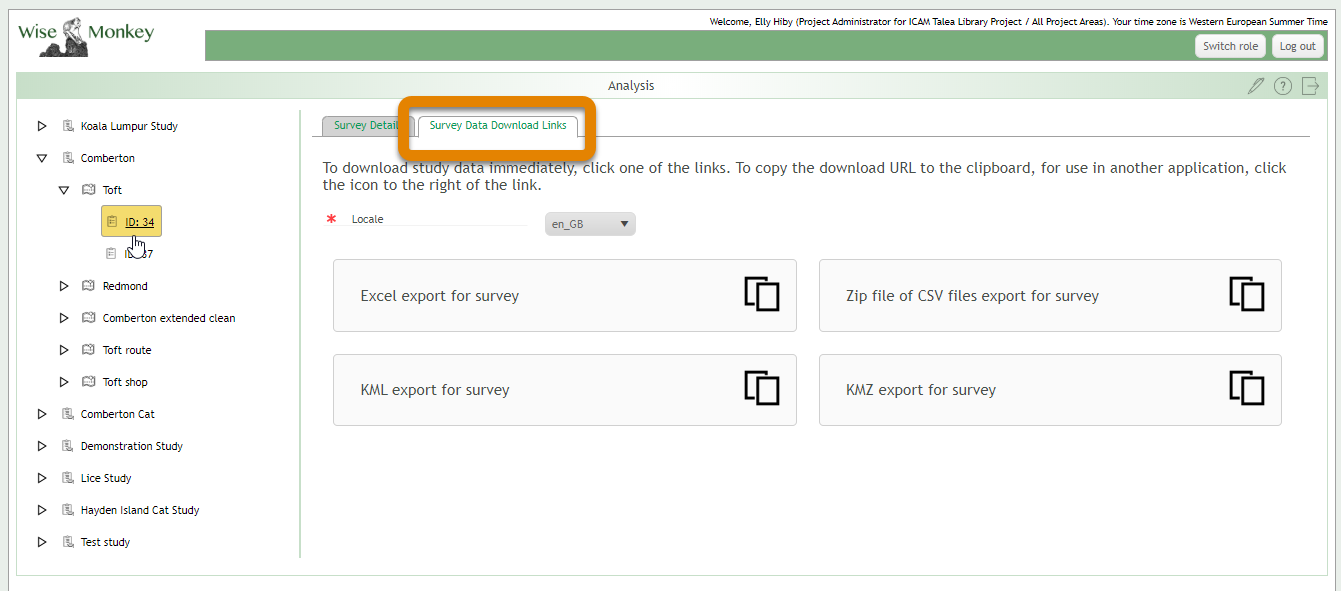
The ‘KML export for survey’ may be particularly useful in the development of a Sandbox. As described in ‘How do I show observers where to survey?’, you may want to allow your observers to design their own Sandbox. In this case, you develop a draft Sandbox in roughly the right area, your observers then run practice surveys until they are happy they have established a route they want to use for future surveying. You then open up the survey where they established this preferred route and download the kml of their track; Talea performs some smoothing of the track to remove any errors produced from inaccurate GPS coordinates. This kml can then be re-uploaded to your Talea Project as a new Sandbox and sent out as a new Package for future Surveys.
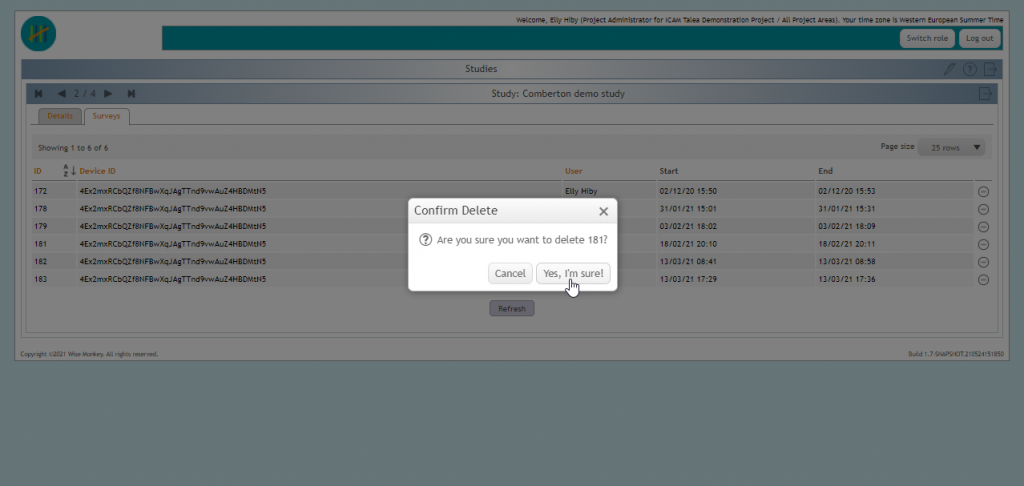
2.14.How to delete a survey from the dataset
You may have reason to want to delete a completed and submitted survey from your dataset, perhaps if you have been running test surveys or if a completed survey was submitted by accident. The following process will delete a survey from your project so that it will not appear in your dataset. However, this deletion is not permanent. If you do delete a survey by mistake, contact us on talea@icam-coalition.org so that we can recall this deleted survey from the archive for you.
- Open Studies from the dashboard.
- Select the Study that contains the survey you wish to delete.
- Open the Surveys tab. The survey IDs are shown on the left, and the date and time they were started and completed on the right. Make sure you have identified the correct survey, and then use the minus icon on the right to delete it.
- You will be asked to confirm if you want to continue with the deletion, clicking ‘Yes, I’m sure!’ will remove this survey from the project.
2.15.How to import external survey data to your Talea project. Import
You may have collected survey data external to the Talea system using a different survey tool. If this external survey data was collected from the same Sandbox and used the same questions and choices as your Template, you can import this data into your Talea project using Packages. Note, you need to have created a Package with this Sandbox and Template before you can import external data. If you recorded the track you followed during this survey as a kml file, this can also be imported along with the data. After data import is complete, when you open Analysis from the Dashboard, it will display and download all your data, including the imported data, under the same Sandbox. You will need to prepare your import data to match the column layout used by Talea.
- Select Analysis from the Dashboard.
- Open the Sandbox or one of the surveys collected using Talea within this Sandbox.
- Open the Data Download Links tab and click ‘Excel export for sandbox’.
- Look carefully at the ‘Main’ worksheet of this data file, as you will need to format your import data to match.
- The first 5 columns are created on import and should not be in your data import file – “Survey ID”, “Device Identity”, “User Name”, “Package Name” and “Sandbox Name”.
- Your data import file needs to start at the “Timestamp” column and then match up across the following “Longitude” and “Latitude” columns. This is the longitude and latitude of the observer location when the sighting was made.
- The next 3 columns should not be included in your data import file – “Altitude”, “Accuracy” and “On Route”
- The next 2 columns are the “Sighting longitude” and “Sighting Latitude” of the sighted animal, rather than the observer, and should only be in your data import file if your Sandbox has been set up to require a sighting location (indicated on the Talea app by using a long press before entering the sighting details).
- The next column “Deleted” should not be included in your data import file, these are sightings that were recorded and then deleted in Talea app.
- All the following columns must be in your data import – these are the questions and choices selected for each sighting.

- Your import data file should be formatted as follows:
- You can have any number of header rows, and the header text does not have to match exactly the headers in the Talea downloads. You will tell Talea when you set-up the export how many rows to skip before the actual data starts.
- You need a row for each sighting, with each choice indicated with a 0/1, False/True, F/T, yes/no or Y/N. If the cell is blank, Talea will assume it is false for that choice.
- For your Timestamp column you can use whatever date and time format you like, but you will need to tell Talea what this format is using date and time pattern strings – you can find out which letters to use here – https://docs.oracle.com/javase/8/docs/api/java/time/format/DateTimeFormatter.html. For example 28/10/2016 06:10 is in the format dd/MM/yyyy HH:mm
- You import data must be saved as a comma separated values file (.csv). The following is an example of a data import file and, in front, the matching Talea output file from the same Sandbox.
- Now you are ready to run the data import.
6. Select Packages from the Dashboard.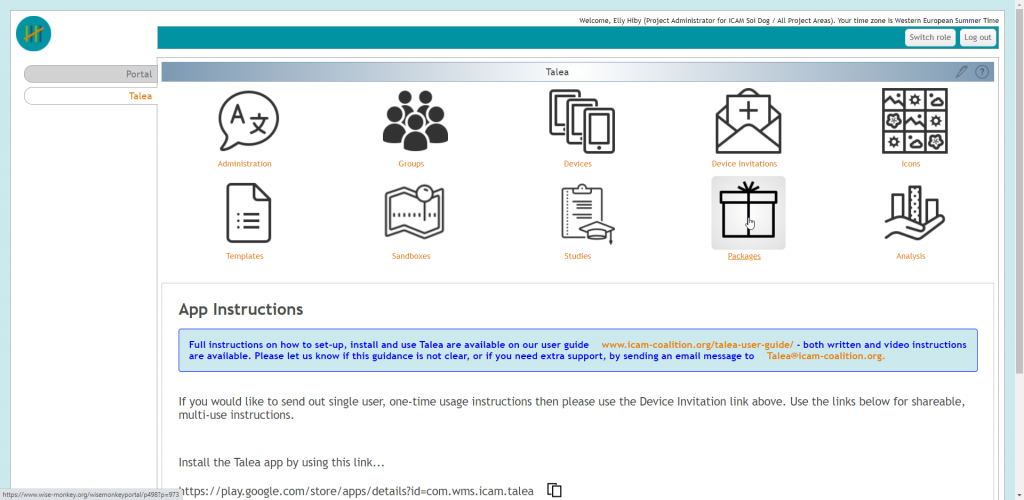
7. Find the Package with the Sandbox and Template that matches the data you have to import.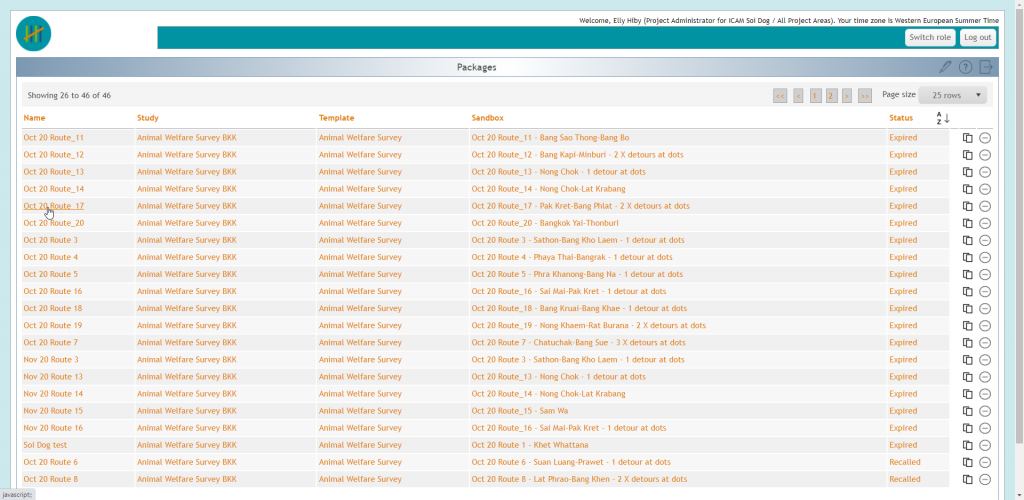
8. Open the Package, you should be able to see all the surveys collected under that package in the ‘Surveys’ tab.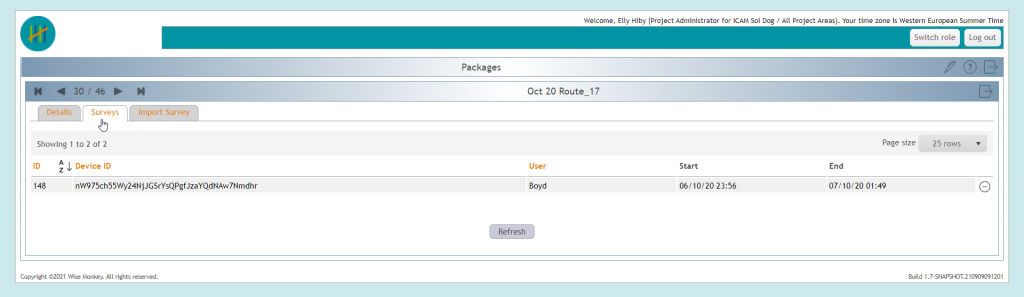
9. Open the ‘Import Survey’ tab and complete this form.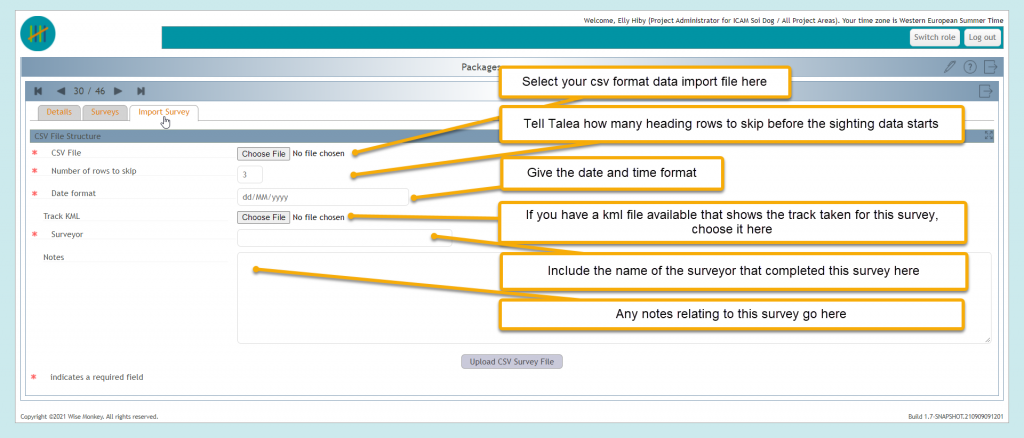
10. When you have finished click ‘Upload CSV Survey File’.
11. You should see a progress log, that will finish with ‘Completed survey import’. Click ‘Close’.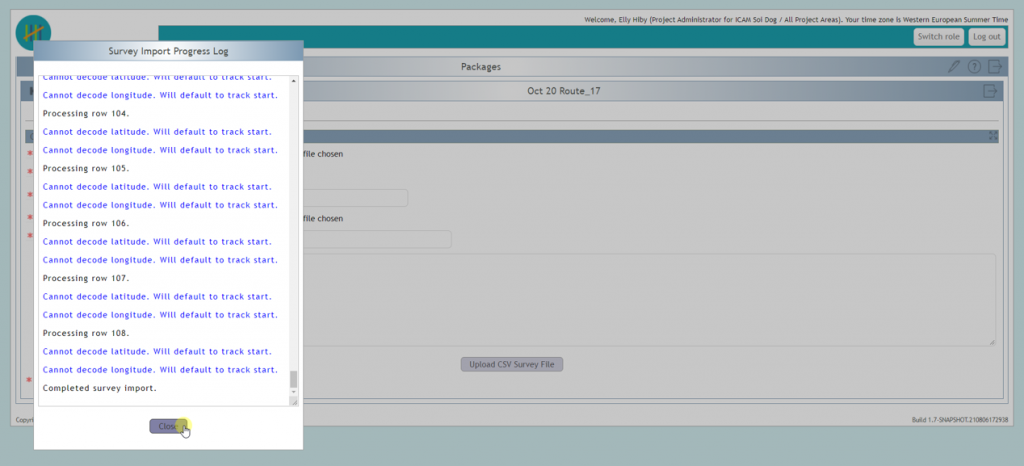
12. Now when you open the same Package, you will be able to see this newly imported survey under the ‘Surveys’ tab.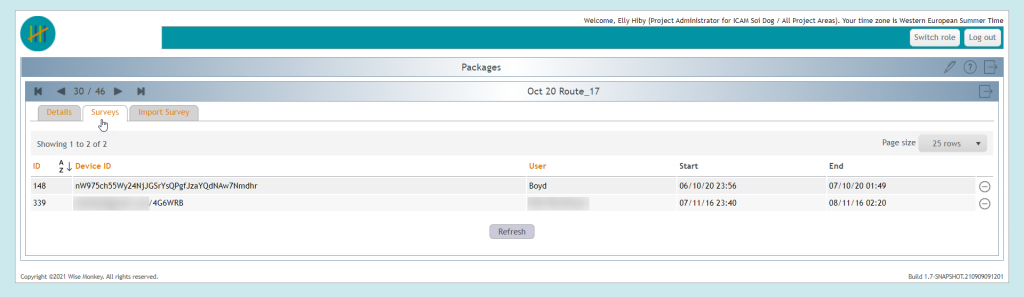
13. When you open Analysis from the Dashboard, you will be able to see this new survey nested under the Sandbox. You will also be able to view the details of this survey in the ‘Survey Details’ tab. Any data downloads from Talea web will now include this imported survey as well as data collected using Talea app.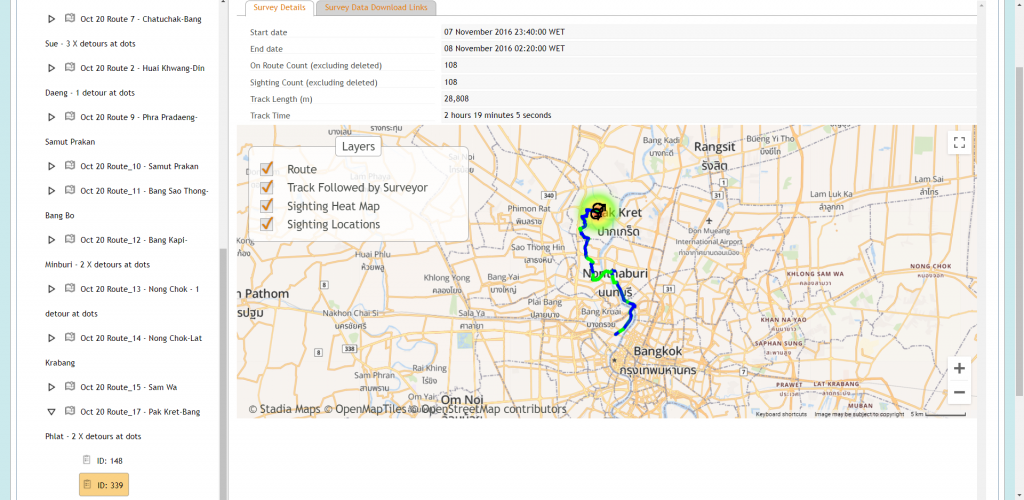
3.How to use Talea app: Android
3.1.How to install Talea app on your Device
- Your Survey Manager will send you a link to Talea in the Play Store (for Android devices, see section 4 of user guide for iPhones) and a Talea Registration token that is unique to your Talea project. Click the first link to open Talea in Google Play Store. Or you can follow this link to find Talea app in the Play Store https://play.google.com/store/apps/details?id=com.wms.icam.talea.
- Click to install Talea app to your Device.

- Once Talea is installed, open Talea app.
- Talea app opens in a registration window.
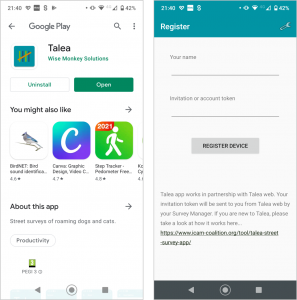
- Now include your name and the Registration Token sent to you by your Survey Manager, then tap ‘REGISTER DEVICE’.
- This completes the registration process and opens Talea app. Tap the curved arrows to sync with the Talea Project and receive into your AVAILABLE tab any Packages you have been sent.

3.2.App settings
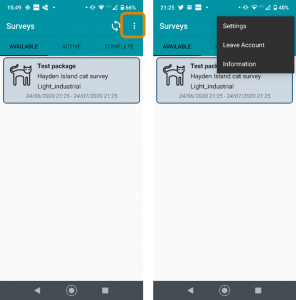
- Talea comes with default settings, to change from these defaults, open the 3 vertical dots menu in the top right of the screen
- Select ‘Settings’ from the menu
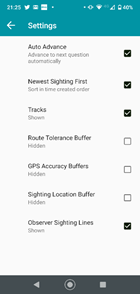
- The default settings are shown in the image. Any of these can be changed to the opposite setting by ticking/unticking the tick box.
-
- Auto Advance: Moves to the next question automatically as soon as a choice is selected. When unticked you must tap ‘Next question’ to move on after a choice has been made – this is default for a multiple-choice question.
- Newest Sighting First: In list view, the most recent sighting will be at the top of the list. When unticked the sightings will be order with oldest sighting first.
- Tracks: Your track will be shown as well as the Sandbox, in green when you are within the route tolerance buffer and red when outside. When unticked no track will be shown.
- Route Tolerance Buffer: Not visible by default. When ticked a translucent blue area will be visible around the route to indicate the extent of the tolerance buffer set when the Sandbox was created.
- Route flags: Visible by default. There will be a green flag at the start of your route and a chequered flag at the end. If the kml file that defines your route includes sections, these will be shown by green and red dots for the start end end. When ticked the route flags will be hidden.
- GPS Accuracy Buffers: Not visible by default. When ticked translucent circles will be visible around your GPS location showing the degree of accuracy, the bigger the circle the lower the accuracy of the GPS coordinates.
- Sighting location buffer: Not visible by default. When ticked a red translucent area will be visible around the route to indicate the extent of the maximum sighting distance set when the Sandbox was created.
- Observer sighting lines: A black line between the sighting location and the observer location is drawn when a sighting is recorded. When unticked this is not visible.
3.3.How to start and pause the survey
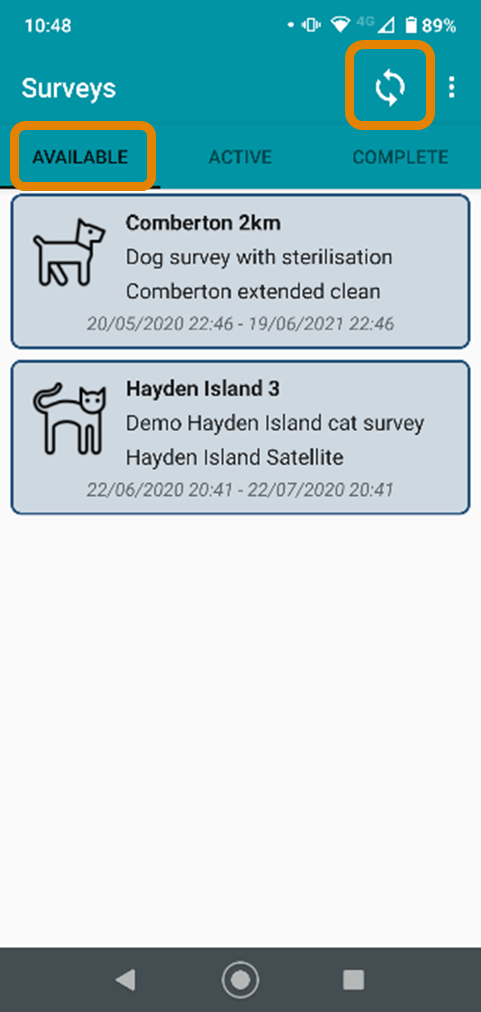
- Tap the curved arrows to sync the app with the Talea web. This will activate any pending app updates or Packages waiting to arrive.
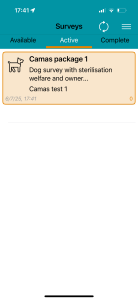
- When you open the Talea app there will be 3 tabs visible: ‘AVAILABLE’, ‘ACTIVE’ and ‘COMPLETE’. The ‘AVAILABLE’ tab includes one or more blue boxes, each box is a Package you can use for surveying. The information displayed in the box is the Package name, Template, Sandbox and the time and date the Package was sent.
- Tap on the Package you wish to use.
- The background map tiles for navigating the Sandbox will now start downloading to the Device. This first download will require internet access so you may wish to be connected to WiFi at this point. Once downloaded, the map tiles will be available for 90 days on the Device before automatically expiring, during this time you will be able to survey using this Package offline, including navigating the Sandbox.
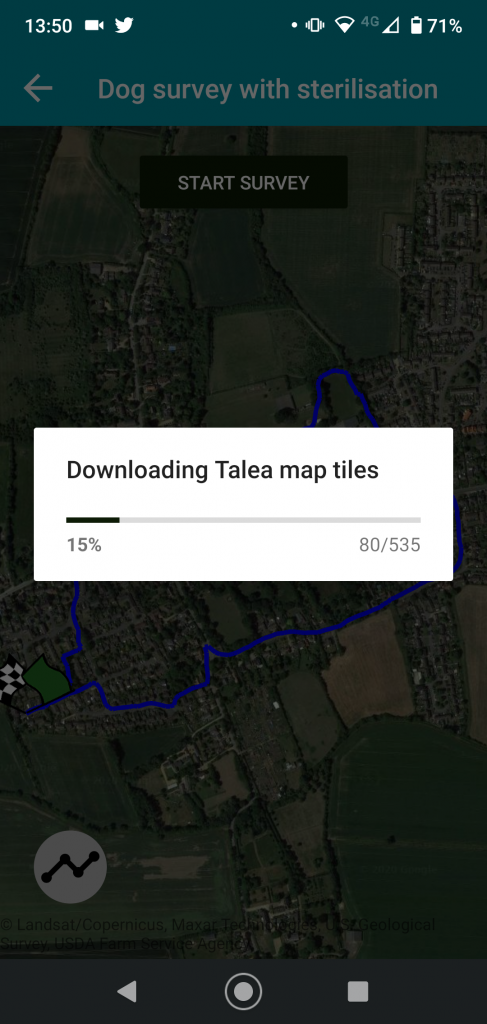
- If you do not need to survey offline, tap anywhere on the screen to stop the download, you will be asked to confirm whether you want to ‘Cancel map download’. You will now require data roaming to view the background map tiles as you navigate.
- Once tile downloading is complete the ‘Downloading tiles’ window will close, exposing the ‘START SURVEY’ box.
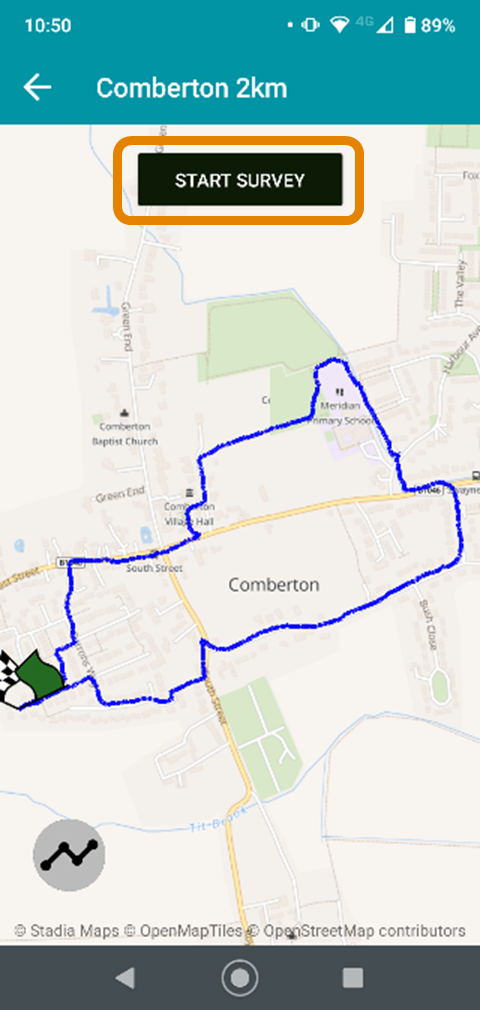
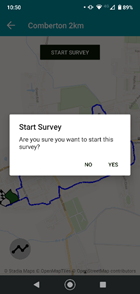
- Tap ‘START SURVEY’ when you are at your Sandbox and ready to begin surveying. You will be asked to confirm if you want to start the survey now.
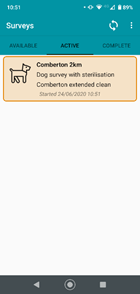
- The Package will now move to an orange box in the ‘ACTIVE’ tab. Tap the Package to open it.
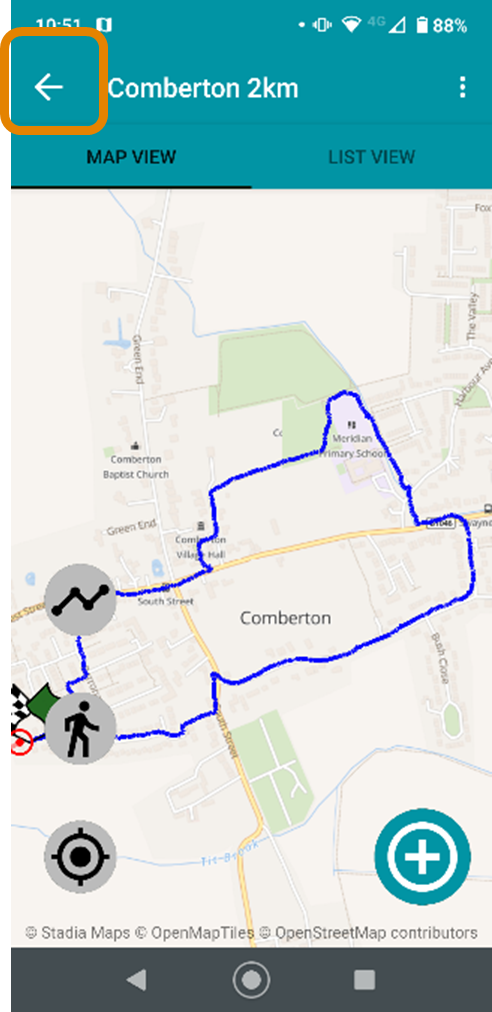
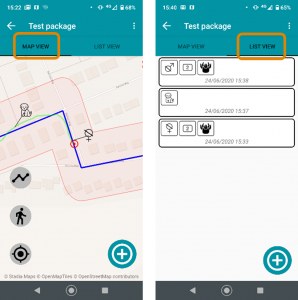
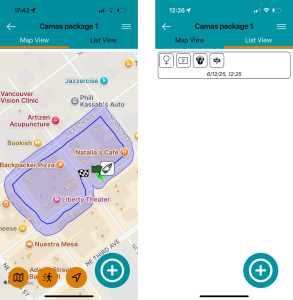
- The survey is now active, your start time and track is being recorded. There are 2 ways of viewing your active survey, the ‘MAP VIEW’ tab and ‘LIST VIEW’ tab. ‘MAP VIEW’ shows the background map, your location and the survey route or area – any recorded sightings will also appear as the icons chosen in answer to the first question about each sighting. ‘LIST VIEW’ provides a list all recorded sightings.
- If you need to pause your survey, tap the back arrow, this brings you back to the ‘ACTIVE’ tab. Recording of your track and time spent surveying is now paused, track length and time spent survey in the Analysis will not include time spent in paused status.
- Tap the Package in the ‘ACTIVE’ tab to resume surveying, this reopens the survey in ‘MAP VIEW’.

3.4.How to navigate in the app
- MAP VIEW has 3 icons for navigation.
- Tapping the line and dots will zoom to view the extent of the entire Sandbox
- Tapping the walking figure will zoom to view the entire track travelled so far on this survey
- Tapping the current locator will zoom to centre on your current position
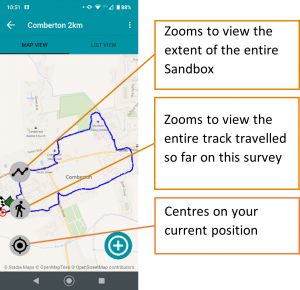
- You can also pan and zoom the map using finger pinch or the ‘–’ and ‘+’ icons which appear at the bottom of the map when you tap the screen.
- Your position appears as a red dot and circle.
- A route Sandbox appears as a blue line. A polygon Sandbox as a translucent blue box.
- Your track appears as a green line when you are within the valid distance from your Sandbox. This distance is set when you create your Sandbox in Talea web. Your track turns red when you are outside the valid distance.
- If your Sandbox was created to ‘Require sighting location selection’, the maximum sighting distance will be seen as a translucent red zone around your Sandbox.

3.5.How to add, edit and delete a sighting
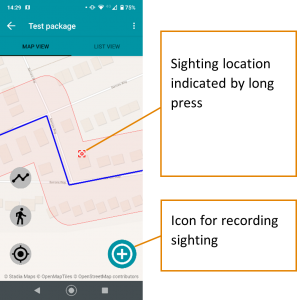
- If your Sandbox requires a sighting location to be selected on the map, long press on the exact location of the sighting on the map, until the red bounded circle appears. You can change the position by long pressing again, until you have the correct location identified. This stage is not used when your Sandbox is configured to record the sighting as the same as the observer position.
- To record a sighting, tap the circled “+” icon.
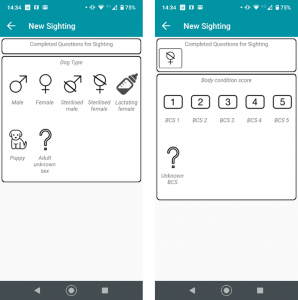
- This opens the questions to answer for the sighting. The questions are presented one at a time. The question name is written at the top, followed by all the choices indicated by their icon and choice name. Tap the correct choice for this sighting.
- From question 2 onwards, the answers to previous questions are shown at the top, the next question is presented in the box below. If you have made a mistake, you can tap the answers to previous questions to reopen that question and change choice, this removes any choices from subsequent questions which must then be re-entered.
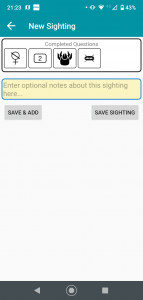
- Once all the questions have been answered, you have the option to add notes for this sighting, you can leave this box blank.
- You then have the option to either ‘SAVE&ADD’ or ‘SAVE SIGHTING’. SAVE&ADD allows you to add another sighting at the same location and starts at question 1 again for this next sighting. SAVE SIGHTING completes this sighting record and returns you to the MAP VIEW.
- Completed sightings are visible on the MAP VIEW, represented by the icon choices from the first question.
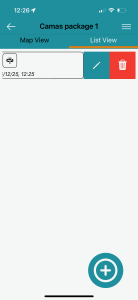
- LIST VIEW tab shows the recorded sightings in a list, the most recent at the top of the list.
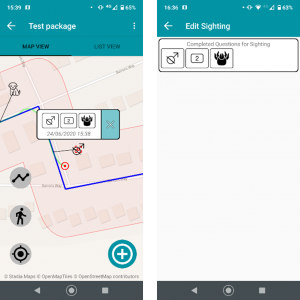
- To edit a previously saved sighting, tap on the sighting icon in MAP VIEW, this opens a window showing the choices selected for that sighting. Tap this window to reopen the questions relating to this sighting and tap any of the choices that you wish to change. This removes any choices from subsequent questions which must then be re-entered.
- In LIST VIEW a sighting can be selected for editing by tapping the sighting box in the list.
- Click ‘SAVE’ when you have completed your amendments.
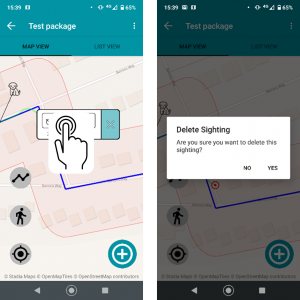
- To delete a previously saved sighting, tap on the sighting icon in MAP VIEW, this opens a window showing the choices selected for that sighting. Long press on the sighting box to request a deletion, you will be asked to confirm whether you want to go ahead with the deletion.
- The same can be done in LIST VIEW with a long press on any of the sighting boxes.
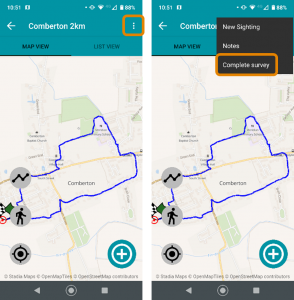
3.6.How to complete and send a survey to Talea Web
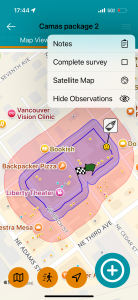
- Once you have completed the survey, open the menu.
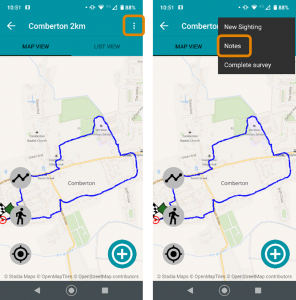
- Select notes to add any details about the survey that need to be recorded (this could include comments about the weather, the name of the observer and driver or difficulties with the route). Tap the disk icon to save the note.

- Select Complete survey to end the survey.
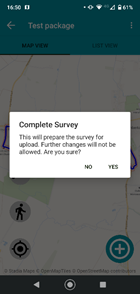
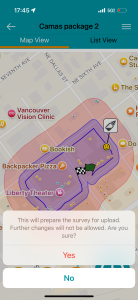
- You will be asked to confirm if you want to complete the survey as you cannot amend a survey once it has been completed.
- Once a survey has been completed it will appear in a green box within the COMPLETE tab. The survey data is saved on your device.
- To submit this survey to the Talea web Project you must tap the curved arrows sync icon. Your data will not be visible in Talea web until you have synced. You will need internet access to sync.
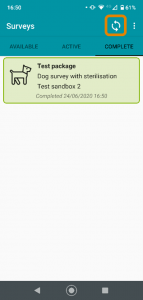
- Once synced, the survey will leave the COMPLETE tab. If your Package has been created to be repeatable, you will see the Package is back in the AVAILABLE tab.
3.7.How to delete an active or completed survey without submitting data
- Once a survey is started, you can pause it by clicking the back arrow.
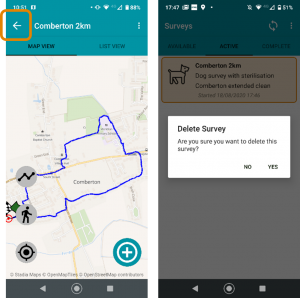
- This returns you to the Active tab. Long press the orange survey box and you will be asked whether you want to delete this survey.
- Tap YES to delete this active survey – this removes all data recorded on this survey from your Device (no data is submitted to Talea Web).
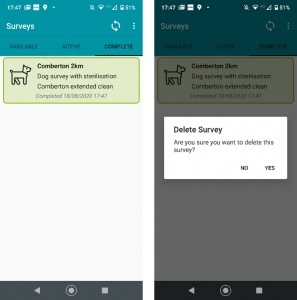
4. You can also delete a completed survey before it has been submitted. Once a survey has been completed it will appear in a green box within the COMPLETE tab.
5. Long press on the green survey box and you will be asked whether you want to delete this survey.
6. Tap YES to delete this completed survey – this removes all data recorded on this survey from your Device (no data is submitted to Talea Web).
4.How to use Talea app: iOS
4.1.Installing Talea app on your iPhone
1.Your Survey Manager will send you a link to Talea in the App Store and a Talea Registration token that is unique to your Talea project. Click the first link to open Talea in the Apple App Store. You can also follow this link to the App Store https://apps.apple.com/app/talea4iphone/id6738431698.
Please note: Talea4iPhone requires iOS 17.6 or newer.

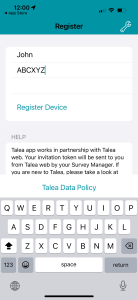
2.Once installed, start the app. The app splash screen will be shown for a few seconds. If the device is not yet registered, which is the case for a new install, next to be presented is the register screen.

3.Enter a name and the registration key, provided by your survey manager. Tap ‘Register Device’ to complete the registration process.
4.2.Synchronizing
1.The app will display 3 tabs: ‘Available’, ‘Active’, and ‘Complete’. To retrieve available survey packages, tap
the circular arrow icon.

2.A ’Synchronizing’ screen is shown when data is exchanged between the app and the Talea cloud server.

3.If available, The ‘Available’ tab includes one or more blue boxes, each box is a Package you can use for surveying. The information displayed in the box is the Package name, Template, Sandbox and the time and date range for which the Package is available.
4.3.App settings and information page
1.Tap the three bar icon to see menu options.
2.Talea comes with default settings. To change from these defaults, select Settings from the menu.

3.The default settings are shown in the image. Any of these can be changed to the opposite
setting by ticking/unticking the tick box.
● Auto Advance: Moves to the next question automatically as soon as a choice is selected.
When unticked you must tap ‘Next question’ to move on after a choice has been made – this is
default for a multiple-choice question.
● Newest Sighting First: In list view, the most recent sighting will be at the top of the list. When
unticked the sightings will be order with oldest sighting first.
● Tracks: Your track will be shown as well as the Sandbox, in green when you are within the
route tolerance buffer and red when outside. When unticked no track will be shown.
● Route Tolerance Buffer: Not visible by default. When ticked a translucent blue area will be
visible around the route to indicate the extent of the tolerance buffer set when the Sandbox
was created.
● Route flags: Visible by default. There will be a green flag at the start of your route and a
chequered flag at the end. If the kml file that defines your route includes sections, these will be
shown by green and red dots for the start end end. When ticked the route flags will be hidden.
● GPS Accuracy Buffers: Not visible by default. When ticked translucent circles will be visible
around your GPS location showing the degree of accuracy, the bigger the circle the lower the
accuracy of the GPS coordinates.
● Sighting location buffer: Not visible by default. When ticked a red translucent area will be
visible around the route to indicate the extent of the maximum sighting distance set when the
Sandbox was created.
● Observer sighting lines: A black line between the sighting location and the observer location
is drawn when a sighting is recorded. When unticked this is not visible.

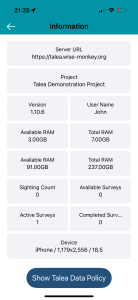
4.Selecting ‘Information’ from the menu option will display a summary of the app/device status. This can be useful if there are any issues to be resolved with the Talea support team.
4.4.How to start and pause a survey
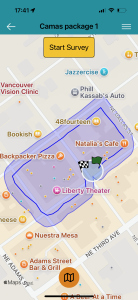
- Select a survey to start by tapping one of the Packages displayed in blue boxes in the “Available” tab.

2. When you select a package, a map will be displayed. The sandbox (survey area polygon or route) is shown, along with a button to start a survey. Tap Start Survey.
3. The package is now an active survey. The blue available package has been moved to the “Active” tab and display as an orange box. The survey is active but currently paused. Tap the orange survey to start recording tracks and sightings.
4. The survey is now active, your start time and track is being recorded. There are 2 ways of viewing your active survey, the “Map view” tab and “List view” tab. “Map view” shows the background map, your location and the survey route or area – any recorded sightings will also appear as the icons chosen in answer to the first question about each sighting. “List view” provides a list all recorded sightings.
5.If you need to pause your survey, tap the back arrow, this brings you back to the “Active” tab. Recording of your track and time spent surveying is now paused, track length and time spent survey in the Analysis will not include time spent in paused status. Tap the Package in the “Active” tab to resume surveying, this reopens the survey in “Map view”.
4.5.How to navigate in the app
1.”Map view” has 3 orange and black icons for navigation.
- Tapping the map icon will zoom to view the extent of the entire Sandbox
- Tapping the walking figure will zoom to view the entire track travelled so far on this survey
- Tapping the arrow locator will zoom to centre on your current position

2.You can also pan and zoom the map using finger pinch.
3.Your position appears as a blue dot with a white border.
4.A route Sandbox appears as a blue line. A polygon Sandbox as a translucent blue box.
5.Your track appears as a green line when you are within the valid distance from your Sandbox. This distance is set when you create your Sandbox in Talea web. Your track turns red when you are outside the valid distance.
6.If your Sandbox was created to ‘Require sighting location selection’, the maximum sighting distance will be seen as a translucent orange zone around your Sandbox.

7. You can change to satelite view by opening the menu when in the “Map view” tab.
4.6.How to add, edit and delete a sighting
1.a. To record a sighting, tap the circled “+” icon.
1.b. If your Sandbox requires a sighting location to be selected on the map (usually only used if you are planning on using the distances between observer and sighting in your analysis), long press on the exact location of the sighting on the map, until the red bounded circle appears. You can change the position by long pressing again anywhere on the map, until you have the correct location identified. Then tap the circled “+” icon to add the sighting.
(This step is not relevant when your Sandbox is configured to record the sighting at the same GPS location as the observer position, which is the default Sandbox design).

2. This opens the questions to answer for the sighting. The questions are presented one at a time. The question name is written at the top, followed by all the choices indicated by their icon and choice name. Tap the correct choice for this sighting.

3. From question 2 onwards, the answers to previous questions are shown at the top, the next question is presented in the box below. If you have made a mistake, you can tap the answers to previous questions to reopen that question and change choice, this removes any choices from subsequent questions which must then be re-entered.

4. Once all the questions have been answered, you have the option to add notes for this sighting, you can leave this box blank.
5. You then have the option to either “Save & Add” or “Save Sighting”. “Save & Add” allows you to add another sighting at the same location and starts at question 1 again for this next sighting. “Save Sighting” completes this sighting record and returns you to the “Map View”.

6. Completed sightings are visible on the “Map View”, represented by the icon choices from the first question.
7. “List View” tab shows the recorded sightings in a list, the most recent at the top of the list.
8. To edit or delete a previously saved sighting, long press on the sighting icon in “Map View”, this opens a pop-out window showing the option to edit, delete or close the pop-out. Edit reopens the questions relating to this sighting and tap any of the choices that you wish to change. This removes any choices from subsequent questions which must then be re-entered.

9. Click “Save Sighting” when you have completed your amendments.
10. In “List View” a sighting can be selected for editing or deleting by swiping left the sighting box in the list to expose the options to edit or delete.
4.7.How to complete and send a survey to Talea Web
1.Once you have completed the survey, open the menu.

2. Select notes to add any details about the survey that need to be recorded (this could include comments about the weather, the name of the observer and driver or difficulties with the route).
3. Select Complete survey to end the survey. You will be asked to confirm that you want to complete the survey, as once completed no more edits can be made. Click “Yes” to confirm and “No” to return to the active survey.
4. Once a survey has been completed it will appear in a green box within the “Complete” tab. The survey data is saved on your device.
5. To submit this survey to the Talea web Project you must tap the curved arrows sync icon. Your data will not be visible in Talea web until you have synced. You will need internet access to sync. You will be asked to to confirm that you want to upload the completed packages and download any pending packages, tap “Yes” to continue.

6. Once synced, the survey will leave the “Complete” tab. If your Package has been created to be repeatable, you will see the Package is back in the “Available” tab.
4.8.How to delete an active or completed survey without submitting data
1.Once a survey is started, you can pause it by clicking the back arrow.
2. This returns you to the “Active” tab. Swipe left the orange survey box to expose the options to add notes or delete the survey.

3. You can use the same swipe left to delete a completed survey (no data is submitted to Talea Web).

5.FAQs Frequently Asked Questions
Can’t see your question listed here? Contact talea@icam-coalition.org for support.
5.1.Does Talea cost anything to use?
No, the development and support of Talea has been thanks to the funding of the ICAM Coalition members so that it can be free to use for those working on dog and cat population management around the world.
5.2.Does Talea app work on iOS devices?
Yes, Talea4iPhone can be found in the App Store. You will need iOS 17.6 or newer.
5.3.How do I access Talea web?
Talea web is web-based, so you access it via a web browser on a computer. It has been tested to work with Chrome, Firefox and Safari.
5.4.Does Talea app allow you to take photos of the animals that you record on the survey?
No, recording a sighting does not include the option to take a photograph. You can however type notes about each individual sighting before you save.
5.5.When I try to sync Talea web I see the message ‘error downloading survey packages’, what is wrong?
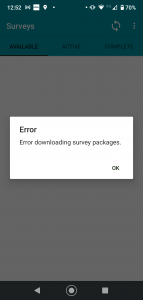
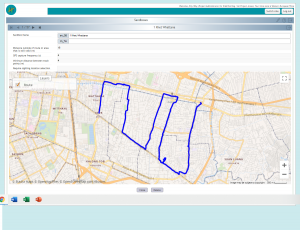
The most common cause of this error is that there is something wrong with the Sandbox in the package. Open Sandboxes from the Talea web dashboard, select the Sandbox used in the Package, this opens the details about this Sandbox – can you see a map displayed below the details? This is an example of what it should look like:
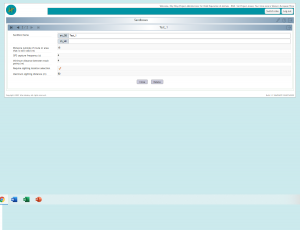
If instead you see no map displayed (example below), then you need to look again at the kml file you used to create this Sandbox.
We suggest using GIS software to do this, for example you can use Google’s online GIS software called ‘Google My Maps’ (not just ‘Google Maps’). Then import the kml to see how it looks. If necessary, recreate the route or polygon in Google My Maps and export as kml (watch the video in section 2.8 of this user guide for how to do this).
If your Sandbox looks good, but you still get the same error, then contact talea@icam-coalition.org and we’ll look into it further.
5.6.What does Talea do with my data?
Talea was developed with ICAM funding to enable data collection that would support learning about humane dog and cat population management. The ambition is that this learning is shared with the wider humane management community for the benefit of animal welfare. However, we recognise that data collected with Talea is owned by those that collect it and sharing must be a proactive choice and not automatic. This data policy outlines what data we will ask from you, what data you will collect through Talea and how we will keep that data private and secure.